
Can you replace your kitchen faucet yourself? Yes, you absolutely can! With the right tools and a little patience, replacing your kitchen faucet is a manageable DIY project. This guide will walk you through the entire process, from gathering your supplies to the final tightening of those connections.
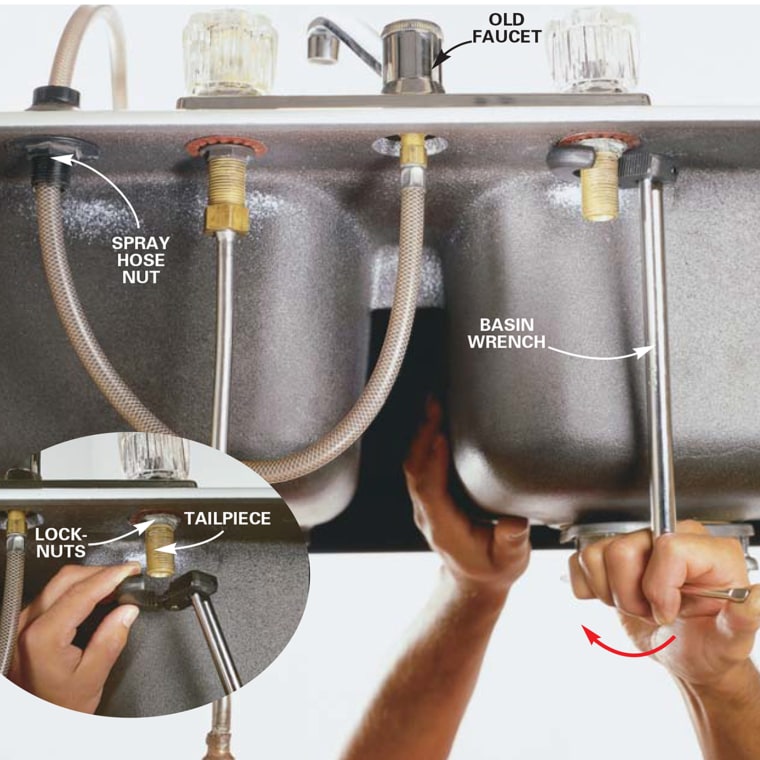
Image Source: media-cldnry.s-nbcnews.com
Why Replace Your Kitchen Faucet?
Over time, kitchen faucets can develop issues that make them less functional and visually appealing. A dripping faucet isn’t just annoying; it wastes water and can increase your utility bills. Sometimes, the finish wears off, leaving unsightly spots. Or perhaps you’re simply looking to update the style of your kitchen with a new, modern faucet. Whatever your reason, a kitchen faucet installation can significantly enhance the look and efficiency of your sink area. While this guide focuses on the kitchen, many principles apply to bathroom faucet repair as well, though bathroom fixtures often involve different sizes and configurations. This guide is also useful if you’re dealing with a leaky faucet repair and find the damage too extensive for simple fixes.
Gathering Your Tools and Materials
Before you start, having all the necessary tools and materials readily available will make the process much smoother. Here’s what you’ll need:
Essential Tools
- Adjustable Wrench: You’ll need this for loosening and tightening various nuts and fittings.
- Basin Wrench: This is a specialized tool with a long handle and a swiveling jaw designed to reach nuts in tight spaces, typically found behind the sink. This is crucial for under sink plumbing.
- Pipe Wrench: While an adjustable wrench can do many jobs, a pipe wrench offers a stronger grip, which can be helpful for stubborn connections. Use it with care to avoid damaging pipes.
- Faucet Wrench: Some newer faucets come with their own specific wrench, or you might need one for certain types of mounting hardware.
- Screwdrivers: Both Phillips and flathead screwdrivers will be needed for any screws holding the faucet or handles in place.
- Bucket or Towels: To catch any residual water when disconnecting the water supply lines. Old towels are also great for wiping up spills.
- Flashlight or Headlamp: It’s dark under the sink, so a good light source is essential for visibility.
- Safety Glasses: Protect your eyes from falling debris or water splashes.
- Utility Knife or Putty Knife: To scrape away old sealant or caulk.
New Faucet and Supplies
- New Kitchen Faucet: Ensure it’s compatible with your sink’s hole configuration (e.g., single-hole, 3-hole, 4-hole).
- Plumber’s Putty or Silicone Sealant: To create a watertight seal between the faucet base and the sink.
- New Supply Lines: It’s highly recommended to replace old supply lines when installing a new faucet. Make sure they are the correct length and have the right fittings for both your faucet and your shut-off valves. These are key plumbing fixtures.
- Thread Seal Tape (Teflon Tape): For sealing threaded pipe connections to prevent leaks.
Step-by-Step Guide to Replacing Your Kitchen Faucet
Let’s get started with the actual replacement. Follow these steps carefully.
Step 1: Turn Off the Water Supply
This is the most important first step. You don’t want water spraying everywhere!
- Look for the shut-off valves located directly under the sink, usually attached to the hot and cold water lines.
- Turn the handles clockwise until they are snug. Do not overtighten.
- Once the valves are off, open the old faucet to drain any remaining water in the lines. Let it run until no more water comes out.
Step 2: Disconnect the Water Supply Lines
Now you need to detach the old faucet from the water supply.
- Place your bucket or towels beneath the connections to catch any drips.
- Using your adjustable wrench or faucet wrench, carefully loosen the nuts connecting the water supply lines to the shut-off valves.
- Next, disconnect the supply lines from the faucet itself. This is where your basin wrench might come in handy if the connections are difficult to reach.
Step 3: Remove the Old Faucet
This can be the trickiest part, as faucet mounting hardware is often in an awkward spot.
- Look for large nuts or mounting brackets securing the faucet to the sink from underneath.
- Use your basin wrench or faucet wrench to loosen these nuts. They can be quite tight, so you might need to apply some force. A little penetrating oil can help if they are corroded.
- Once the nuts are removed, the old faucet should lift straight out from the top of the sink. If it’s stuck, gently rock it back and forth. Old sealant might be holding it in place.
Step 4: Clean the Sink Surface
Before installing the new faucet, thoroughly clean the area where the old one was mounted.
- Use a putty knife or utility knife to scrape away any old sealant, caulk, or mineral deposits.
- Wipe the surface clean with a damp cloth to ensure a smooth, clean surface for the new faucet to seal against.
Step 5: Prepare the New Faucet
Read the manufacturer’s instructions for your specific new faucet.
- Most new faucets come with instructions on how to apply sealant or place rubber gaskets.
- If your faucet requires plumber’s putty, roll a rope of it and place it around the base of the faucet or escutcheon plate. If it has a rubber gasket, ensure it’s properly seated.
Step 6: Install the New Faucet
Now it’s time to put the new faucet in place.
- Carefully lower the new faucet through the holes in your sink from the top. Make sure it’s aligned correctly.
- From underneath the sink, attach the mounting hardware provided with the new faucet. This usually involves washers and nuts that thread onto the faucet shanks.
- Hand-tighten these nuts first. Then, use your basin wrench or faucet wrench to tighten them securely. Be careful not to overtighten, which could crack the sink or damage the faucet. The faucet should be snug and not move.
Step 7: Connect the New Water Supply Lines
This is where you’ll connect the new faucet to the water supply.
- Attach the new water supply lines to the corresponding hot and cold inlets on the new faucet shanks. Tighten these by hand, then use your adjustable wrench for a snug fit. Again, avoid overtightening.
- Connect the other ends of the supply lines to the shut-off valves. Use thread seal tape on the threads of the shut-off valves for a better seal. Hand-tighten the nuts, then use your adjustable wrench to snug them up. Some newer supply lines have a built-in rubber seal and do not require thread tape. Always check the manufacturer’s instructions.
Step 8: Turn the Water Back On and Check for Leaks
It’s time to see if your work paid off!
- Slowly turn the shut-off valves back on by turning them counter-clockwise.
- Turn on the new faucet, both hot and cold, to flush out any air or debris from the lines.
- Carefully inspect all connections under the sink for any drips or leaks. Pay close attention to where the supply lines connect to the shut-off valves and the faucet.
- If you find a leak, gently tighten the connection slightly. If it persists, you may need to shut off the water again, disconnect the line, reapply thread seal tape, and reconnect.
Step 9: Final Touches
- Wipe down your new faucet and the sink area.
- Clean up your tools and any mess made during the installation.
Congratulations! You’ve successfully replaced your kitchen faucet.
Common Issues and Tips
Even with careful work, you might encounter a few snags. Here are some common issues and tips to help you troubleshoot:
Stubborn Nuts
Old, corroded nuts can be very difficult to remove.
- Penetrating Oil: Apply a good penetrating oil (like WD-40) to the threads and let it sit for 15-30 minutes. This can help loosen rust and corrosion.
- Heat: In extreme cases, a bit of heat from a hairdryer or heat gun (used carefully and briefly) can help expand the metal and break the seal. Be cautious not to damage surrounding materials.
- Pipe Wrench: A pipe wrench provides more leverage than an adjustable wrench, but use it with caution to avoid stripping the nut or damaging the pipe.
Leaks After Installation
A small drip can be frustrating, but often it’s an easy fix.
- Tighten Connections: Most leaks are due to loose connections. Shut off the water and slightly tighten the problematic nut.
- Thread Seal Tape: Ensure you used thread seal tape on all threaded connections. If not, shut off the water, remove the fitting, apply tape in a clockwise direction (so it doesn’t unravel when tightening), and reattach.
- Washer/Gasket Issues: Check that washers and gaskets are seated correctly and not damaged.
Faucet Not Sitting Flat
If your new faucet wiggles or doesn’t sit flush against the sink:
- Check Mounting Nuts: Ensure the mounting nuts underneath are tightened evenly.
- Sealant/Putty: The sealant or plumber’s putty might not have been applied evenly, or there might be debris preventing a good seal. You might need to loosen the nuts, add more sealant, and retighten.
Old Shut-Off Valves
Sometimes, the shut-off valves themselves are old and leak or won’t close completely.
- Replacement: If your shut-off valves are in poor condition, it’s best to replace them while you have the water off. This is a slightly more involved plumbing task, but often necessary for a reliable repair or replacement. You might need a pipe wrench and possibly a second wrench to hold the valve body steady while you loosen the connection.
What Type of Faucet Should I Choose?
There’s a wide variety of kitchen faucets available. Consider these factors when making your selection:
| Faucet Type | Description | Pros | Cons |
|---|---|---|---|
| Pull-Down Faucet | The spray head pulls down from the spout. | Excellent for washing large pots and pans, easy to maneuver. | Can be heavier, spray head may snag over time. |
| Pull-Out Faucet | The spray head pulls straight out from the spout. | Good for reaching all corners of the sink, lighter than pull-down. | Less maneuverable than pull-down, hose length can be a limitation. |
| Commercial-Style | Often feature high arches and spring-loaded sprayers, like in restaurants. | High functionality, dramatic look. | Can be expensive, might be too large for some kitchens. |
| Single-Handle | Controls both temperature and flow with one lever. | Easy to use, good for tight spaces, modern look. | Less precise temperature control than two-handle models. |
| Two-Handle | Separate handles for hot and cold water. | Precise temperature and flow control, classic look. | Can be harder to operate with one hand, requires more sink space. |
| Touch Faucet | Activated by touching the spout or handle. | Hygienic, convenient when hands are dirty. | More expensive, requires batteries or AC power, can be accidentally activated. |
When selecting your new faucet, also consider the finish (chrome, brushed nickel, stainless steel, matte black) to match your kitchen decor and the number of holes your sink has.
Frequently Asked Questions (FAQs)
Q: How long does it take to replace a kitchen faucet?
A: For most DIYers, replacing a kitchen faucet takes about 1-3 hours. The actual installation of the faucet is usually quick, but time can be added if you encounter stubborn old fittings or need to make extra trips to the hardware store.
Q: Can I replace my faucet if I have a garbage disposal?
A: Yes, you can. The garbage disposal unit is usually attached to the sink drain and doesn’t directly interfere with the faucet installation, though it might make access to the under sink plumbing a little more challenging.
Q: What is the most common problem when replacing a faucet?
A: The most common problems are dealing with old, corroded mounting nuts that are hard to remove and ensuring all connections are watertight to prevent leaks.
Q: Do I need to replace my supply lines?
A: It is highly recommended to replace old water supply lines when you install a new faucet. Old lines can become brittle and prone to leaks or bursts, and new faucets often come with incompatible or non-standard fittings for older lines. It’s a small investment for peace of mind.
Q: What kind of sealant should I use?
A: Most faucets come with a rubber gasket, which is often sufficient. If not, or if the manufacturer recommends it, plumber’s putty or a silicone sealant is used to create a watertight seal between the faucet base and the sink. Plumber’s putty is generally preferred for granite and most natural stone countertops, while silicone is better for laminate or engineered stone surfaces. Always check your faucet’s manual for specific recommendations.
Replacing your kitchen faucet is a rewarding project that can breathe new life into your kitchen. By following these steps and using the right tools, you can successfully tackle this DIY task and enjoy your updated plumbing fixtures.