
Can you fix the wood under your kitchen sink yourself? Yes, you absolutely can! This guide will walk you through replacing damaged wood under your kitchen sink, addressing everything from minor leaks to significant water damage. We’ll cover how to identify the problem, choose the right materials, and complete the repair step-by-step. Dealing with water damage under your kitchen sink is a common issue, but with the right approach, you can achieve effective kitchen sink cabinet repair and prevent future problems.
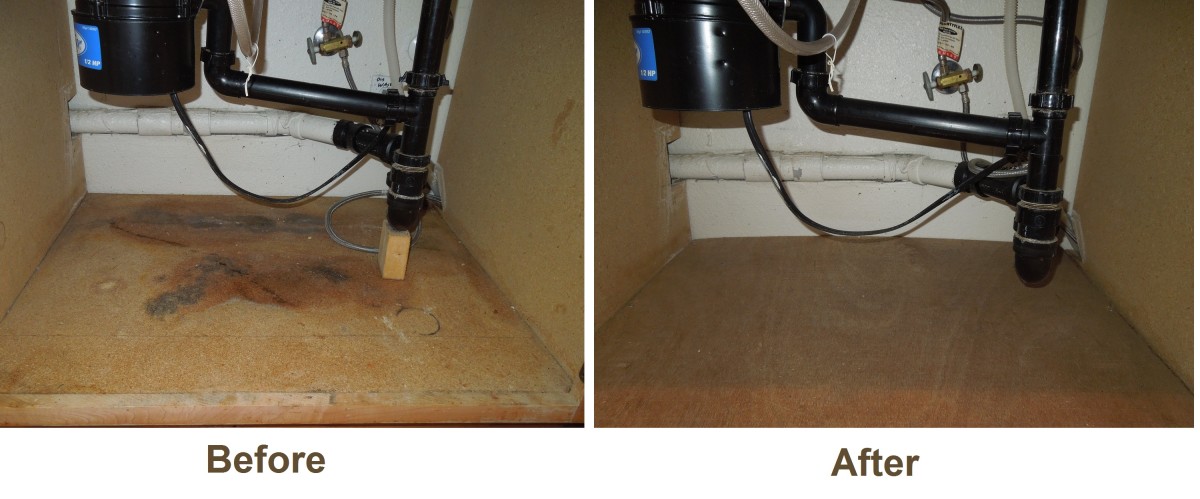
Image Source: images.saymedia-content.com
Identifying the Problem: Signs of Rotting Wood Under Sink
The first step in any repair is to know what you’re dealing with. Leaks under the kitchen sink are notorious for causing damage to the cabinet base. Even small drips can lead to rotting wood under sink fix issues over time. Keep an eye out for these tell-tale signs:
- Musty Odors: A persistent damp, mildewy smell emanating from the cabinet is a strong indicator of moisture and potential rot.
- Visible Water Stains or Discoloration: Look for dark spots or rings on the wood surfaces inside and around the cabinet.
- Soft or Spongy Wood: Gently press on the wood. If it feels soft, crumbly, or gives way easily, it’s likely water-damaged and needs attention.
- Peeling or Bubbling Paint/Varnish: Moisture trapped beneath the finish can cause it to lift and peel.
- Mold or Mildew Growth: Green, black, or white fuzzy patches are a clear sign of moisture and mold.
- Sagging Cabinet Floor: If the weight of the water has caused the cabinet floor to droop, this indicates significant damage.
Water damage under kitchen sink can spread quickly, so it’s important to act fast once you notice any of these symptoms.
Common Causes of Water Damage
- Leaky Pipes: Dripping supply lines or drain pipes are the most frequent culprits.
- Faulty Garbage Disposal: Seals or connections can fail, leading to leaks.
- Dishwasher Hoses: Cracks or loose connections in dishwasher hoses can spray water.
- Condensation: In humid environments, condensation can form on pipes and form puddles.
- Overflows: Clogs can cause sinks to back up and overflow, soaking the cabinet.
- Plumbing Seal Failures: Gaskets around drains or pipes can degrade and leak.
Preparing for the Repair: Tools and Materials
Before you start replacing damaged wood sink base, gather all the necessary tools and materials. Having everything on hand will make the diy under sink wood replacement process much smoother.
Essential Tools You’ll Need:
- Safety Gear:
- Safety glasses
- Gloves (rubber or work gloves)
- Dust mask (especially if dealing with mold)
- Measuring and Marking:
- Tape measure
- Pencil
- Carpenter’s square
- Cutting and Removal:
- Pry bar or putty knife
- Utility knife
- Reciprocating saw (Sawzall) with wood-cutting blades (for larger sections)
- Jigsaw (for more precise cuts)
- Hand saw (for smaller pieces)
- Drill with various drill bits
- Fastening:
- Screwdriver or drill with screw bits
- Wood screws (appropriate length and type)
- Wood glue
- Clamps (if needed to hold pieces while glue dries)
- Finishing and Sealing:
- Sandpaper (medium and fine grit)
- Wood filler or epoxy putty (for small repairs)
- Primer
- Paint or wood stain (to match existing cabinet)
- Caulking gun
- Silicone caulk (kitchen and bath grade)
- Waterproof sealant or membrane (optional, for added protection)
- Cleanup:
- Bucket
- Rags or paper towels
- Shop vacuum
- Trash bags
Choosing the Right Materials: Best Material for Under Sink Repair
The choice of material is crucial for the longevity of your repair. For cabinet repair for kitchen sink work, consider these options:
| Material Type | Pros | Cons | Best For |
|---|---|---|---|
| Plywood | Strong, readily available, easy to work with, good for larger sections | Can be susceptible to moisture if not properly sealed. | Replacing cabinet floors, sides, or structural elements. |
| Marine-grade Plywood | Highly resistant to moisture and rot due to waterproof glue. | More expensive, harder to find in some areas. | Areas with high moisture exposure, critical structural repairs. |
| MDF (Medium-Density Fiberboard) | Smooth surface, affordable, easy to paint. | Very susceptible to water damage; can swell and disintegrate. | Small cosmetic repairs where moisture is minimal. |
| Particleboard | Cheap, common in older cabinets. | Extremely vulnerable to water damage; swells and breaks down easily. | Generally avoid for repairs; often the material that fails. |
| Treated Lumber | Naturally resistant to rot and insects. | Can off-gas chemicals, not ideal for enclosed cabinet spaces. | Structural supports outside direct living areas. |
| Epoxy Resin/Putty | Waterproof, durable, can be used to fill holes or rebuild damaged areas. | Can be messy to work with, requires careful mixing, expensive for large areas. | Repairing small rot spots, filling cracks, reinforcing edges. |
For most diy under sink wood replacement, high-quality exterior-grade plywood (like ACX or BCX) or marine-grade plywood is your best bet. They offer the strength and moisture resistance needed for this environment. If you’re dealing with waterlogged particleboard sink base, replacing it with plywood is highly recommended.
Sealing Under Sink Cabinet Wood
To prevent future issues, sealing under sink cabinet wood is a critical step. Once your new wood is in place, consider applying a waterproof sealant or a rubberized coating to the underside of the cabinet floor and any exposed wood edges. This creates a barrier against moisture.
Step-by-Step Guide to Replacing Wood Under Kitchen Sink
Let’s get started on the actual kitchen sink cabinet repair.
Step 1: Empty and Inspect the Cabinet
- Remove Everything: Take out all cleaning supplies, trash cans, or anything stored under the sink.
- Clear the Area: Lay down old towels or a tarp to catch any residual water or debris.
- Thorough Inspection: Use a flashlight to carefully examine all wooden surfaces, pipes, and connections. Look for the signs of damage mentioned earlier.
Step 2: Turn Off Water Supply
This is a critical safety step.
- Locate Shut-Off Valves: Find the hot and cold water shut-off valves, usually located behind the sink, either attached to the wall or under the sink basin.
- Turn Off Valves: Turn both valves clockwise until they are completely shut off.
- Test: Turn on the faucet to ensure no water is flowing. Leave the faucet open to relieve pressure in the lines.
Step 3: Disconnect Plumbing (If Necessary)
If the damaged wood is directly around the pipes or drain, you may need to disconnect them.
- Drain Pipes: Place a bucket directly under the P-trap (the U-shaped pipe under the drain). Loosen the slip nuts connecting the P-trap. Water will drain into the bucket.
- Disconnect Supply Lines: Use adjustable wrenches to carefully loosen the nuts connecting the flexible supply lines to the shut-off valves and the faucet. Have rags ready to catch any remaining water.
- Garbage Disposal: If you have a garbage disposal, unplug it from the power outlet for safety. You may need to disconnect it from the sink drain flange if it obstructs your work.
Step 4: Remove Damaged Wood
This is where the cutting and prying begin.
- Mark the Damaged Area: Use your pencil and carpenter’s square to mark the boundaries of the damaged wood you need to remove. Aim to cut just beyond the rotten or wet areas.
- Cut Away Damaged Sections:
- For the cabinet floor: If the entire floor is damaged, you might need to cut it out in sections. Use a jigsaw or reciprocating saw. Be careful not to cut into the cabinet sides or any plumbing that remains connected.
- For side panels or supports: Use a jigsaw or hand saw to cut out damaged sections.
- Pry Out Removed Wood: Use a pry bar or putty knife to gently loosen and remove the cut-out pieces.
Step 5: Clean and Dry the Area
Thorough cleaning is essential to prevent mold and mildew.
- Remove Debris: Use a shop vacuum to remove all sawdust and debris.
- Treat Mold (If Present): If you found mold, clean the area with a solution of bleach and water (1 part bleach to 10 parts water) or a specialized mold cleaner. Wear your mask and gloves.
- Dry Thoroughly: Use rags or paper towels to dry the entire area. You can also use a fan to speed up the drying process. Ensure the wood is completely dry before proceeding.
Step 6: Measure and Cut Replacement Wood
Accuracy is key here.
- Measure Precisely: Measure the dimensions of the section you removed. If you’re replacing the entire cabinet floor, measure the interior dimensions of the cabinet base.
- Transfer Measurements: Mark these dimensions onto your chosen plywood or repair material. Use a carpenter’s square to ensure straight lines and 90-degree angles.
- Cut the New Piece: Carefully cut the replacement wood using a jigsaw or hand saw. Test-fit the piece to ensure it fits snugly into the opening or the cabinet base. Make any necessary adjustments.
Step 7: Install the New Wood
Now it’s time to fit the new piece.
- Apply Wood Glue: Apply a generous amount of wood glue to the edges of the existing cabinet where the new piece will attach.
- Position the New Wood: Carefully place the new wood piece into position.
- Secure with Screws:
- For cabinet floor replacement: If you’re replacing the entire floor, you might need to pre-drill pilot holes. Use wood screws to secure the new floor to the cabinet sides and any supporting braces. Space screws about 6-8 inches apart.
- For smaller patches: Screw the patch piece to the surrounding undamaged wood.
- Use Clamps (Optional): If necessary, use clamps to hold the piece firmly in place while you drive screws or while the glue dries.
Step 8: Seal and Finish
This step protects your repair and makes it look good.
- Fill Gaps: Use wood filler or epoxy putty to fill any small gaps or screw holes. Let it dry according to the product instructions.
- Sand Smooth: Once the filler is dry, sand the entire new piece and surrounding areas until smooth. Use medium-grit sandpaper first, then fine-grit for a smooth finish.
- Prime: Apply a coat of primer to the new wood. This helps the paint or stain adhere better and provides an extra layer of protection.
- Paint or Stain: Apply one or two coats of paint or wood stain to match your existing cabinet. Allow each coat to dry completely.
- Waterproof Sealing (Highly Recommended):
- Apply Sealant: Once the paint/stain is dry, apply a waterproof sealant or a rubberized coating to the underside of the cabinet floor and any exposed wood edges. This is your best defense against future water damage under kitchen sink.
- Caulk Edges: Apply a bead of silicone caulk along all edges where the new wood meets the old cabinet material. This seals any potential entry points for moisture.
Step 9: Reconnect Plumbing and Test
Carefully reassemble your plumbing.
- Reconnect Pipes: Reattach the P-trap and any other disconnected pipes. Hand-tighten the slip nuts first, then give them a quarter turn with a wrench. Avoid over-tightening, which can crack plastic fittings.
- Reconnect Supply Lines: Reconnect the water supply lines to the faucet and shut-off valves.
- Turn Water On: Slowly turn the water shut-off valves back on.
- Check for Leaks: Turn on the faucet and let the water run. Carefully inspect all connections for drips or leaks. Check the P-trap, supply lines, and any other plumbing components.
- Run Garbage Disposal (If applicable): Plug it back in and run it with a bit of water to ensure it’s working correctly.
- Final Inspection: Once you’re confident there are no leaks, place your belongings back into the cabinet.
Troubleshooting Common Issues
Even with careful work, you might encounter a few snags.
Waterlogged Particleboard Sink Base
If your sink base is made of waterlogged particleboard sink base, it’s often best to replace it entirely with plywood. Particleboard loses its structural integrity when wet and will likely continue to degrade.
Small Rot Spots vs. Extensive Damage
- Small Rot Spots: For minor rot or holes, you can often use wood filler or epoxy putty after cleaning and drying the affected area. Sand it smooth and seal it well.
- Extensive Damage: If the wood is soft, crumbly, or the damage is widespread, you’ll need to cut out and replace the entire section, as detailed in this guide.
Dealing with Mold
If mold is a significant problem, ensure you clean the affected areas thoroughly with a bleach solution or mold killer. Wear appropriate protective gear. If mold growth is extensive or you suspect it’s behind walls, consider consulting a professional mold remediation service.
Preventing Future Water Damage
Prevention is key to avoiding future kitchen sink cabinet repair.
- Regular Inspections: Periodically check under the sink for any signs of moisture or leaks.
- Prompt Repairs: Address any drips or leaks immediately, no matter how small.
- Use a Sink Mat: A waterproof mat or tray under the sink can catch small spills or drips.
- Check Supply Lines: Replace flexible supply lines every 5-7 years, as they can degrade over time and burst.
- Properly Seal: Ensure all plumbing connections are tight and well-sealed.
- Consider Waterproofing: Apply a waterproof sealant or membrane to the cabinet floor during renovations or when repairing damage.
Frequently Asked Questions (FAQ)
Q1: How long does it typically take to replace wood under a kitchen sink?
A1: For a DIYer with basic tools and some experience, replacing a section of wood under the sink can take anywhere from 2 to 6 hours, depending on the extent of the damage and the complexity of the plumbing. If significant plumbing needs to be disconnected and reconnected, it can take longer.
Q2: Can I use wood filler instead of replacing the wood?
A2: You can use wood filler or epoxy putty for very small, superficial damage like minor dents or shallow rot spots that have been thoroughly cleaned and dried. However, for soft, spongy, or structurally compromised wood, replacing the damaged section with new material is essential for a durable repair.
Q3: What is the best material for replacing the cabinet floor under the sink?
A3: High-quality exterior-grade plywood (like ACX or BCX) or marine-grade plywood are the best choices. They offer good strength and moisture resistance. Avoid particleboard or MDF as they are very susceptible to water damage.
Q4: Do I need to be a plumber to do this?
A4: You don’t need to be a licensed plumber, but it helps to have some comfort working with basic plumbing. The most critical plumbing steps are turning off the water supply and reconnecting the P-trap and supply lines correctly. If you’re uncomfortable with any plumbing aspect, it’s best to call a plumber for those specific steps.
Q5: What if I find mold? How do I deal with it safely?
A5: If you find mold, it’s important to address it properly. Wear gloves, a mask, and eye protection. Clean the affected area with a solution of 1 part bleach to 10 parts water or a commercial mold cleaner. Ensure the area is thoroughly dried afterward. If the mold is extensive or you have respiratory issues, consider hiring a professional mold remediation service.
Q6: How can I prevent the new wood from getting damaged again?
A6: The best way to prevent future damage is to seal the new wood thoroughly. Apply a waterproof sealant, rubberized coating, or multiple coats of a good quality sealant to the wood surfaces, especially the underside of the cabinet floor and any exposed edges. Always check for leaks and address them immediately.
By following this comprehensive guide, you can confidently tackle the task of replacing damaged wood sink base and ensure your kitchen sink cabinet remains in good condition for years to come. Remember to prioritize safety and take your time for a successful diy under sink wood replacement.