
Image Source: forresterhome.com
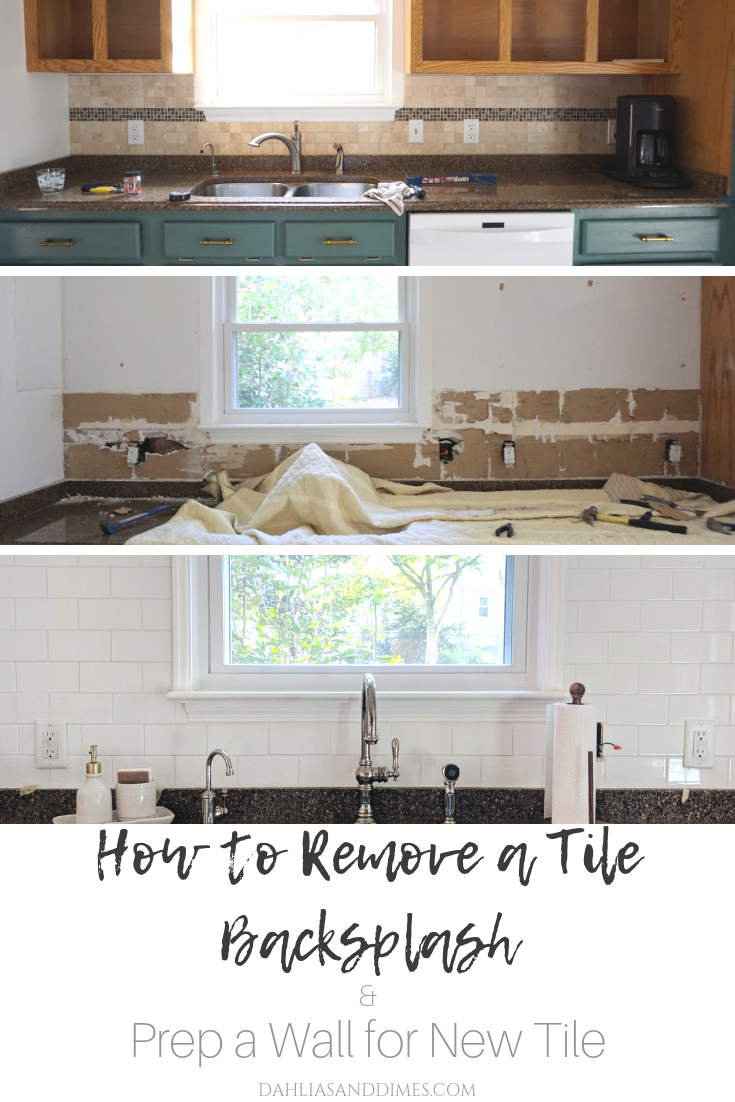
How To Remove Kitchen Tile Backsplash Easily and Safely: A Step-by-Step Guide
Can you remove a kitchen tile backsplash yourself? Yes, absolutely! With the right tools and a bit of patience, DIY backsplash removal is a manageable project for most homeowners. This guide will walk you through kitchen backsplash removal step-by-step, ensuring you can safely and effectively tackle your old backsplash removal.
Preparing for Tile Backsplash Removal
Before you start the actual kitchen wall tile removal, it’s crucial to gather your supplies and prepare your workspace. Proper preparation makes the job much smoother and safer.
Essential Tools for Tile Backsplash Removal
Having the right equipment is key to making tile backsplash removal efficient. Here’s what you’ll need:
- Safety Gear:
- Safety glasses or goggles
- Work gloves
- Dust mask or respirator (especially for older grout and adhesive)
- Knee pads (optional, but recommended for comfort)
- Protective Materials:
- Drop cloths or old sheets
- Painter’s tape or masking tape
- Removal Tools:
- Putty knife or chisel (a stiff one is best)
- Hammer
- Pry bar (a flathead screwdriver can work for smaller areas)
- Utility knife or scoring tool
- Heat gun or hairdryer (optional, for stubborn adhesive)
- Tile backsplash removal tool (specialized tools designed to grip tiles and pry them off can be helpful, but not always necessary)
- Cleaning Supplies:
- Scraper or putty knife for tile adhesive removal
- Sponge or cloth
- Bucket
- Mild detergent
- Trash bags or a wheelbarrow
Protecting Your Kitchen Workspace
Your kitchen is a busy place, so protecting surfaces is vital.
- Clear the Countertops: Remove everything from your countertops. This includes small appliances, canisters, and anything else that might be in the way or get damaged.
- Cover the Countertops: Lay down drop cloths or old sheets over your countertops and stove. Secure them with painter’s tape to prevent them from shifting. This will catch falling debris and protect against scratches.
- Protect the Floor: Extend your drop cloths or sheets to cover the floor in front of the backsplash area. This will catch dust and small pieces of tile.
- Turn Off Power: If your backsplash is near electrical outlets or switches, it’s a good idea to turn off the power to those circuits at your breaker box. This is a crucial safety step.
The Step-by-Step Process of Kitchen Backsplash Removal
Now that you’re prepared, let’s get down to the actual kitchen wall tile removal.
Step 1: Grout Removal for Backsplash
Removing the grout first often makes it easier to dislodge individual tiles.
- Using a Grout Saw or Utility Knife: A grout saw has a small, hardened blade that’s perfect for sawing through grout lines. A sharp utility knife can also work, but it will be more time-consuming and strenuous.
- Technique: Hold the saw or knife at an angle and carefully saw back and forth along the grout lines. Apply firm, consistent pressure. Aim to remove as much grout as possible from between the tiles and the wall.
- Safety: Wear your safety glasses and dust mask. Grout dust can be irritating to your lungs and eyes.
- Using a Rotary Tool (Optional): If you have a rotary tool with a grout removal attachment, this can significantly speed up the process. Be very careful not to go too deep and damage the drywall behind the tile.
- Aim: The goal is to create a clear channel around each tile. This allows your removal tools to get under the tile edges more easily.
Step 2: Loosening and Removing Tiles
This is where the real work begins. The best way to remove backsplash tiles often depends on the type of tile and the adhesive used.
- Starting Point: Begin with a tile that appears to be loose or has a cracked edge. If no tile seems particularly loose, choose a tile in a corner or an inconspicuous area.
- Using a Putty Knife or Chisel:
- Technique: Place the edge of your putty knife or chisel into a grout line or under the edge of a tile.
- Gentle Tapping: If the putty knife doesn’t immediately pry the tile loose, gently tap the back of the putty knife with a hammer. Work your way around the tile, applying steady pressure.
- Prying Action: As you tap, try to pry the tile away from the wall. Work slowly and deliberately to avoid breaking tiles into smaller, sharper pieces.
- Using a Pry Bar: For more stubborn tiles, a pry bar can be more effective.
- Technique: Insert the flat end of the pry bar under the edge of the tile. Lever the bar gently, applying upward pressure. You may need to reposition the pry bar as you go.
- Using a Tile Backsplash Removal Tool: These tools often have a specialized head designed to grip the tile and provide leverage. Follow the manufacturer’s instructions for your specific tool.
- Dealing with Stubborn Adhesive: Sometimes, the tile adhesive is incredibly strong.
- Heat Gun/Hairdryer: For some adhesives, applying heat with a heat gun or hairdryer can soften them, making the tiles easier to remove. Hold the heat source a few inches away from the tile and move it back and forth. Be cautious not to overheat the wall or surrounding surfaces.
- Scrape Kitchen Backsplash Residue: Once a tile is removed, you might find adhesive residue stuck to the wall. This is part of the tile adhesive removal process.
- Working in Sections: It’s often easier to work in manageable sections. Remove a few tiles at a time, then proceed to the next area.
Step 3: Dealing with Different Tile Types
The method for removing tiles can vary slightly based on the material.
| Tile Type | Best Removal Method | Considerations |
|---|---|---|
| Ceramic/Porcelain | Standard putty knife, chisel, and hammer. Pry bar for stubborn tiles. | Can be brittle; expect some breakage. Grout removal is key. |
| Natural Stone | Similar to ceramic, but be more cautious as some stones can be softer or more porous. Use gentle pressure. | Can be more prone to chipping or staining. Test a small area if unsure. |
| Glass | Be extremely careful. Glass tiles are fragile and can shatter into sharp pieces. Use a fine-toothed grout saw for grout removal. A very thin putty knife and gentle prying are essential. | High risk of breakage and sharp edges. Wear extra protective gear. Consider using a specialized glass tile removal tool if available. |
| Peel-and-Stick | Usually the easiest. A utility knife to score the edges, then peel slowly. A hairdryer can help soften the adhesive. | Adhesive residue is often the main challenge. |
Step 4: Cleaning the Wall After Tile Removal
Once all the tiles are off, you’ll be left with a wall covered in old adhesive and possibly some leftover grout. This is the tile adhesive removal phase.
- Scraping Off Adhesive:
- Tools: Use a stiff putty knife, scraper, or even a floor scraper for larger areas.
- Technique: Hold the scraper at a low angle to the wall and push firmly to scrape away as much of the adhesive as possible. Work systematically across the entire backsplash area.
- Stubborn Adhesive: For very thick or hardened adhesive, you might need to gently score it with your utility knife or apply a solvent specifically designed for tile adhesive (follow product instructions carefully and ensure good ventilation).
- Dealing with Grout Residue: Any remaining grout fragments can usually be scraped away with the same tools used for adhesive.
- Washing the Wall:
- Solution: Mix a mild detergent with warm water in a bucket.
- Wiping: Use a sponge or cloth dipped in the soapy water to wipe down the entire wall. This will help remove any remaining dust, adhesive residue, and grime.
- Rinsing: Rinse the sponge or cloth frequently and wipe the wall again with clean water to remove any soap residue.
- Drying: Allow the wall to dry completely. You can speed this up with a fan or by opening windows.
Step 5: Inspecting and Repairing the Wall
After cleaning, carefully inspect the wall surface.
- Damage Assessment: Look for any gouges, holes, or damage to the drywall or plaster caused during the removal process.
- Minor Repairs: Small nicks or shallow gouges can often be filled with joint compound or spackle.
- Deeper Damage: If there are larger holes or significant damage, you might need to patch them with drywall tape and compound. Allow ample drying time for any repairs, and sand them smooth once dry.
- Smoothness: The goal is to have a clean, smooth, and even surface ready for whatever you plan to do next – whether that’s painting, installing a new backsplash, or preparing for a different wall treatment.
Tips for a Smoother Kitchen Backsplash Removal Experience
Here are some additional tips to make the DIY backsplash removal process as painless as possible:
- Patience is Key: Rushing the process can lead to mistakes and potential injury. Take your time with each step.
- Listen to Your Walls: Pay attention to how the tiles are coming off. If a tile is exceptionally difficult, re-evaluate your approach. Is there more grout to remove? Is the adhesive particularly strong?
- Teamwork: If possible, enlist the help of a friend or family member. Two people can make the job go much faster, especially when holding drop cloths or passing tools.
- Dispose of Debris Properly: Broken tiles and construction debris can be sharp. Bag them carefully and dispose of them according to your local waste disposal guidelines.
- When to Call a Professional: If you encounter unexpected issues like damaged plumbing, electrical wiring embedded in the wall, or severe wall damage that you’re not comfortable repairing, it’s best to call a professional contractor.
Frequently Asked Questions About Kitchen Backsplash Removal
Q1: What is the best tool to remove backsplash tiles?
The best tools are generally a stiff putty knife or a chisel combined with a hammer for prying. A specialized tile backsplash removal tool can also be very effective. For grout, a grout saw or utility knife is recommended.
Q2: Can I remove a tile backsplash without damaging the drywall?
It’s possible, but it requires patience and careful technique. The best way to remove backsplash involves thorough grout removal for backsplash first, followed by gentle prying. Some minor drywall damage is common, especially with older installations, but can usually be repaired.
Q3: How do I remove stubborn tile adhesive?
For stubborn tile adhesive removal, you can try using a heat gun or hairdryer to soften it. If that doesn’t work, a specialized adhesive remover solvent or a sharp scraper might be necessary. Always test solvents in an inconspicuous area first and ensure good ventilation.
Q4: Do I need to remove all the old grout?
Yes, it’s highly recommended to remove as much of the old grout as possible. This makes it easier to get your tools under the tiles and reduces the risk of damaging the wall when you pry them off.
Q5: How long does it take to remove a kitchen tile backsplash?
The time can vary greatly depending on the size of the backsplash, the type of tile, the adhesive used, and your experience level. A small backsplash might take a few hours, while a larger or more challenging one could take a full day or more.
Q6: What should I do if I hit wiring or pipes during backsplash removal?
If you suspect you might have hit wiring or plumbing, immediately stop what you are doing. Turn off the power to the affected area at the breaker box if you suspect electrical issues. For plumbing issues, turn off the main water supply. It is safest to call a qualified professional to assess and repair any damage.
Q7: Is it safe to scrape kitchen backsplash residue?
Yes, scraping kitchen backsplash residue is a standard part of the removal process. Just ensure you wear appropriate safety gear, especially a dust mask, as you’ll be dealing with dust and potentially old adhesive particles.
By following these steps, you can confidently tackle your kitchen backsplash removal project and prepare your kitchen for its next beautiful update.