
Can you replace a kitchen faucet yourself? Absolutely! Replacing your kitchen faucet is a common and achievable DIY project. With a bit of preparation and the right tools, you can successfully swap out your old, leaky faucet for a shiny new one. This guide will walk you through the entire process, from gathering your supplies to the final tightening of those under-sink connections.
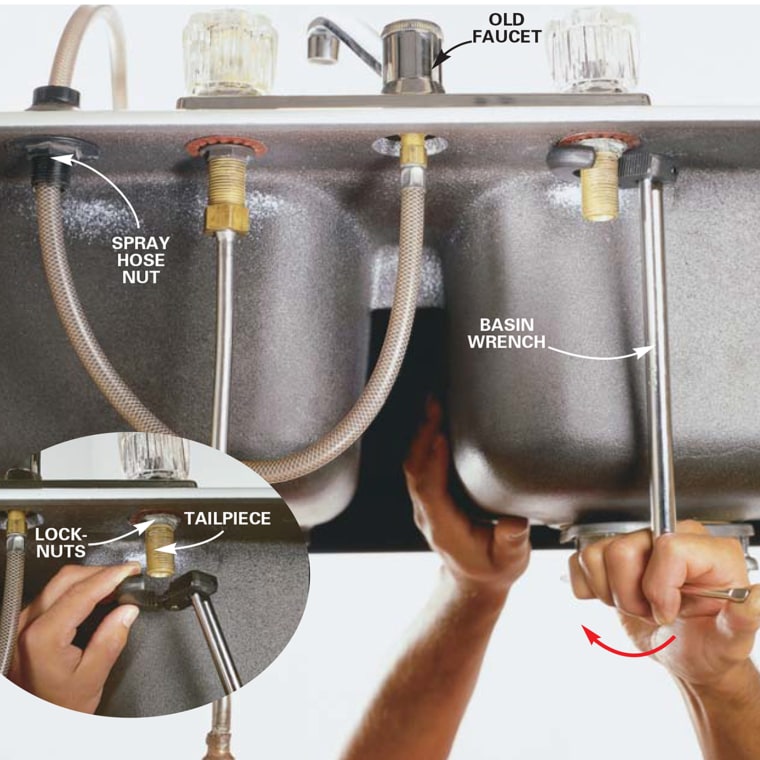
Image Source: media-cldnry.s-nbcnews.com
Why Replace Your Kitchen Faucet?
Over time, your kitchen faucet can show signs of wear and tear. Leaks, drips, mineral buildup, and even outdated styles can all be reasons to consider a replacement. A new faucet can:
- Save Water and Money: A leaky faucet wastes a significant amount of water. Replacing it can lower your water bills.
- Improve Functionality: Modern faucets often offer better spray patterns, easier handle operation, and improved ergonomics.
- Enhance Aesthetics: A new faucet can dramatically update the look and feel of your kitchen sink and countertop.
- Prevent Costly Kitchen Sink Repair: Addressing minor issues like leaks before they worsen can save you from more extensive and expensive kitchen sink repair down the line.
Getting Started: What You’ll Need
Before diving into faucet replacement steps, ensure you have all the necessary plumber tools and materials. Having everything ready will make the process smoother and less frustrating.
Essential Tools for Faucet Replacement
- Adjustable Wrenches (Two): These are crucial for loosening and tightening nuts. Having two allows you to hold one part steady while turning another.
- Basin Wrench: This specialized tool is a lifesaver for reaching those tight nuts located far up under the sink, behind the faucet itself.
- Plumber’s Putty or Silicone Sealant: This creates a watertight seal between the faucet base and the sink or countertop.
- Screwdrivers (Phillips and Flathead): You might need these for various small screws that hold parts together or for disconnecting supply lines.
- Bucket or Towels: To catch any residual water when you disconnect the water supply lines.
- Safety Glasses: Protect your eyes from debris and drips.
- Work Gloves: For a better grip and to keep your hands clean.
- Flashlight or Headlamp: It’s dark under the sink, so good lighting is essential.
- Rags or Old Towels: For cleaning up spills and drying parts.
- Wire Brush or Steel Wool: To clean mineral deposits from mounting surfaces.
- Penetrating Oil (Optional): If your old faucet is stubborn, this can help loosen corroded nuts.
Choosing Your New Faucet
When selecting a new kitchen faucet, consider:
- Mounting Holes: Check how many holes your sink has (one, two, three, or four) and choose a faucet that matches or use a deck plate to cover extra holes.
- Style: Pick a style that complements your kitchen’s decor.
- Features: Decide if you want a pull-down or pull-out sprayer, a single-handle or double-handle design, a pot filler, or touchless technology.
- Finish: Common finishes include chrome, brushed nickel, stainless steel, and matte black.
Preparing for the Replacement
Proper preparation is key to a successful DIY kitchen faucet installation.
Step 1: Turn Off the Water Supply
This is the most critical first step.
- Locate the shut-off valves under the sink. Typically, there’s one for hot water and one for cold.
- Turn both valves clockwise until they are fully closed.
- If you don’t have shut-off valves under the sink, you’ll need to turn off the main water supply to your house.
Step 2: Relieve Water Pressure
- Turn on the old faucet to drain any remaining water in the lines and relieve pressure. Leave it in the “on” position.
Step 3: Clear the Workspace
- Remove everything from under the sink to give yourself ample room to work.
- Place a bucket or towels under the water supply lines to catch any drips.
The Old Faucet Removal Process
This is where you’ll likely encounter some of the trickiest parts of the job. Patience is your friend!
Step 4: Disconnect the Water Supply Lines
- Using an adjustable wrench, carefully loosen the nuts connecting the flexible water supply lines to the shut-off valves.
- Be prepared for a small amount of water to drip out.
Step 5: Disconnect the Sprayer Hose (If Applicable)
- If your old faucet has a side sprayer or a pull-down/pull-out sprayer, locate where its hose connects to the faucet body under the sink.
- Disconnect this hose. You might need a wrench or sometimes it’s a quick-connect fitting.
Step 6: Loosen and Remove the Mounting Nuts
This is where the basin wrench often becomes indispensable.
- Look up under the sink at the base of the faucet. You’ll see nuts (usually large plastic or metal ones) that secure the faucet to the sink or countertop.
- Use your adjustable wrench or basin wrench to loosen these nuts. They can be very tight due to corrosion or mineral buildup.
- Tip: If the nuts are extremely stubborn, a little penetrating oil applied a few hours beforehand can help.
- Once the nuts are loose, unscrew them completely.
Step 7: Remove the Old Faucet
- From above the sink, gently lift the old faucet straight up and out of the mounting holes.
- If it feels stuck, check again for any missed connections or nuts. Sometimes old plumber’s putty can create a strong bond. You might need to gently rock the faucet or carefully use a putty knife to break the seal.
Step 8: Clean the Mounting Surface
- Before installing the new faucet, thoroughly clean the sink or countertop where the old faucet was mounted.
- Scrape away any old plumber’s putty, caulk, or mineral deposits using a putty knife or scraper.
- A wire brush or steel wool can help with stubborn residue. A clean surface ensures a good seal for the new faucet.
Installing Your New Kitchen Faucet
Now for the exciting part – bringing your new faucet to life! This is where the specific faucet replacement steps for your chosen model will come into play, but the general process is similar.
Step 9: Prepare the New Faucet
- Read the manufacturer’s instructions carefully. Each faucet model might have slight variations.
- Assemble any components of the new faucet that were shipped separately.
- Apply plumber’s putty or silicone sealant around the base of the faucet or the gasket provided. This creates a watertight seal. If your faucet comes with a gasket, you often don’t need plumber’s putty.
Step 10: Position the New Faucet
- Carefully insert the new faucet’s shanks and hoses through the mounting holes in the sink or countertop.
- Ensure the faucet is oriented correctly, with handles facing the right direction and the spout positioned as desired.
Step 11: Secure the New Faucet from Below
- From under the sink, slide any washers or mounting brackets onto the faucet shanks as per the manufacturer’s instructions.
- Thread the mounting nuts onto the shanks.
- Hand-tighten the nuts first.
- Use your basin wrench or adjustable wrench to tighten the nuts securely. Ensure the faucet doesn’t move or spin, but don’t overtighten, which could damage the sink or countertop.
Step 12: Connect the Water Supply Lines
This is a key part of the new faucet plumbing.
- Connect the new flexible water supply lines to the corresponding hot and cold water inlets on the new faucet. Hand-tighten first.
- Then, use your adjustable wrench to tighten them about a quarter to half a turn more. Avoid overtightening, which can strip the threads or damage the lines.
- Connect the other ends of the supply lines to the shut-off valves. Again, hand-tighten, then snug them up with a wrench.
Step 13: Reconnect the Sprayer Hose (If Applicable)
- If your new faucet has a sprayer, connect its hose to the designated port on the faucet body under the sink. Follow the manufacturer’s specific connection instructions (often a quick-connect or threaded fitting).
Step 14: Test for Leaks
This is a crucial step before you consider the job done.
- Slowly turn the water supply valves back on (counter-clockwise).
- Turn on the new faucet and let the water run for a minute or two. Check for water flow and proper operation.
- Crucially: Inspect all under sink connections (at the valves and at the faucet) for any drips or leaks.
- Also, check around the base of the faucet on top of the sink.
- If you find any leaks, shut off the water again and slightly tighten the offending connection. Repeat this until all leaks are gone.
Step 15: Final Touches and Clean Up
- Wipe down the new faucet and the surrounding sink area.
- Reorganize the items under your sink.
- Dispose of the old faucet and any packaging.
Troubleshooting Common Issues
Even with careful work, you might run into a few snags. Here are some common problems and how to fix them:
Leaking Connections
- Cause: Loose fittings or damaged seals.
- Solution: Shut off the water and gently tighten the connection. If it still leaks, you might need to disconnect, inspect the threads and seal, and reconnect. If the supply line is damaged, it will need to be replaced.
Stubborn Nuts
- Cause: Corrosion or mineral buildup.
- Solution: As mentioned, penetrating oil can help. Ensure you’re using the right tool (basin wrench for tight spots) and applying steady pressure.
Faucet Wobbles
- Cause: Mounting nuts not tightened enough.
- Solution: Carefully tighten the mounting nuts from under the sink until the faucet is stable.
Low Water Pressure
- Cause: This could be a problem with the new faucet’s aerator, the shut-off valves not being fully open, or even a blockage in the supply lines.
- Solution:
- Aerator: Unscrew the aerator from the tip of the faucet spout and clean out any debris.
- Valves: Ensure the shut-off valves are fully open.
- Supply Lines: If the issue persists and you suspect a blockage, you might need to disconnect the supply lines and flush them, or consider replacing them.
Frequently Asked Questions (FAQ)
Q: How long does it typically take to replace a kitchen faucet?
A: For an experienced DIYer, it can take as little as 30 minutes to an hour. For a first-timer, plan for 1-3 hours, depending on the complexity of the old faucet removal and your comfort level with the tools.
Q: Do I need a plumber to replace my kitchen faucet?
A: While a plumber can certainly do it for you, most people can successfully tackle this project themselves with the right tools and by following these faucet replacement steps. If you are uncomfortable working with plumbing or encounter significant problems, calling a professional is always an option.
Q: What is plumber’s putty used for?
A: Plumber’s putty is a soft, pliable compound used to create a watertight seal between plumbing fixtures (like the base of a faucet) and the surface they are mounted on (like a sink or countertop). It prevents water from leaking down into the cabinet.
Q: Can I replace just the faucet handle?
A: Yes, faucet handle replacement is often possible. The method varies greatly by faucet type and brand. You’ll typically need to pry off a decorative cap, unscrew a set screw, and then lift the handle off. Refer to your faucet’s specific manual or the manufacturer’s website for detailed instructions.
Q: Should I use plumber’s putty or silicone sealant?
A: For most kitchen faucet installations, plumber’s putty is the traditional choice. However, some countertop materials, like natural stone (granite, marble), can be stained by the oils in plumber’s putty. In these cases, a silicone-based sealant is a safer alternative. Always check the faucet manufacturer’s recommendations.
Q: What are the common problems with old faucets?
A: Old faucets are prone to leaks (from worn-out seals or cracked cartridges), dripping handles, mineral buildup that restricts water flow, corrosion that makes parts seize, and outdated styles or finishes. Addressing these can prevent minor kitchen sink repair issues from becoming major ones.
Q: What are water supply lines?
A: Water supply lines are the flexible hoses that connect your faucet’s inlets to your home’s hot and cold water shut-off valves. They are typically made of braided stainless steel or flexible PEX tubing and are essential for delivering water to your faucet.
Q: Where do I connect the new faucet plumbing?
A: The new faucet plumbing connects via flexible water supply lines. One line connects to the hot water inlet on the faucet and then to the hot water shut-off valve. The other connects to the cold water inlet on the faucet and then to the cold water shut-off valve.
Q: What is a basin wrench and why do I need it?
A: A basin wrench is a specialized plumbing tool with a long shaft and a pivoting head designed to reach and turn nuts in confined spaces, particularly those behind or under a sink where standard wrenches cannot fit. It’s invaluable for loosening and tightening the nuts that hold a faucet in place.
By following these comprehensive steps, you can confidently undertake the task of replacing your kitchen faucet. This DIY kitchen faucet project is a rewarding way to improve your kitchen’s functionality and appearance, and it can save you money on professional plumbing services. Enjoy your new faucet!