
Yes, you absolutely can adjust kitchen cabinet doors yourself with simple tools! Dealing with cabinet doors that don’t quite hang right can be frustrating, but thankfully, most common issues like cabinet door sagging, cabinet door wobbling, or doors that don’t close flush are easily fixed by adjusting the cabinet door hinges. This article will guide you through the straightforward process of cabinet door alignment and provide you with the knowledge for common kitchen cabinet repair tasks.
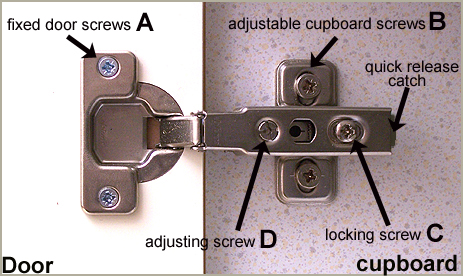
Image Source: www.handymanknowhow.co.uk
Why Do Cabinet Doors Need Adjusting?
Over time, your kitchen cabinet doors can fall out of alignment for a variety of reasons. Wood can expand and contract with changes in humidity and temperature, leading to shifts in how the doors hang. Hinges can also loosen from frequent use, or the cabinet box itself might shift slightly. Even a minor jolt can throw off the precise alignment needed for a smooth, flush appearance and proper closing. Recognizing these issues is the first step in knowing when a DIY cabinet door adjustment is in order.
Common Signs of Misaligned Cabinet Doors:
- Gaps between doors: You notice uneven spaces between your cabinet doors when they are closed.
- Doors hitting each other: One door scrapes against another when opening or closing.
- Uneven reveals: The “reveal,” which is the visible edge of the cabinet frame around the door, is not consistent on all sides.
- Cabinet door wobbling: A door feels loose and moves excessively when touched.
- Cabinet door sagging: A door hangs lower on one side than the other.
- Doors not closing flush: The door doesn’t sit perfectly against the cabinet frame.
- Squeaky cabinet doors: While not strictly an alignment issue, squeaky hinges can sometimes be a sign that they need cleaning and lubrication, which can also help with movement and alignment.
Essential Tools for Adjusting Cabinet Doors
Before you start, gather these simple tools. You likely have most of them in your home already.
- Phillips head screwdriver: This is the most common type of screwdriver used for cabinet hinges.
- Flathead screwdriver: Some older or specific types of hinges might use a flathead screw.
- Measuring tape: To check for consistent gaps.
- Level: To ensure doors are hanging straight.
- A helper: For larger doors or when you need an extra pair of hands to hold things steady.
- Optional: Lubricant (like WD-40 or silicone spray): For squeaky cabinet doors.
- Optional: Painter’s tape: To mark positions if you need to remove a door.
Deciphering Your Cabinet Door Hinges
The key to adjusting cabinet doors lies in understanding your hinges. Most modern kitchen cabinets use adjustable hinges, typically concealed or “European-style” hinges. These hinges have a two-part system: one part mounts to the cabinet door, and the other mounts to the cabinet frame. The magic happens at the part of the hinge attached to the cabinet door, which has adjustment screws.
Types of Cabinet Hinges and Their Adjustment Screws
While there are many hinge styles, the most common adjustable ones found in kitchens are:
-
Concealed Hinges (European Hinges): These are the most prevalent. They offer three-way adjustment:
- In/Out Adjustment: Controls how far the door sits from the cabinet frame.
- Up/Down Adjustment: Moves the door vertically.
- Left/Right Adjustment: Moves the door horizontally, aligning it with adjacent doors.
The adjustment screws are usually visible when the cabinet door is open. One screw typically controls the side-to-side movement, another controls the in-and-out depth, and sometimes there’s a third screw or a mounting plate adjustment for up-and-down movement.
-
Surface-Mount Hinges: These are more traditional and often visible from the outside. Adjustment capabilities vary greatly. Some have slots for minor up/down or left/right adjustments, while others may require shimming behind the hinge to achieve better cabinet door alignment.
-
Saloon Door Hinges (Spring Hinges): These are designed to swing in both directions and often self-close. Adjustments are usually limited to controlling the swing tension or the stop position.
-
Overlay Hinges: These are designed for doors that sit on top of the cabinet frame (full overlay), partially on top (half overlay), or inside the frame (inset). The adjustment screws will manage how the door sits relative to the frame.
How to Identify Adjustment Screws:
When you open a cabinet door, look at the hinge. You’ll usually see one or more screws.
* The screw furthest from the door edge often controls the side-to-side movement.
* The screw closest to the door edge often controls the in-and-out depth.
* The screws that attach the hinge to the cabinet door or the mounting plate can sometimes be loosened to allow for up-and-down adjustment, or the mounting plate itself might have slots for this purpose.
| Hinge Type | Common Adjustment Areas | How to Adjust |
|---|---|---|
| Concealed (European) | Side-to-Side, In/Out, Up/Down | Typically 2-3 screws on the hinge itself. |
| Surface-Mount | Limited Up/Down, Left/Right | Slots in hinge plate; may require shimming. |
| Saloon Door | Swing Tension, Stop Position | Adjusting spring tension or pivot points. |
| Overlay | Relative to Cabinet Frame | Screws adjust door position for full, half, or inset applications. |
Step-by-Step DIY Cabinet Door Adjustment
Let’s get your cabinet doors looking straight and hanging right. We’ll focus on the most common type: concealed hinges.
Step 1: Assess the Problem
Open the cabinet door you want to adjust. Look closely at how it hangs.
* Is it too far in or out?
* Is it crooked (leaning to one side)?
* Is it too high or too low?
* Is it too close to or too far from the adjacent door?
Having a clear idea of the issue will help you know which screw to turn.
Step 2: Locate the Adjustment Screws
On the hinge arm that attaches to the cabinet door, you should see one or more screws.
- Screw 1 (Usually Furthest from Door Edge): Side-to-Side Adjustment. Turning this screw will move the door left or right.
- Screw 2 (Usually Closest to Door Edge): In-and-Out (Depth) Adjustment. Turning this screw will move the door closer to or further from the cabinet frame.
- Up-and-Down Adjustment: This can be trickier. Sometimes, loosening the screws that attach the hinge to the door or the mounting plate allows for vertical movement. Other times, the mounting plate itself is slotted, allowing you to slide the hinge up or down by loosening those screws.
Step 3: Make Small Adjustments
It’s crucial to make small, incremental turns of the screws. A quarter-turn is often enough.
* For Side-to-Side: Turn the designated screw. Close the door to see the effect. If it’s not right, open it again and turn the screw a little more in the same direction.
* For In-and-Out: Turn the depth adjustment screw. Close the door to check.
* For Up-and-Down: If your hinges have this adjustment, you might need to loosen the mounting screws slightly, adjust the door’s vertical position, and then retighten. If the mounting plate is slotted, loosen the screws holding the plate to the cabinet frame, slide the plate up or down, and retighten.
Tip: If you’re unsure which screw does what, try turning one screw a quarter-turn and observe the door’s movement. Then, return it to its original position and try another.
Step 4: Check the Alignment
After each small adjustment, close the door and:
* Check the gap: Is it consistent with other doors? Use a measuring tape to ensure even spacing.
* Check the reveal: Is the wood frame visible around the door equally on all sides?
* Check for wobbling: Does the door still feel secure?
* Check for sagging: Is the bottom edge of the door now level?
Step 5: Repeat as Necessary
Continue making small adjustments and checking until the door is perfectly aligned. It might take a few tries to get it just right. Patience is key for a professional-looking finish.
Fixing Specific Cabinet Door Problems
Here’s how to tackle common issues:
Correcting Cabinet Door Sagging
Cabinet door sagging is usually due to the screws that attach the hinge to the cabinet door becoming loose, or the mounting plate screws to the cabinet frame loosening.
- Tighten Hinge Screws: Open the cabinet door. Locate the screws that attach the hinge to the door itself. Tighten them gently with your screwdriver. Don’t overtighten, as this can strip the wood.
- Tighten Mounting Plate Screws: Next, locate the screws that attach the hinge’s mounting plate to the cabinet frame. Tighten these as well.
- Up/Down Adjustment: If tightening doesn’t resolve the sag, you’ll need to adjust the vertical position.
- If Mounting Plate is Slotted: Loosen the screws holding the mounting plate to the cabinet frame just enough so the plate can slide up or down. Gently lift the sagging side of the door, slide the plate upwards, and retighten the screws. This should lift the door.
- If Hinges Have Vertical Adjustment: Some concealed hinges have a third screw specifically for up/down adjustment. Turn this screw to raise the door.
Addressing Cabinet Door Wobbling
A loose cabinet door that wobbles often means the screws holding the hinge or the mounting plate are loose.
- Check All Screws: Open the door and thoroughly check every screw on both parts of the hinge (the part on the door and the part on the frame). Tighten any that are loose.
- Consider Dowel Reinforcement: If the screw holes in the cabinet door or frame are stripped and the screws won’t tighten, you might need to reinforce them. A common DIY cabinet door repair is to insert wooden toothpicks or small wooden dowels into the stripped screw hole with a bit of wood glue. Let it dry, then re-drill a pilot hole and re-insert the screw. This provides new material for the screw to grip.
Aligning Doors That Don’t Close Flush
This is a classic cabinet door alignment issue that’s usually fixed with the side-to-side and in-and-out adjustments.
- Side-to-Side: If a door is too far to the left or right, identify the screw that controls this movement and turn it to push the door into the correct position.
- In-and-Out (Depth): If the door is too deep (recessed) or too proud (sticking out) from the cabinet frame, use the other adjustment screw to bring it flush.
Tackling Squeaky Cabinet Doors
Squeaky cabinet doors are often due to friction between the hinge components.
- Clean the Hinges: Open the door wide and clean the hinges with a dry cloth to remove dust and grime.
- Lubricate: Apply a small amount of lubricant directly to the hinge pin and any moving parts. WD-40 or a silicone-based spray works well.
- Work the Hinge: Open and close the door several times to distribute the lubricant.
- Wipe Excess: Wipe away any excess lubricant with a clean cloth.
If lubrication doesn’t help, the hinge might be worn out, and a cabinet door replacement of the hinge might be necessary.
Advanced Adjustments and Troubleshooting
Sometimes, the problem is more complex than a simple screw turn.
Adjusting Inset Doors
Inset doors, which sit inside the cabinet frame, require precise adjustment. The same hinge screws typically control side-to-side and in-out movement. Up-and-down is often adjusted by slightly loosening the mounting plate screws and repositioning. Achieving perfect alignment on inset doors can be challenging and may require a helper to hold the door steady.
When Hinges Need Replacing
If you’ve tried all adjustments and a door still won’t align, or if a hinge is visibly damaged, bent, or rusted, it might be time for a cabinet door hinge replacement.
- Identify the Hinge Type: Take a picture of your existing hinge and, if possible, note any brand names or part numbers. Visit a hardware store or cabinet supply shop for replacements.
- Match the Overlay: Ensure the new hinge has the same overlay specification (full, half, or inset) as your original hinge.
- Installation:
- Support the Door: Have a helper support the door, or place a sturdy object underneath it.
- Remove Old Hinge: Unscrew the old hinge from both the door and the cabinet frame.
- Install New Hinge: Screw the new hinge into the existing holes. If the holes are stripped, use the toothpick/dowel trick mentioned earlier.
- Mount Door: Attach the door to the cabinet.
- Adjust New Hinges: Use the adjustment screws on the new hinges to achieve proper cabinet door alignment.
Dealing with a Warped Cabinet Door
If a cabinet door itself is warped, no amount of hinge adjustment will fix the issue permanently. Warping can occur due to excessive moisture.
- Minor Warping: You might be able to slightly compensate with hinge adjustments, pulling the door into a straighter position.
- Significant Warping: This may require replacing the entire cabinet door. You can often order a new door from the cabinet manufacturer or a custom woodworking shop to match your existing cabinets. This is a more involved kitchen cabinet repair.
Keeping Your Cabinet Doors in Top Shape
Preventative measures can reduce the need for frequent adjustments.
- Maintain Consistent Humidity: Avoid extreme fluctuations in humidity in your kitchen.
- Wipe Spills Promptly: Excess moisture can lead to wood expansion and warping.
- Check Screws Periodically: Give your hinges a quick check every six months or so to ensure screws are still tight.
- Lubricate Annually: A quick spray of lubricant on hinges once a year can prevent squeaks and ensure smooth operation.
Frequently Asked Questions About Adjusting Cabinet Doors
How do I know which screw to turn on my cabinet hinges?
Generally, the screw furthest from the door edge adjusts side-to-side, and the screw closest to the door edge adjusts the depth (in/out). If you’re unsure, make a small turn on one screw, close the door, check the result, then return it to its original position before trying another.
Can I adjust cabinet doors with different types of hinges?
Yes, but the method varies. Concealed (European) hinges are the easiest to adjust with their built-in screws. Surface-mount hinges might have slots for minor adjustments or require shimming. Always check the specific type of hinge you have.
My cabinet doors keep going out of alignment. What could be the cause?
Frequent misalignment can indicate loose cabinet boxes, significant changes in humidity affecting the wood, or hinges that are worn out and need replacing. You might need to tighten the cabinet box screws or consider new hinges.
How much adjustment can cabinet hinges provide?
Most modern adjustable hinges offer a significant range of movement, typically allowing for about ¼ to ½ inch of adjustment in each direction (side-to-side, up-down, and in-out).
Do I need a special tool for cabinet door hinges?
No, a standard Phillips head screwdriver is usually all you need for most adjustable cabinet door hinges. A flathead screwdriver might be useful for some older styles.
What is cabinet door alignment?
Cabinet door alignment refers to how evenly cabinet doors sit in relation to each other and the cabinet frame when closed. Proper alignment means doors are parallel, have consistent gaps between them, and are flush with the cabinet face.
By following these steps, you can effectively tackle common kitchen cabinet repair issues, achieve perfect cabinet door alignment, and keep your kitchen looking its best. Enjoy your newly adjusted doors!