
Image Source: media-cldnry.s-nbcnews.com
How Do I Replace A Kitchen Faucet DIY Guide
Yes, you can absolutely replace your kitchen faucet yourself! It’s a common DIY project that, with a little patience and the right tools, most homeowners can tackle. This guide will walk you through everything you need to know for a successful kitchen faucet installation, from removing your old sink faucet to plumbing in your new kitchen faucet.
Replacing a kitchen faucet might seem daunting, but it’s a manageable task for the average homeowner. This detailed guide will equip you with the knowledge and steps needed to swap out your old kitchen tap for a shiny new one, transforming your kitchen sink water fixtures with your own hands. Whether you’re a seasoned DIYer or embarking on your first plumbing project, this comprehensive walkthrough will cover everything from sink faucet removal to the final tightening of those crucial connections for your new kitchen faucet. We’ll demystify the under sink plumbing and ensure you have the right faucet replacement parts.
Why Replace Your Kitchen Faucet?
There are many reasons to consider a DIY kitchen faucet replacement. Your current faucet might be leaking, dripping constantly, or have a corroded finish that detracts from your kitchen’s appeal. Perhaps you’re renovating your kitchen and want an updated style or a faucet with improved functionality, like a pull-down sprayer or touchless technology. Whatever the motivation, changing a faucet can significantly improve both the aesthetics and the performance of your kitchen sink. It’s a great way to update your kitchen without a massive renovation budget.
Tools and Materials You’ll Need
Before you dive in, gather all the necessary tools and materials. Having everything at hand will make the process much smoother.
Essential Tools:
- Adjustable Wrench (or two): These are crucial for loosening and tightening nuts and fittings. Having two can be very helpful for holding one part while turning another.
- Basin Wrench: This specialized tool is designed to reach those awkward nuts tucked away under the sink, making sink faucet removal and installation much easier.
- Bucket: To catch any residual water when you disconnect the old faucet.
- Plumber’s Tape (PTFE Tape): Used to seal threaded pipe connections and prevent leaks.
- Safety Glasses: Protect your eyes from debris and dripping water.
- Work Gloves: For a better grip and to keep your hands clean.
- Old Towels or Rags: For wiping up spills and keeping the area dry.
- Flashlight or Headlamp: It’s dark under the sink, so good lighting is essential.
- Screwdriver (Phillips and Flathead): You might need these for securing mounting hardware.
- Utility Knife or Putty Knife: To scrape away old putty or sealant.
- Penetrating Oil (Optional): For loosening stubborn, corroded nuts.
Materials:
- New Kitchen Faucet: Ensure it’s compatible with your sink and the number of holes you have (one, two, three, or four).
- New Supply Lines (Recommended): It’s a good idea to replace old supply lines when installing a new faucet. Check the connection sizes for your new faucet and shut-off valves.
- Plumber’s Putty or Silicone Sealant: To create a watertight seal between the faucet base and the sink.
Step-by-Step Guide to Replacing Your Kitchen Faucet
Let’s get started with the practical steps involved in swapping out your old kitchen tap for a new one.
Step 1: Shut Off the Water Supply
This is the most critical first step. Look under your sink for two shut-off valves, one for hot water and one for cold water. Turn these valves clockwise until they are hand-tight. To be absolutely sure, turn on your old faucet to drain any remaining water from the lines and confirm that the water is indeed off.
- Tip: If you can’t find or turn the shut-off valves under the sink, you’ll need to turn off the main water supply to your house. This is usually located in the basement, garage, or utility closet.
Step 2: Disconnect the Old Faucet
Now, you’ll need to disconnect the water supply lines from the old faucet. Place your bucket underneath to catch any water.
- Supply Lines: Use your adjustable wrench to loosen the nuts connecting the supply lines to the faucet shanks. Unscrew them completely.
- Sprayer Hose (if applicable): If your old faucet has a separate sprayer, locate where its hose connects under the sink and disconnect it. There might be a quick-connect fitting or a threaded connection.
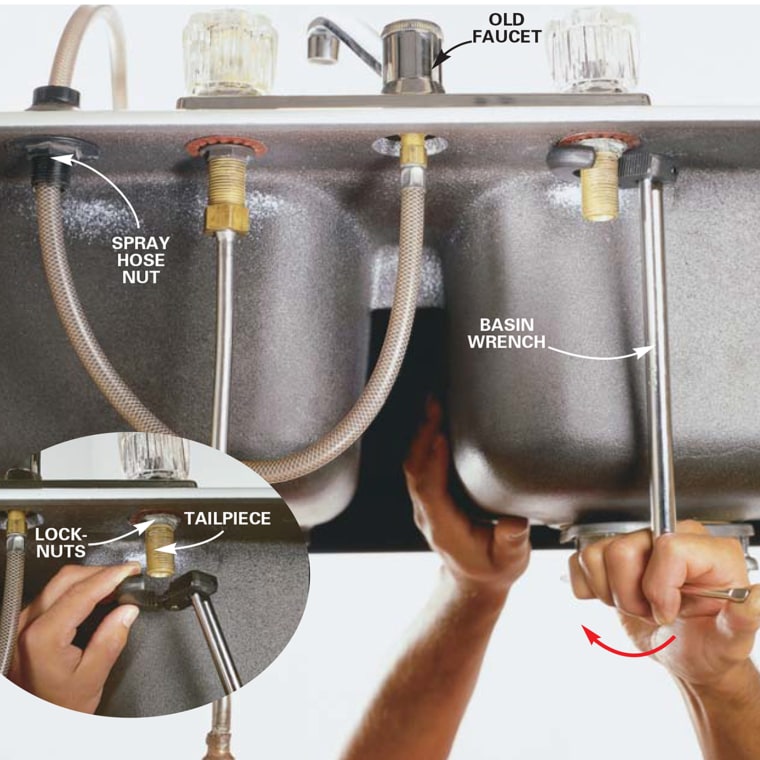
Step 3: Remove the Old Faucet
This is where the basin wrench often becomes your best friend. Underneath the sink, you’ll find mounting nuts that secure the faucet to the sink or countertop.
- Locate Mounting Nuts: These can be plastic or metal and might be difficult to access.
- Loosen Nuts: Use your basin wrench or adjustable wrench to loosen and remove these nuts.
- Free the Faucet: Once the nuts are removed, gently pull the old faucet straight up from the top of the sink. If it’s stuck, carefully use a utility knife to break the seal of old plumber’s putty or sealant around the base.
Step 4: Clean the Sink Surface
Before installing your new kitchen faucet, take the opportunity to clean the area where the old faucet was mounted. Scrape away any old plumber’s putty, sealant, or mineral deposits with a putty knife or utility knife. A clean surface ensures a good seal for your new faucet.
Step 5: Prepare the New Faucet for Installation
Your new faucet will likely come with some assembly required. Follow the manufacturer’s instructions carefully.
- Attach Supply Lines (if not pre-attached): If your new faucet doesn’t have integrated supply lines, you’ll need to attach them now. Hand-tighten them, then give them a quarter-turn with a wrench. Don’t overtighten, as this can damage the fittings.
- Apply Plumber’s Putty or Sealant: Most faucets require a seal at the base. Roll a rope of plumber’s putty and place it around the underside of the faucet base or escutcheon plate. If your faucet comes with a rubber gasket, you may not need putty, or you might use a small amount to supplement the gasket. Alternatively, some manufacturers recommend silicone sealant. Check your faucet’s manual.
Step 6: Install the New Kitchen Faucet
Now it’s time to place your new faucet in position.
- Position the Faucet: Carefully feed the faucet shanks and any hoses down through the mounting holes in your sink or countertop from the top. Ensure the faucet is straight and centered.
- Secure from Below: Go back under the sink. If you used plumber’s putty, excess will squeeze out. Remove this excess.
- Install Mounting Hardware: Slide any rubber gaskets, washers, or mounting brackets onto the faucet shanks from below, following the manufacturer’s instructions. Then, thread on the mounting nuts.
- Tighten Mounting Nuts: Hand-tighten the nuts first. Then, use your basin wrench or adjustable wrench to tighten them securely. Be firm, but don’t overtighten, as this can crack your sink or damage the faucet. Ensure the faucet is stable and doesn’t wiggle from the top.
Step 7: Connect the Water Supply Lines
This is the plumbing a faucet stage. You’ll connect the new supply lines to your shut-off valves.
- Connect to Faucet: If you haven’t already, connect the supply lines to the faucet shanks under the sink.
- Connect to Shut-Off Valves: Align the supply line nuts with the shut-off valve threads. Thread them on by hand to avoid cross-threading.
- Tighten Connections: Use your adjustable wrench to tighten the nuts. Typically, hand-tight plus a quarter to a half-turn is sufficient. Again, avoid overtightening.
Step 8: Connect the Sprayer Hose (if applicable)
If your new faucet has a pull-down or side sprayer, connect its hose to the designated port under the sink. Many modern faucets use quick-connect fittings, which simply snap into place. Ensure it’s securely attached.
Step 9: Turn On the Water and Check for Leaks
This is the moment of truth!
- Turn On Shut-Off Valves: Slowly turn the hot and cold water shut-off valves counter-clockwise to restore the water supply.
- Inspect All Connections: Carefully examine all the connections you made under the sink – at the shut-off valves and at the faucet shanks – for any signs of leaks or drips.
- Run the Faucet: Turn on the new faucet and let the water run for a minute or two. Check the hot and cold settings.
- Check Again: Look under the sink again for any leaks, especially while the water is running and after you turn it off. If you see any drips, gently tighten the offending connection a bit more. If it still leaks, you might need to reapply plumber’s tape to the threads or check the gasket.
Step 10: Test and Final Touches
- Test Sprayer (if applicable): If you have a sprayer, test its functionality. Make sure the hose retracts smoothly.
- Clean Up: Wipe down any water or excess putty. Put away your tools.
Congratulations! You’ve successfully completed your DIY kitchen faucet replacement.
Common Issues and Troubleshooting
Even with careful work, you might encounter a few hiccups. Here’s how to address them:
- Leaky Connections: This is the most common issue.
- Cause: Loose fitting, improper thread tape application, or damaged threads.
- Solution: Gently tighten the connection a bit more. If that doesn’t work, shut off the water, disconnect the line, reapply plumber’s tape to the threads (making sure to wrap in the direction of the threads), and reconnect.
- Faucet Wobbles:
- Cause: Mounting nuts are not tight enough.
- Solution: Go under the sink and tighten the mounting nuts securely with your basin wrench.
- Low Water Pressure:
- Cause: Aerator clogged, or shut-off valves not fully open.
- Solution: Unscrew the aerator at the tip of the faucet and clean out any debris. Ensure your shut-off valves are fully open. Check that the supply lines aren’t kinked.
- Difficult Removal of Old Faucet:
- Cause: Mineral buildup or corrosion on mounting nuts.
- Solution: Apply penetrating oil to the nuts and let it sit for a while before trying to loosen them. A basin wrench is essential here.
Faucet Replacement Parts: What You Need to Know
When choosing faucet replacement parts or new faucets, consider these factors:
- Number of Holes: Your sink or countertop will have a certain number of holes for faucet installation. Standard configurations are:
- 1-hole: Usually for single-handle faucets.
- 2-hole: Often for a faucet and a sprayer, or a bridge faucet.
- 3-hole: Most common for widespread faucets (separate hot and cold handles and a spout).
- 4-hole: Typically for a faucet, sprayer, soap dispenser, and sometimes a separate hot water dispenser.
Make sure your new faucet matches the hole configuration of your sink. If not, you might need an escutcheon plate to cover unused holes.
- Valve Type: Faucets have different internal valve mechanisms, like ceramic disc, ball, or cartridge. Ceramic disc valves are generally the most durable and reliable.
- Finish: Choose a finish that complements your kitchen décor (e.g., chrome, brushed nickel, stainless steel, matte black).
- Functionality: Consider features like pull-down or pull-out sprayers, touchless operation, or filtered water dispensers.
- Supply Line Compatibility: Ensure the connection sizes for your new supply lines match both the new faucet and your existing shut-off valves. Common sizes are 3/8″ and 1/2″.
Fathoming Under Sink Plumbing
The area under your sink is where all the action happens for plumbing a faucet. It houses the shut-off valves, the connections for your supply lines, and often the water lines themselves. It’s essential to keep this area clean and dry to easily spot any leaks. When working here, it’s always a good idea to have your bucket ready, as there will likely be some residual water when you disconnect lines.
When to Call a Professional
While this is a very achievable DIY project, there are times when calling a plumber is the wisest course of action:
- No Shut-Off Valves: If you can’t find or operate the shut-off valves under your sink, and you’re not comfortable shutting off the main water supply to your house, a plumber can handle this.
- Damaged Pipes or Valves: If you notice any signs of corrosion, damage, or leaks in the pipes or shut-off valves themselves, it’s best to let a professional assess and repair them.
- Unsure About the Process: If at any point you feel overwhelmed or unsure about the steps, don’t hesitate to call for help. A plumber can ensure the job is done correctly and safely.
- Persistent Leaks: If you’ve tried troubleshooting and still have leaks, a professional can diagnose and fix the problem.
Frequently Asked Questions (FAQ)
Q1: How long does it typically take to replace a kitchen faucet?
A: For a DIYer with all the tools and materials ready, replacing a kitchen faucet usually takes between 1 to 3 hours. The time can vary depending on the complexity of the faucet, the accessibility of the space under the sink, and whether you encounter any stubborn old fixtures.
Q2: Can I replace my faucet with one that has a different number of holes?
A: Yes, you often can. If your new faucet requires fewer holes than your sink has, you can use an escutcheon plate (also called a deck plate) to cover the unused holes. If your new faucet requires more holes, you might need to drill new holes in your sink or countertop, which is a more complex task and might require professional help depending on the material.
Q3: What is plumber’s putty and when do I use it?
A: Plumber’s putty is a malleable compound used to create a watertight seal around plumbing fixtures like faucets, drains, and strainers where they meet a sink or countertop. You typically roll it into a rope and place it around the base of the faucet before installing it to prevent water from seeping underneath. Always check your faucet manufacturer’s instructions, as some may recommend silicone sealant or a rubber gasket instead.
Q4: Do I need to turn off the main water supply to my house?
A: Only if you cannot locate or operate the individual shut-off valves under your sink. It’s always best to try the local shut-off valves first. If they don’t work or are absent, then you must shut off the main water supply to avoid flooding.
Q5: What are faucet replacement parts?
A: Faucet replacement parts are components that can be replaced individually within a faucet, such as cartridges, O-rings, handles, or aerators. If your faucet is leaking or not functioning correctly, sometimes you can fix it by replacing a specific part rather than the entire faucet. However, when you are replacing the whole faucet, the “replacement parts” you’ll be dealing with are the new faucet itself, new supply lines, and possibly new mounting hardware if they aren’t included.
By following these detailed steps and tips, you can confidently tackle the task of replacing your kitchen faucet yourself. Enjoy your updated kitchen sink water fixtures!