
Image Source: images.younghouselove.com
Step-by-Step: How To Take Kitchen Cabinets Down Safely
Can you remove kitchen cabinets yourself? Yes, with careful preparation and the right tools, you can safely remove kitchen cabinets yourself. This guide will walk you through the entire process, from preparing your workspace to safely detaching and storing your old cabinets. Whether you’re embarking on a full kitchen renovation cabinet removal or simply replacing a few units, these cabinet removal steps are essential for a smooth and safe DIY cabinet removal.
Preparing for Cabinet Removal: Laying the Groundwork for Success
Before you even think about unscrewing a single cabinet, thorough preparation is key to a safe and efficient cabinet removal process. This stage involves protecting your kitchen, gathering necessary tools and materials, and ensuring the area is safe to work in. Rushing this phase can lead to damaged cabinets, injuries, or unforeseen complications.
Protecting Your Kitchen and Yourself
- Clear the Workspace: Remove all items from countertops and inside the cabinets. This includes dishes, food, appliances, and any decorative items. Move these to a safe area, such as another room or a designated covered space.
- Protect Flooring: Kitchen floors can easily be scratched or damaged during cabinet removal. Lay down drop cloths, old blankets, or heavy-duty cardboard across the entire work area, extending slightly beyond the cabinet footprint. Secure them with painter’s tape to prevent slipping.
- Cover Appliances: If you are not removing appliances, cover them with drop cloths or plastic sheeting to protect them from dust and debris.
- Shut Off Utilities: This is a critical safety step. Locate the circuit breaker for your kitchen lighting and outlets and switch them off. If you have gas appliances, locate the shut-off valve for your gas line and turn it off. If you are unsure about gas lines, it’s best to call a professional.
- Water Supply: If your cabinets house a sink or dishwasher, turn off the water supply valves underneath the sink. Open the faucet to drain any residual water in the pipes.
- Personal Protective Equipment (PPE): Always wear safety glasses to protect your eyes from falling debris. Work gloves will protect your hands from splinters and sharp edges. A dust mask is also recommended, especially if the cabinets are old or have been painted with lead-based paint (in which case, specialized precautions are needed).
Gathering Your Tools and Materials
Having the right tools readily available will make the entire process of demounting kitchen cabinets much smoother. You’ll want to gather everything before you begin.
- Screwdrivers: Both Phillips head and flathead screwdrivers are essential. A cordless drill with various driver bits will significantly speed up the process.
- Pry Bar or Flat Bar: Useful for gently separating cabinets from walls and prying off decorative trim or filler pieces.
- Stud Finder: To locate the wall studs behind the cabinets, which is where they are typically secured.
- Level: To ensure cabinets are plumb before they are fully detached, helping with easier removal.
- Utility Knife: For scoring paint or caulk lines around the cabinets.
- Putty Knife: For gently scraping away old caulk or paint.
- Measuring Tape: To accurately measure cabinets if you plan to reuse or sell them.
- Safety Glasses, Work Gloves, Dust Mask: As mentioned in the PPE section.
- Ladder or Step Stool: To reach higher cabinets safely. Ensure it’s stable.
- Buckets or Tubs: For collecting screws and small hardware. Label these clearly.
- Marker or Pencil: For labeling cabinets if you plan to reinstall them in the same or a different location.
- Helper: For larger cabinets, having an extra pair of hands is invaluable for stability and safe lifting.
Cabinet Removal Steps: The Core Process of Detaching
With your preparation complete, it’s time to begin the actual process of removing kitchen cabinets. This involves carefully identifying how they are secured and then systematically detaching them from the walls and each other.
Identifying Cabinet Securing Methods
Most kitchen cabinets are attached to the wall studs using screws. However, there can be variations:
- Screws: These are the most common. They are typically driven through the back of the cabinet frame into the wall studs. You might find them in the upper cabinet frame, the base cabinet frame, or along the back or sides of the cabinet box.
- Brackets or L-Brackets: Some cabinets may be attached using metal brackets that are screwed to the cabinet and then to the wall.
- Hidden Fasteners: Occasionally, cabinets might be joined to each other using specialized clips or fasteners that need to be located and released.
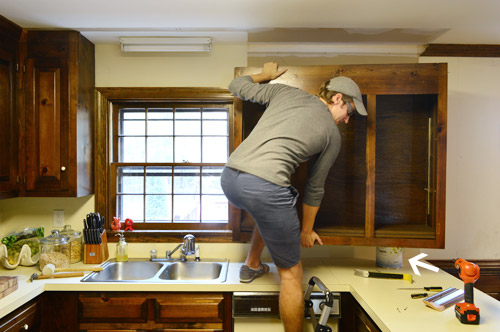
Detaching Upper Kitchen Cabinets
Upper cabinets are usually the first to be removed. They are often secured at the top and bottom, and sometimes to adjacent cabinets.
- Locate Securing Screws: Use a stud finder to identify wall studs behind the cabinets. Look for screw heads through the back of the cabinet frame, often near the top and bottom rails. You might need to remove decorative trim or molding to access these screws.
- Remove Doors and Drawers: For easier handling and to reduce weight, it’s a good idea to remove cabinet doors and drawers. You can do this by unscrewing the hinges from the doors and the cabinet frame, or by releasing the drawer slides according to their specific mechanism. Label each door and drawer with its corresponding cabinet location for easier reinstallation if needed.
- Score Paint and Caulk: If the cabinets have been painted over, the paint may be sealing them to the wall. Use a utility knife to score the paint line where the cabinet meets the wall. A putty knife can help gently separate any caulked seams.
- Unscrew Cabinets from Walls: With the screws located, use your screwdriver or drill to carefully remove them. Start with the screws that attach the cabinet to the wall studs. If you have a helper, they can support the cabinet while you remove the screws.
- Separate Cabinets (if joined): If cabinets are joined side-by-side, you’ll need to find the screws or clips that connect them. These are often located along the stiles (the vertical pieces of the cabinet frame) where two cabinets meet. Remove these fasteners to separate the units.
- Gently Pry Away: Once all visible screws are removed, the cabinet should be loose. If it feels stuck, check again for any missed screws or obstructions. You can use a pry bar very gently between the cabinet and the wall to create a small gap, but be careful not to damage the wall or the cabinet.
- Lower Safely: With the cabinet detached, have your helper support its weight. Carefully lower the cabinet from the wall, keeping it as upright as possible to prevent strain on the structure.
Detaching Base Kitchen Cabinets
Base cabinets are typically heavier and more robust than upper cabinets. They are often secured to the wall studs and may also be screwed to each other.
- Remove Countertops (if applicable): If your base cabinets have a countertop attached, you will likely need to remove the countertop first. Countertops can be secured with screws from underneath, caulk, or adhesive. Carefully assess the method and remove fasteners. Be mindful of the countertop’s weight and support it properly when detached.
- Remove Drawers and Doors: Similar to upper cabinets, remove doors and drawers to make the base cabinets lighter and easier to handle.
- Locate Securing Screws: Base cabinets are usually screwed into wall studs through their back or through the horizontal rails at the top and bottom of the cabinet frame. Use your stud finder to locate the studs and then search for screw heads. Sometimes, the screws are driven through the cabinet’s kick plate or along the top edge where the countertop was.
- Score and Pry: As with upper cabinets, score any paint or caulk lines where the cabinet meets the wall or backsplash. Gently use a putty knife or pry bar to break any remaining seals.
- Unscrew Cabinets from Walls: Carefully remove all screws securing the base cabinets to the wall studs. Again, having a helper is highly recommended for stability.
- Separate Cabinets: Base cabinets are almost always joined together side-by-side. Look for screws along the vertical stiles. Remove these to free each cabinet.
- Check for Plumbing/Electrical: Before fully detaching, ensure there are no remaining plumbing connections (like a sink drain or dishwasher hose) or electrical wires still attached. Disconnect these safely if necessary. For plumbing, have a bucket ready to catch any residual water.
- Lift and Remove: Base cabinets can be heavy. With your helper, lift the cabinet straight up and away from the wall. Be mindful of your back and lift with your legs.
Disassembling Kitchen Cabinets for Storage or Transport
Once the cabinets are removed from the wall, you might need to disassemble them further for easier storage, transport, or if you’re planning a significant kitchen renovation cabinet removal where the old cabinets will be repurposed or sold.
Taking Apart Individual Cabinet Boxes
Many cabinets are constructed using screws and wood glue. The assembly method will dictate how easily they can be disassembled.
- Remove Shelves and Dividers: Any adjustable or fixed shelves inside the cabinet boxes should be removed first.
- Look for Hidden Screws: Examine the cabinet box carefully for screws that might be hidden on the inside faces of the cabinet frame or under decorative elements.
- Separate Sides from Back and Bottom: Cabinet boxes are typically made of a front frame, sides, a back panel, and a bottom. You’ll need to find the screws that hold these components together. Often, the back panel is nailed or screwed into the edges of the sides and bottom.
- Use a Pry Bar Carefully: For components joined with wood glue, a pry bar can be used gently to break the bond. Be prepared for some wood to splinter.
- Label Components: If you plan to reassemble the cabinets, it’s crucial to label each piece and note how they fit together. Taking photos during disassembly can also be very helpful.
Handling Specialized Cabinet Systems
Some modern kitchen cabinet installation removal might involve specialized fastening systems.
- Cam Locks and Dowels: Many flat-pack or modern cabinets use cam lock systems. These typically involve a dowel screwed into one piece and a cam lock (a circular metal piece with an arrow) inserted into the other. Turning the cam lock with a screwdriver tightens the connection. You’ll need to find and turn these cam locks to release the panels.
- Drawer Slides: If you haven’t already, ensure all drawer slides are separated from the cabinet boxes. Most slides have a lever or clip that allows you to detach the drawer from its mounting bracket on the cabinet.
Safe Cabinet Removal: Key Considerations for a Secure Outcome
Throughout the entire process of removing kitchen cabinets, safety must be your top priority. This means being aware of potential hazards and taking steps to mitigate them.
- Weight: Cabinets, especially base cabinets with countertops, can be surprisingly heavy. Always lift with your legs, not your back, and never attempt to lift a heavy cabinet alone.
- Falling Hazards: Ensure ladders are stable and that you have a clear path to work. When removing upper cabinets, be aware of what is below them.
- Sharp Edges and Splinters: Cabinet materials can have sharp edges or splinters. Wearing gloves is essential.
- Electrical and Plumbing Hazards: Always confirm that utilities are shut off before working near wires or pipes. If you are unsure, consult a professional.
- Lead Paint and Asbestos: Older homes may have cabinets or paint containing lead or asbestos. If you suspect this, do not disturb the materials and consult with a professional abatement service. This is particularly relevant for kitchen renovation cabinet removal in older properties.
- Tool Safety: Use tools correctly and ensure they are in good working order. Keep tools organized to prevent tripping hazards.
Cabinet Installation Removal: A Look at Reinstallation
If your goal is to reuse the cabinets, then careful cabinet installation removal is paramount.
- Labeling is Crucial: As mentioned, label every door, drawer, shelf, and cabinet box with its location. For example, “Upper Left, Door 1” or “Base Cabinet, Right of Sink, Bottom Drawer.”
- Protect Components: Wrap delicate parts like doors or shelves in blankets or bubble wrap to prevent scratches or dents during storage or transport.
- Keep Hardware Together: Store all screws, hinges, drawer slides, and other hardware in clearly labeled containers corresponding to their cabinet. This will save you immense time and frustration during reinstallation.
Kitchen Renovation Cabinet Removal: Planning for the Project
When undertaking a kitchen renovation cabinet removal, consider the scope of your project.
- Selling or Donating: If you plan to sell or donate your old cabinets, ensure they are removed carefully and are in good condition. Clean them up and photograph them to attract potential buyers or donors.
- Disposal: If the cabinets are not reusable, plan for their proper disposal. Check local waste disposal regulations for large items.
- Temporary Kitchen: If you’re renovating, you might need a temporary kitchen setup. Plan where you will store your removed cabinets and what you will do for cooking and food storage during the renovation.
Frequently Asked Questions (FAQ) about Removing Kitchen Cabinets
Q1: How long does it typically take to remove kitchen cabinets?
A1: For a standard-sized kitchen, removing cabinets can take anywhere from 4 hours to a full day, depending on the complexity of the installation, the number of cabinets, and whether you have a helper. Removing countertops can add significant time.
Q2: Do I need a helper to remove kitchen cabinets?
A2: It is highly recommended, especially for base cabinets and larger upper cabinets. Having a second person provides stability, helps with lifting, and ensures a safer removal process.
Q3: What’s the best way to handle old screws that are stuck?
A3: If screws are stripped, try using a rubber band between the screw head and the screwdriver tip for better grip. If that doesn’t work, you might need a screw extractor kit or carefully use a drill to bore out the screw head.
Q4: Can I remove cabinets without damaging the walls?
A4: It’s possible, but not always guaranteed, especially if the cabinets have been painted or caulked extensively. Taking your time, scoring paint lines, and using gentle prying techniques will minimize wall damage. Patching minor damage is often necessary after removal.
Q5: What should I do with my old kitchen cabinets?
A5: You can sell them if they are in good condition, donate them to organizations like Habitat for Humanity ReStore, or dispose of them responsibly through local waste management services.
Q6: Is it safe to remove cabinets if they are connected to plumbing or electrical wires?
A6: Absolutely not, unless you are qualified to disconnect them. Always turn off the relevant water or electrical supply at the source (main shut-off valve or breaker panel) and if you are not experienced with these tasks, hire a professional plumber or electrician to disconnect them safely.
Q7: What if my cabinets are made of particleboard?
A7: Particleboard can be more fragile than solid wood or plywood. Be extra gentle when applying pressure or prying, as it can crumble or break more easily. Ensure you have adequate support when lifting.