
Image Source: prettyhandygirl.com
How To Remove A Soffit In The Kitchen: Your DIY Guide
Can you remove kitchen soffits? Yes, you can absolutely remove kitchen soffits. This is a common DIY project that can open up your kitchen, create more storage space, and update the overall look of your room. What is a kitchen soffit? A kitchen soffit is a decorative or functional enclosure typically found above kitchen cabinets, often housing ductwork, wiring, or plumbing. It can also be used to cover uneven ceilings or to create a more finished look. What is soffit boxing in a kitchen? Soffit boxing in a kitchen refers to the construction and installation of these soffit enclosures.
Removing a kitchen soffit, often referred to as a kitchen bulkhead or soffit overhead kitchen, can dramatically change the feel of your kitchen. Many homeowners opt for kitchen soffit removal to gain more cabinet space, improve lighting, or simply achieve a more modern and open aesthetic. If you’ve been looking at your kitchen cabinet soffit and wondering if you can tackle this project yourself, this guide is for you. We’ll walk you through the process of kitchen soffit demolition, from planning to the final cleanup.
Why Consider Kitchen Soffit Removal?
There are several compelling reasons to consider removing your kitchen soffit:
- Increased Cabinet Space: This is often the primary driver for kitchen soffit removal. By eliminating the soffit, you can extend your upper cabinets all the way to the ceiling, providing significantly more storage.
- Improved Aesthetics: Soffits can make a kitchen feel closed in and dated. Removing them can create a more open, airy, and contemporary feel.
- Better Lighting: Soffits can sometimes obstruct the placement of task lighting or pot lights, leading to dark spots. Removal allows for more flexible and effective lighting solutions.
- Easier Cleaning: The surfaces and crevices of soffits can be difficult to clean. Removing them simplifies maintenance.
- Access to Utilities: In some cases, soffits may house essential but unsightly ductwork or wiring. While removal means these will need to be rerouted or concealed differently, it can also be an opportunity to upgrade or repair these systems.
Before You Begin: Essential Planning and Preparation
Before you grab your tools for kitchen soffit demolition, thorough planning is crucial. This is not a project to rush into.
1. Assess the Soffit’s Purpose
What is inside your kitchen soffit? This is the most critical question. Carefully inspect the soffit to determine its contents. Common elements found within kitchen soffits include:
- HVAC Ductwork: Air conditioning or heating vents often run through soffits.
- Electrical Wiring: Switches, outlets, or lighting circuits might be housed here.
- Plumbing: Water lines or drain pipes can sometimes be located in soffits, especially around sinks or dishwashers.
- Exhaust Fans/Ventilation: Ducting for kitchen exhaust fans commonly passes through soffits.
- Structural Components: While less common in modern kitchens, some older soffits might contain minor structural elements.
How to check:
- Visual Inspection: Look for vent covers, electrical boxes, or access panels.
- Tap Test: Gently tap the soffit. Different materials and the spaces within will produce different sounds.
- Electrical/Plumbing Diagrams: If available, consult your home’s original blueprints.
- Professional Assessment: If you’re unsure or suspect significant utilities are present, it’s wise to consult an electrician or plumber before proceeding.
2. Identify Potential Obstacles and Solutions
Once you know what’s inside, you can plan for how to deal with it.
- Ductwork: If ductwork is present, you’ll need to decide whether to reroute it, replace it with smaller ducting, or cap it off if it’s no longer needed. Rerouting ductwork often requires professional assistance.
- Electrical Wiring: If you find electrical wires, you MUST turn off the power to that circuit at the breaker box before doing any work. If the wires are live or you’re not comfortable working with electricity, hire a licensed electrician to disconnect or reroute them safely.
- Plumbing: If plumbing is present, you’ll need to shut off the water supply to the affected lines and drain them before proceeding. Again, if you’re not experienced with plumbing, call a professional.
- Exhaust Fan Venting: If the soffit houses your range hood’s exhaust, you’ll need to extend the vent to the ceiling or find an alternative route.
3. Gather Your Tools and Materials
Having the right tools makes the job easier and safer.
Essential Tools:
- Safety Glasses
- Work Gloves
- Dust Mask (N95 recommended)
- Utility Knife
- Pry Bar (various sizes)
- Hammer
- Putty Knife
- Screwdrivers (Phillips and flathead)
- Cordless Drill/Impact Driver
- Reciprocating Saw (Sawzall) with various blades (wood, metal)
- Stud Finder
- Level
- Ladder or Sturdy Step Stool
- Drop Cloths or Plastic Sheeting
- Painter’s Tape
- Vacuum Cleaner with Hose Attachment
- Screws and Nails (for temporary bracing if needed)
Optional but Helpful Tools:
- Oscillating Multi-Tool
- Drywall Saw
- Measuring Tape
Materials:
- Replacement Drywall (if needed for ceiling or wall repairs)
- Drywall Tape and Joint Compound (for patching)
- Sanding Sponges or Sandpaper
- Primer and Paint (to match your ceiling and walls)
- Trash Bags or a Debris Bin
4. Safety First!
Safety should always be your top priority during kitchen soffit removal.
- Electricity: Always turn off the power to any circuits that might run through the soffit at the breaker box. Double-check with a non-contact voltage tester.
- Water: Shut off the water supply to any pipes that might be in the soffit.
- Dust: Soffits can contain old insulation or debris. Wear a dust mask and safety glasses to protect your eyes and lungs. Cover your countertops and floors with drop cloths to minimize cleanup.
- Falling Debris: Work from a stable ladder or step stool. Be aware of what’s above you and be prepared for materials to fall as you work.
- Sharp Edges: Old soffits might have sharp metal edges or exposed nails. Wear gloves.
Step-by-Step Guide to Kitchen Soffit Removal
This guide assumes a standard drywall-covered soffit. The process for other materials like wood or plaster may vary slightly.
Step 1: Prepare the Work Area
- Clear the Kitchen: Remove all items from countertops and the area directly below the soffit. Move appliances like toasters or blenders if they are in the way.
- Protect Surfaces: Lay down drop cloths or plastic sheeting over countertops, appliances, and the floor. Use painter’s tape to secure them. Cover any cabinets that are directly adjacent to the soffit to prevent dust from entering.
- Turn Off Utilities: As mentioned, shut off power to any relevant electrical circuits and water to any relevant plumbing lines.
Step 2: Locate Support Framing
Soffits are typically built with a wooden frame covered in drywall. You need to find where this frame is attached to the wall and ceiling.
- Use a Stud Finder: Scan the edges of the soffit where it meets the wall and the ceiling. Mark the location of the studs or framing members with painter’s tape.
- Tap and Listen: Gently tap along the edges. You’ll often hear a more solid sound when tapping over framing.
Step 3: Begin the Demolition – The “Safest Cut”
The most controlled way to start is by making a precise cut to reveal the interior. This also helps you gauge the depth of the soffit and the materials within.
- Mark Your Cut Line: Using a level and measuring tape, mark a straight line along the bottom edge of the soffit where it meets the upper cabinets. You can also mark lines up the sides where the soffit meets the wall.
- Make the First Cut:
- Utility Knife: For a clean starting point in drywall, use a sharp utility knife to score the drywall along your marked line. Make multiple passes if necessary.
- Reciprocating Saw: For faster removal, especially if you’ve confirmed there are no electrical wires or pipes directly behind your cut line, a reciprocating saw can be used. Caution: Start with a small pilot hole and use a fine-tooth blade. Be extremely careful and cut slowly, only as deep as the drywall thickness initially.
Step 4: Expose the Interior and Identify Utilities
Once you have a cut, you can carefully pry away the drywall to see what’s inside.
- Pry Gently: Use a putty knife or a thin pry bar to carefully widen the initial cut. Pull away sections of the drywall.
- Inspect Again: As you expose the interior, reconfirm the presence and location of any ductwork, wiring, or plumbing. If you encounter anything unexpected or feel uncomfortable, stop and reassess.
Step 5: Strategically Remove Soffit Sections
Now, you can start systematically removing the soffit material.
- Drywall Removal:
- Controlled Cuts: Use your reciprocating saw to cut along the marked lines, following the framing. If you’re concerned about dust, you can attach a vacuum hose to your saw.
- Prying: For smaller sections or if you want to minimize dust, you can continue to use a pry bar to detach drywall panels after scoring and cutting them into manageable pieces.
- Frame Removal:
- Locate Fasteners: Once the drywall is off, you’ll see the wooden or metal frame. Identify where it’s attached to the ceiling and walls.
- Disassemble the Frame: Use your reciprocating saw or a hand saw to cut through the framing members. If the framing is screwed, use your drill to remove the screws. Pay attention to how the sections are joined. You may need to cut through nails or screws.
- Support as You Go: In some cases, removing a section of framing might destabilize another part. You might need temporary bracing.
Step 6: Dealing with Utilities (If Applicable)
This is where professional help might be necessary.
- Ductwork: If you need to reroute ductwork, this is a job for an HVAC professional. If it’s a small, unused vent, a qualified handyman might be able to cap it off.
- Electrical: If wires are in the way and you’ve safely de-energized them, you can carefully move them aside or have an electrician disconnect them. Never re-energize a circuit that has been tampered with without ensuring it’s safe.
- Plumbing: If pipes are in the way, you might need a plumber to reroute them or cap them off.
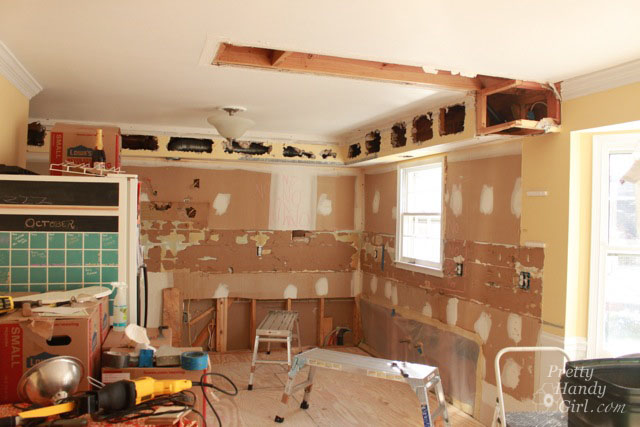
Step 7: Prepare for Finishing
After the soffit and its framing are completely removed, you’ll have exposed drywall edges, potentially some uneven surfaces, and possibly holes in your ceiling or walls where the soffit was attached.
- Clean Up the Mess: Vacuum thoroughly. Remove all debris from the work area.
- Inspect for Damage: Look for any damage to the ceiling or wall drywall that needs repair.
- Prepare for Patching:
- If you have clean, straight edges of drywall from the ceiling or walls where the soffit was, you might just need to tape and mud any seams or small holes.
- If large sections of drywall were removed or damaged, you may need to cut out the damaged areas and install new drywall pieces.
Step 8: Repair and Finish
This is where you make your kitchen look polished again.
- Patching Drywall:
- Apply drywall tape to any seams.
- Apply thin coats of joint compound (mud) over seams, screws, and any holes.
- Allow each coat to dry completely (usually 24 hours).
- Lightly sand each coat smooth before applying the next. You’ll likely need 2-3 coats.
- Sanding: Once the joint compound is completely dry and smooth, sand the patched areas until they are flush with the surrounding drywall. Wear a dust mask and use fine-grit sandpaper.
- Priming: Apply a coat of primer to the patched areas. This seals the joint compound and ensures the paint covers evenly.
- Painting: Apply two coats of paint that matches your ceiling and wall color. Allow adequate drying time between coats.
What to Do with the Newly Opened Space?
With the soffit gone, you have a blank canvas.
- Extend Kitchen Cabinets: This is the most common upgrade. You can purchase new upper cabinets that reach the ceiling or have custom cabinets built to fill the void.
- Install New Lighting: Add pot lights, track lighting, or pendant lights to illuminate the area better.
- Open Shelving: Install stylish open shelves for display or storage.
- Decorative Elements: Use the space for decorative moulding, tile, or a unique backsplash.
Considerations for Different Soffit Types
While this guide focuses on drywall soffits, other materials might be present.
- Plaster Soffits: Older homes may have plaster and lath soffits. These can be more challenging to remove and create more dust. A drywall saw or a small reciprocating saw can be used, but expect more mess.
- Wood Panel Soffits: If your soffit is made of wood panels, it might be easier to detach the panels by unscrewing or prying them away from the frame.
When to Call a Professional
While kitchen soffit removal is a viable DIY project, there are times when professional help is recommended:
- Extensive Utility Work: If there’s significant HVAC ductwork, complex electrical wiring, or plumbing that needs rerouting, it’s safer and often more efficient to hire specialists.
- Structural Concerns: If you suspect the soffit contains any load-bearing elements, consult a structural engineer or experienced contractor.
- Lack of Experience: If you are uncomfortable with any aspect of the demolition, electrical work, plumbing, or drywall repair, it’s best to outsource those tasks.
- Time Constraints: If you’re on a tight schedule, hiring professionals can speed up the process considerably.
Frequently Asked Questions (FAQ) about Kitchen Soffit Removal
Q1: How long does it take to remove a kitchen soffit?
A1: The time it takes can vary greatly depending on the size and complexity of the soffit, what’s inside it, and your DIY experience. For a standard drywall soffit with minimal utilities, a DIYer might take a full weekend (1-2 days) to complete the removal, patching, and initial finishing. If extensive utility rerouting is needed, it could take several days or even weeks, often involving multiple tradespeople.
Q2: Is removing a kitchen soffit expensive?
A2: The cost depends on whether you DIY or hire professionals. DIY removal costs are primarily for tools (if you don’t own them) and finishing materials like drywall, mud, primer, and paint. If you hire professionals for utility work or the entire project, costs can range from several hundred to several thousand dollars, depending on the scope of work.
Q3: Can I remove a soffit that has lights in it?
A3: Yes, you can remove a soffit that has lights. However, you must first turn off the power to those lights at the breaker box. You will then need to decide whether to reroute the wiring to new ceiling locations, extend it to new fixtures, or have an electrician remove the old wiring if it’s no longer needed.
Q4: What if the soffit is made of plaster?
A4: Plaster soffits are more common in older homes. They are typically more brittle and can create more dust than drywall. You can remove them using similar methods, but be prepared for a messier process. A drywall saw or a reciprocating saw with a wood/plaster blade works well. You may need to use a plaster-specific patching compound for repairs.
Q5: Will removing the soffit damage my cabinets?
A5: If the soffit was installed without damaging the cabinets, careful removal should not harm them. However, the soffit is usually attached to the wall and ceiling, not directly to the cabinets. Always be cautious when prying and ensure your ladder or supports don’t scratch or dent your cabinet fronts. Protecting your cabinets with drop cloths is a good idea.
Q6: What’s the difference between a soffit and a bulkhead in a kitchen?
A6: In the context of kitchens, the terms “soffit” and “bulkhead” are often used interchangeably to refer to the same architectural feature that drops down from the ceiling, usually above cabinets. A soffit is technically the underside of an architectural feature, but in kitchen design, it refers to the entire enclosure. A bulkhead is a more general term for a projecting beam or overhead structure.
Q7: What are the risks of removing a kitchen soffit yourself?
A7: The main risks involve:
* Electrical Shock: If power is not turned off to wiring within the soffit.
* Water Damage: If plumbing lines are cut or compromised.
* Structural Damage: If the soffit contains unexpected structural elements.
* Injury: From falling debris, tools, or working at heights.
* Extensive Dust and Mess: Creating more cleanup than anticipated.
* Costly Mistakes: If essential utilities are damaged and require expensive repairs.
By carefully planning, taking necessary safety precautions, and understanding what you’re dealing with, removing a kitchen soffit can be a rewarding DIY project that significantly enhances your kitchen. Good luck!