
Can you remove a Moen kitchen faucet yourself? Yes, with the right tools and a clear understanding of the process, you can successfully remove a Moen kitchen faucet. This guide will walk you through each step, from preparation to the final removal, making what might seem like a daunting task quite manageable. Whether you’re aiming for a Moen kitchen faucet repair, a complete Moen kitchen faucet replacement, or simply need to access parts for a Moen faucet cartridge replacement, this detailed breakdown will help. We’ll cover everything needed to tackle Moen faucet disassembly like a pro.
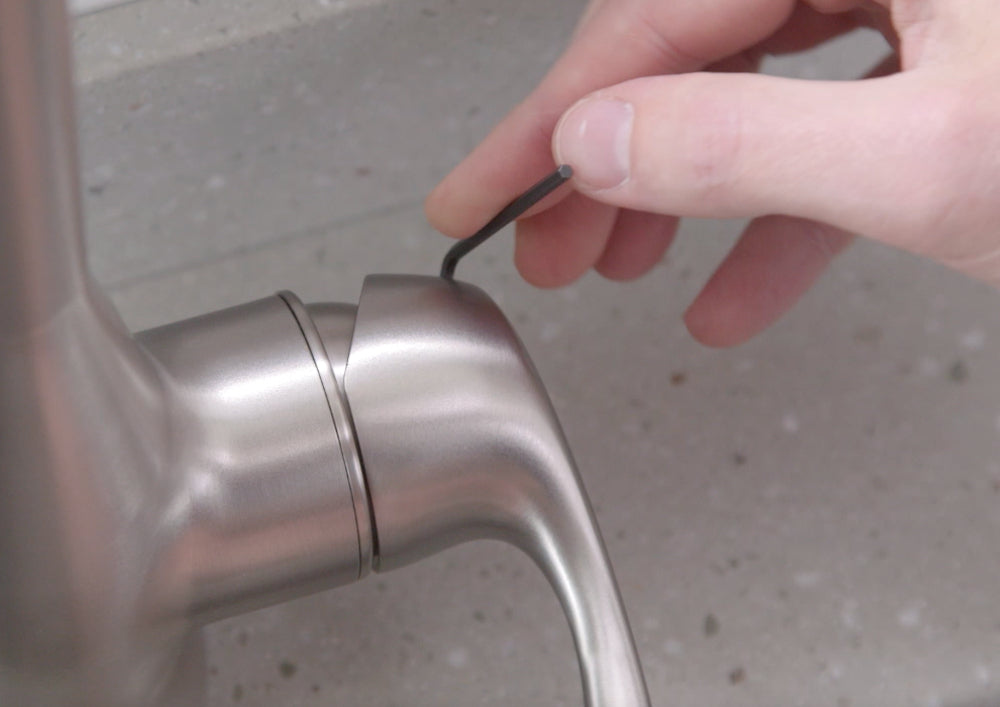
Image Source: shop.moen.com
Getting Ready: What You Need Before You Start
Before diving into the actual removal, it’s crucial to gather all the necessary tools and prepare your workspace. This makes the job smoother and prevents frustrating interruptions.
Essential Tools for Moen Faucet Removal
Having the right tools on hand is half the battle. Here’s a list of items you’ll likely need:
- Adjustable Wrench: This is your primary tool for loosening nuts and fittings. Having a couple of different sizes can be helpful.
- Basin Wrench: This specialized tool is designed to reach nuts in tight spaces under the sink, which is essential for faucet removal.
- Plumber’s Putty or Silicone Sealant: You might need this to create a watertight seal when installing a new faucet or if you plan to reuse certain parts.
- Screwdriver Set: Both Phillips and flathead screwdrivers will be necessary for various screws holding the faucet assembly together.
- Bucket or Towels: To catch any residual water left in the pipes.
- Safety Glasses: Protect your eyes from debris and drips.
- Work Gloves: To protect your hands.
- Utility Knife or Putty Knife: To help break the seal of old plumber’s putty or caulk.
- Flashlight or Headlamp: The area under the sink can be dark.
- Penetrating Oil (Optional): For stubborn or corroded nuts.
Preparing Your Workspace
A clean and well-lit workspace is key to an efficient DIY project.
- Clear the Area: Remove everything from under the sink. This includes cleaning supplies, trash cans, and anything else stored there.
- Protect Surfaces: Lay down old towels or a tarp to protect your cabinet floor from water and debris.
- Turn Off Water Supply: This is the most critical step. Locate the hot and cold water shut-off valves under the sink. They are usually small knobs or levers attached to the pipes coming from the wall. Turn them clockwise until they are completely closed.
- Test the Water: Turn on the faucet you are working on to ensure the water supply is indeed shut off. Let any remaining water drain out.
Dismantling the Moen Faucet: A Step-by-Step Approach
Now that you’re prepared, let’s get to the core of the task: taking apart your Moen kitchen faucet.
Step 1: Removing the Faucet Handle
The first part of Moen faucet disassembly is often the handle. Moen handles can vary slightly in design, but the general principle is the same.
Accessing the Handle Screw
- Look for a Set Screw: Most Moen faucet handles are secured by a small set screw. This screw is usually located on the underside or back of the handle.
- Identify the Cap: Some handles have a decorative cap that hides the set screw. Gently pry off this cap using a flathead screwdriver or a utility knife. Be careful not to scratch the finish.
- Loosen the Set Screw: Once you find the set screw, use the appropriate size Allen wrench (hex key) or screwdriver to loosen it. You don’t need to remove the screw completely, just loosen it enough so the handle can be pulled off.
Removing the Handle
- Pull the Handle: With the set screw loosened, gently pull the handle straight up and off the faucet stem. If it’s stuck, a gentle wiggle or a bit of penetrating oil might help. Avoid excessive force, which could damage the faucet. This is a key step in Moen faucet handle removal.
Step 2: Removing the Faucet Escutcheon or Cap
Beneath the handle, you’ll often find an escutcheon or decorative cap that covers the internal workings of the faucet.
- Unscrew the Cap: This cap is usually threaded onto the faucet body. Try unscrewing it by hand. If it’s tight, use your adjustable wrench, but wrap a cloth around the cap first to prevent scratching.
Step 3: Accessing and Removing the Cartridge
The cartridge is the heart of the faucet, controlling water flow and temperature. For many Moen kitchen faucet repair tasks, this is the component you’ll need to access.
Removing the Cartridge Retaining Clip or Nut
- Locate the Clip: In many Moen faucets, the cartridge is held in place by a U-shaped retaining clip. This clip fits into slots on the faucet body and slides over the top of the cartridge stem. You can usually pull this clip straight up and out with pliers.
- Or Locate the Retaining Nut: Some Moen models use a threaded retaining nut instead of a clip. This nut screws onto the faucet body, securing the cartridge. You’ll need your adjustable wrench or basin wrench to loosen and remove this nut.
Removing the Cartridge
- Pull the Cartridge: Once the clip or nut is removed, the cartridge should be free. You may need to use pliers to grip the stem and pull the cartridge straight up and out. Some cartridges come with a special tool for removal, which is often included with replacement parts. If it’s stuck, a gentle wiggle or tapping around the faucet body can help. This is often the most involved part of Moen faucet cartridge replacement.
Step 4: Removing the Faucet Spout
If you need to replace the spout or need access behind it, this is the next step in your Moen faucet disassembly.
Detaching the Spout
- Check for a Retaining Nut: On many Moen faucets, the spout is held in place by a nut located underneath the sink where the spout connects to the faucet body. You’ll need your basin wrench to reach and loosen this nut.
- Look for a Set Screw (Less Common): In some older or specific models, there might be a small set screw at the base of the spout that secures it. Loosen this screw with an Allen wrench.
- Pull the Spout: Once the retaining nut or set screw is loosened, you should be able to pull the spout straight up and off the faucet body. It might be sealed with O-rings, so a slight twist or wiggle might be necessary. This completes the Moen faucet spout removal.
Step 5: Disconnecting Water Lines
Finally, you need to disconnect the water supply lines from the faucet.
- Locate Connections: The water supply lines usually connect to threaded fittings on the underside of the faucet body.
- Use Adjustable Wrenches: Use your adjustable wrenches to hold the faucet fitting steady while you loosen the nut on the supply line. Be prepared for a small amount of residual water to drip out.
- Disconnect: Once loosened, unscrew the supply line nuts completely.
Releasing the Faucet from the Sink Mount
With all the internal components and water lines disconnected, the final step is to detach the faucet from the sink.
Step 1: Loosening the Mounting Nuts
Beneath the sink, where the faucet body passes through the sink or countertop, there are usually mounting nuts.
- Locate the Nuts: These nuts secure the faucet to the sink. They are often large and can be made of metal or plastic.
- Use the Basin Wrench: This is where the basin wrench is invaluable. It’s designed to fit into the tight space under the sink and grip these nuts.
- Unscrew the Nuts: Turn the basin wrench counter-clockwise to loosen and remove the mounting nuts. You might find one or more nuts, depending on the faucet’s design.
Step 2: Removing the Faucet Assembly
Once the mounting nuts are off, the faucet should be loose.
- Lift the Faucet: From above the sink, gently lift the entire faucet assembly straight up and out of the mounting holes.
- Break the Seal: If the faucet is old, it might be sealed to the sink with plumber’s putty or caulk. You might need to use a utility knife or putty knife to gently break this seal from above.
What to Do After Removal
Once the faucet is out, you have a few options.
Options for Your Old Moen Faucet
- Moen Kitchen Faucet Replacement: If you’re replacing the faucet, clean the sink surface where the old faucet was mounted. Ensure you have your new faucet ready for installation. The process of Moen faucet installation is essentially the reverse of removal.
- Moen Kitchen Faucet Repair: If you removed the faucet to perform a specific repair, such as a Moen faucet cartridge replacement or cleaning the Moen faucet aerator, you can now work on those parts. The aerator, located at the tip of the spout, can often be unscrewed by hand or with pliers and cleaned to resolve issues like low water flow or Moen faucet leak troubleshooting.
- Disposal: If the faucet is beyond repair or replacement, dispose of it responsibly.
Common Issues and Troubleshooting During Removal
Even with careful preparation, you might encounter a few snags.
Stubborn Nuts and Fittings
- Penetrating Oil: For corroded or tightly seized nuts, apply penetrating oil and let it sit for 15-30 minutes (or longer, as per the product instructions) before attempting to loosen again.
- Gentle Tapping: Sometimes, a few gentle taps with a wrench handle on a stubborn nut can help break the corrosion bond.
- Proper Tool Use: Ensure you are using the correct size wrench and that it’s firmly gripping the nut to prevent stripping the threads.
Stuck Cartridge or Handle
- Wiggling and Patience: Gentle wiggling from side to side while pulling can help free a stuck cartridge or handle.
- Manufacturer Tools: Check if Moen offers specific removal tools for your model, especially for cartridges. These can often be found at hardware stores or online.
- Heat (Use with Extreme Caution): In rare cases, a hairdryer on a low setting can slightly expand the metal, potentially helping to loosen a stuck part. Avoid open flames or excessive heat, as this can damage plastic components or the faucet finish.
Leaks After Shut-Off
- Double-Check Valves: Ensure the shut-off valves are fully closed. Sometimes, old valves don’t seal completely.
- Emergency Shut-Off: If you can’t stop the water from the under-sink valves, you may need to shut off the main water supply to your house temporarily.
Frequently Asked Questions About Moen Faucet Removal
Here are some common questions people have when undertaking this task.
Q1: How do I know if I need to remove my Moen faucet?
You might need to remove your Moen faucet for several reasons: a persistent Moen faucet leak troubleshooting that can’t be fixed in place, a desire for a Moen kitchen faucet replacement with a new style or function, or to access specific Moen kitchen sink faucet parts for repair like the cartridge or O-rings. If your faucet is heavily corroded, damaged, or not performing as it should, removal is often the best course of action.
Q2: Do I need special tools for Moen faucet removal?
While you can get by with a basic toolkit, a basin wrench is highly recommended for safely and effectively loosening the mounting nuts located in the tight space under the sink. An Allen wrench set is also crucial for handles secured by set screws.
Q3: How long does it typically take to remove a Moen kitchen faucet?
For someone with some DIY experience, removing a Moen kitchen faucet can take anywhere from 30 minutes to 2 hours. If it’s your first time, or if you encounter stubborn parts, it might take a bit longer. The complexity of the faucet model and the condition of the existing installation can also affect the time.
Q4: Can I replace just the Moen faucet cartridge without removing the whole faucet?
Yes, in many cases, you can perform a Moen faucet cartridge replacement without fully removing the entire faucet assembly. This is a common repair for leaks or flow issues. You typically only need to remove the handle and the escutcheon cap to access the cartridge for replacement.
Q5: What if the mounting nuts are impossible to loosen?
If the mounting nuts are seized with corrosion, apply a generous amount of penetrating oil and let it soak for several hours or overnight. If that still doesn’t work, you might need to use a nut splitter tool, though this is a more aggressive approach and can sometimes damage the sink if not used carefully.
Q6: How do I clean the Moen faucet aerator?
To clean the Moen faucet aerator, you usually just need to unscrew it from the tip of the spout. It can often be done by hand, or with pliers if it’s tight (use a cloth to protect the finish). Once removed, soak it in a 50/50 solution of white vinegar and water for a few hours to dissolve mineral deposits. Use a small brush, like an old toothbrush, to scrub away any remaining debris before reattaching it.
Q7: Where can I find replacement Moen kitchen sink faucet parts?
You can find a wide variety of Moen kitchen sink faucet parts at most major home improvement stores (like Home Depot or Lowe’s), plumbing supply stores, and online retailers such as Amazon. It’s helpful to know your faucet’s model number to ensure you get the correct parts. You can usually find the model number on the faucet itself, or on the original packaging or manual.
Q8: What are the common causes of a Moen faucet leak?
Common causes of a Moen faucet leak include worn-out O-rings, a faulty or worn-out cartridge (the most frequent culprit), mineral buildup, or a loose connection. If the leak is from the spout base, it’s often the O-rings. If it’s from the handle, it’s usually the cartridge. Performing Moen faucet leak troubleshooting often involves inspecting and replacing these internal components.
Conclusion
Removing a Moen kitchen faucet is a achievable DIY project with the right preparation and a methodical approach. By following these detailed steps, you can confidently tackle Moen faucet disassembly for repairs, replacements, or upgrades. Remember to prioritize safety, gather your tools, and be patient with any stubborn parts. Whether you are performing a simple Moen faucet repair or a full Moen kitchen faucet replacement, a clear understanding of the process will lead to a successful outcome.