
Installing a kitchen hood vent is a crucial step in creating a healthier and more enjoyable cooking space. Can I install a kitchen hood vent myself? Yes, many homeowners can successfully install a kitchen hood vent with basic DIY skills and the right tools. What is the purpose of a kitchen hood vent? A kitchen hood vent, also known as a range hood or exhaust hood, removes smoke, grease, heat, and cooking odors from your kitchen, improving air quality and preventing grease buildup on surfaces. This detailed guide will walk you through the entire process of kitchen vent installation, making DIY kitchen ventilation achievable. We’ll cover everything from choosing the right vent to the final connection of your range hood ducting.
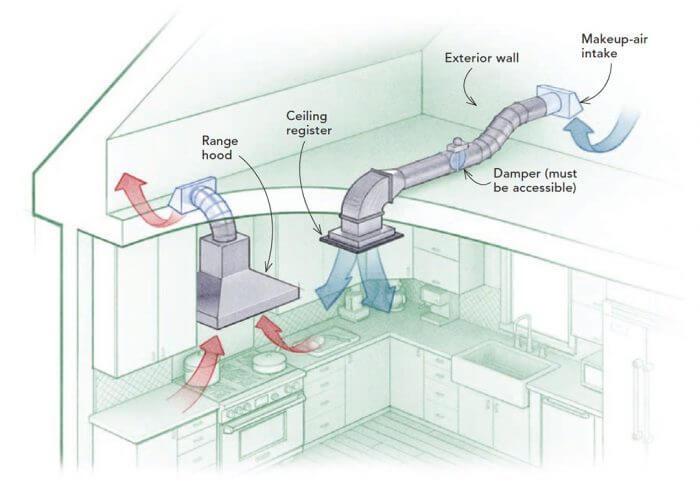
Image Source: kitchen.services
Why a Kitchen Hood Vent Matters
Before diving into the installation, let’s appreciate why a proper kitchen exhaust hood setup is so important. Cooking, especially frying and sautéing, releases various byproducts into the air. These include:
- Grease particles: These can settle on cabinets, walls, and appliances, creating a sticky residue that’s hard to clean and can even become a fire hazard.
- Smoke: Visible smoke can irritate eyes and lungs.
- Odors: Lingering cooking smells can be unpleasant and spread throughout the house.
- Moisture: Cooking generates steam, which can contribute to mold and mildew growth if not vented properly.
- Combustion byproducts: Gas stoves, in particular, can release carbon monoxide and nitrogen dioxide, which are harmful to health.
A well-functioning ventilation hood install effectively captures and removes these airborne contaminants, ensuring a cleaner, safer, and more comfortable kitchen environment. This guide is designed to be a comprehensive cooker hood installation guide for both under cabinet hood installation and wall mount range hood installation scenarios.
Choosing the Right Kitchen Hood Vent
The first step in any successful installation is selecting the correct type of hood for your kitchen. There are several common types, each with its own installation requirements.
Types of Kitchen Hood Vents
- Under Cabinet Hoods: These are mounted directly beneath your cabinets. They are often the easiest to install as they typically vent through the back of the cabinet and then up through the wall or ceiling. This type is popular for its space-saving design and straightforward kitchen vent installation.
- Wall Mount Range Hoods: These are mounted directly onto a wall above the stove. They often have a more prominent visual presence and can offer more powerful ventilation. Wall mount range hood installation involves venting through the wall or directly upward through the ceiling.
- Downdraft Vents: These are integrated into the cooktop itself or a separate unit behind it, pulling air downwards. Their installation is generally more complex and often requires specialized ductwork, making them less common for DIY projects.
- Island Hoods: Designed for kitchens with a cooking island, these are mounted to the ceiling above the island. They are often larger and require specific ceiling support and electrical work.
Ducting Options
- Ducted Range Hoods: These are the most effective as they vent air outside your home. This requires running range hood ducting from the hood to an exterior vent. This is the preferred method for optimal air quality.
- Ductless (Recirculating) Hoods: These hoods filter the air through charcoal filters and recirculate it back into the kitchen. While easier to install as they don’t require ductwork, they are less effective at removing grease and odors and do not improve indoor air quality by removing moisture or combustion gases. For this guide, we will focus on ducted installations.
Sizing and CFM
- Width: The hood should be at least as wide as your cooktop, and ideally a few inches wider, to effectively capture smoke and grease.
- CFM (Cubic Feet per Minute): This measures how much air the hood can move. A general rule of thumb is 100-150 CFM per linear foot of cooktop for electric stoves and 150-200 CFM for gas stoves. A higher CFM is needed for powerful cooking or smaller, enclosed kitchens.
Essential Tools and Materials
Before you begin your ventilation hood install, gather all necessary tools and materials. This will ensure a smooth and efficient process.
Tools You’ll Need
- Measuring Tape: For precise measurements.
- Pencil: For marking.
- Stud Finder: To locate wall studs for secure mounting.
- Drill and Drill Bits: For creating pilot holes and driving screws.
- Screwdriver Set: Phillips and flathead.
- Level: To ensure the hood is mounted straight.
- Screwdrivers (various sizes): For electrical connections and mounting screws.
- Wire Strippers/Cutters: For electrical work.
- Caulking Gun and Caulk: For sealing around exterior vents.
- Safety Glasses: To protect your eyes.
- Work Gloves: To protect your hands.
- Drywall Saw or Reciprocating Saw: For cutting holes for ducting.
- Sheet Metal Screws: For securing ductwork.
- Duct Tape (HVAC approved): For sealing duct joints.
- Ladder: For reaching the mounting area.
Materials You’ll Need
- Kitchen Hood Vent: Your chosen under cabinet or wall mount range hood.
- Range Hood Ducting: Typically rigid or flexible metal ducting that matches the hood’s exhaust outlet diameter.
- Duct Clamps: To secure flexible ducting.
- Wall Cap or Roof Cap: The exterior vent termination point.
- Electrical Wire: If a new circuit is needed or to extend existing wiring.
- Wire Connectors (Wire Nuts): For electrical connections.
- Outlet Box (if needed): For the electrical connection.
- Wall Anchors (if not mounting into studs): For secure mounting.
- Flashing: For the exterior vent to prevent leaks.
Preparing for Installation
Proper preparation is key to a safe and successful kitchen vent installation.
Safety First
- Turn off Power: Crucially, turn off the power to the cooktop and any existing ventilation system at the circuit breaker. Double-check that the power is off before touching any wires.
- Read the Manual: Every hood is slightly different. Always read the manufacturer’s installation manual for your specific model.
Planning the Duct Route
This is a critical part of the range hood ducting process.
- Location of Exterior Vent: Decide where the air will exit your house. This could be through an exterior wall or the roof.
- Obstacles: Identify any studs, pipes, or electrical wiring in the path of your ductwork.
- Duct Length and Bends: Keep the duct run as short and straight as possible. Each bend in the duct reduces airflow efficiency. Avoid using flexible ducting for long runs or sharp bends if possible; rigid metal ducting is generally preferred.
Measuring and Marking
- Marking the Hood Position: Hold the hood or its mounting template in position and mark where screws will go. For under cabinet hoods, ensure it’s centered over the cooktop and flush with the front of the cabinets. For wall mount hoods, determine the correct height above the cooktop (typically 24-30 inches for electric, 24-36 inches for gas, but check your cooktop manual).
- Marking the Duct Outlet: Once the hood’s position is determined, mark where the duct will exit the cabinet or wall.
Step-by-Step Installation Guide
This section breaks down the installation into manageable steps. We will cover both under cabinet hood installation and wall mount range hood installation.
Step 1: Removing Old Vent (If Applicable)
If you’re replacing an old hood, you’ll need to remove it first.
- Disconnect Power: Ensure power is off.
- Remove Screws: Locate and remove mounting screws. These are usually on the underside or at the back of the hood.
- Disconnect Ducting: Detach the old ductwork from the hood and the wall or ceiling.
- Lower the Hood: Carefully lower the old hood and remove it.
- Remove Old Ductwork: If necessary, remove the old ducting from the wall cavity or ceiling.
Step 2: Preparing the Ducting Path
This step involves creating the path for your range hood ducting.
- For Under Cabinet Hoods Venting Through a Cabinet Back:
- Mark the hole for the duct on the back of the cabinet, aligning with the hood’s exhaust outlet.
- Use a hole saw or jigsaw to cut the opening.
- If venting through the wall behind the cabinet, locate your desired exit point on the exterior wall.
- For Wall Mount Hoods or Under Cabinet Hoods Venting Through a Wall:
- Locate your desired exit point on the exterior wall.
- Drill a small pilot hole from inside the kitchen through to the outside to mark the center of your hole.
- From the outside, use a level and the pilot hole to draw the circumference of your vent cap.
- Using a drywall saw or reciprocating saw, carefully cut out the hole for the ducting. Ensure the hole is large enough for the ducting and the exterior vent cap.
- For Venting Through the Ceiling:
- Determine the location for your roof cap or ceiling vent.
- Drill a pilot hole from the attic or upper floor down to the installation area.
- From below, trace the outline of your vent cap.
- Carefully cut the hole.
Step 3: Installing the Exterior Vent Cap
This is the first part of your range hood ducting that goes to the outside.
- Insert the Cap: Push the exterior vent cap (wall cap or roof cap) into the hole you cut from the outside.
- Secure the Cap: Use screws to secure the cap to the exterior surface.
- Install Flashing: Apply flashing around the cap to create a watertight seal against the wall or roof. This is crucial to prevent water damage.
- Seal Edges: Use caulk to seal any gaps around the flashing and the cap.
Step 4: Running the Ductwork
Now it’s time to connect the hood to the exterior vent.
- Connect to Hood: Attach the first piece of ducting to the exhaust outlet on your new kitchen hood. Use a duct clamp or screws to secure it.
- Connect to Exterior Vent: Carefully maneuver the ductwork through the wall cavity or ceiling joists, connecting it to the exterior vent cap.
- Rigid Ducting: Use sections of rigid ducting and connect them with coupling joints, securing each joint with sheet metal screws and sealing with HVAC-approved duct tape.
- Flexible Ducting: Extend the flexible ducting and connect it to the exterior vent. Pull it taut and avoid sharp kinks or bends. Secure with a duct clamp and seal with duct tape.
- Seal All Joints: Ensure every connection point in your range hood ducting is well-sealed with HVAC-approved duct tape to prevent air leaks.
Step 5: Electrical Connections
This is a critical step and requires caution. If you are not comfortable with electrical work, hire a qualified electrician.
- Turn Off Power: Again, ensure the power is OFF at the breaker.
- Locate Wiring: Find the electrical cable that will power the hood. This might be a plug from an outlet or a direct wire connection.
- Wire the Hood: Follow the manufacturer’s instructions for connecting the hood’s wires to the house wiring. Typically, this involves connecting black wires (hot), white wires (neutral), and green or bare wires (ground) using wire nuts.
- Secure Connections: Ensure all wire connections are secure and insulated with wire nuts.
- Tuck Wires: Carefully tuck the wires into the appropriate junction box or compartment on the hood.
Step 6: Mounting the Kitchen Hood
Now it’s time to attach the hood itself.
- Under Cabinet Hood Installation:
- Carefully lift the hood into place under the cabinet.
- Align the mounting holes on the hood with the pilot holes you drilled earlier.
- Secure the hood to the underside of the cabinet using the provided screws. Ensure it is flush and level.
- Wall Mount Range Hood Installation:
- Lift the hood into position on the wall, aligning it with your mounting marks.
- Some wall mount hoods have a mounting bracket that attaches to the wall first. Follow the manufacturer’s instructions.
- Secure the hood to the wall using the appropriate screws, ensuring it is level and firmly attached. Use wall anchors if you are not screwing directly into studs.
Step 7: Final Checks and Testing
This is your last chance to ensure everything is correct before turning on the power.
- Ductwork Secured: Gently tug on the ductwork to ensure it’s securely fastened and sealed.
- Electrical Connections: Double-check all wire connections for tightness and proper insulation.
- Hood Stability: Ensure the hood is firmly mounted and doesn’t wobble.
- Clearance: Make sure there’s no debris or tools near the cooktop or the hood.
- Turn On Power: Restore power at the circuit breaker.
- Test Functionality: Turn on the hood’s fan and lights. Listen for any unusual noises and check that air is being exhausted. You can test the exhaust by holding a piece of paper towel near the vent opening – it should be pulled towards the vent.
Tips for a Successful DIY Kitchen Ventilation Project
- Work with a Helper: For heavier hoods or when maneuvering ductwork, having an extra pair of hands is invaluable.
- Measure Twice, Cut Once: This adage is especially true when cutting holes in your walls or cabinets.
- Use the Right Ducting: Rigid metal ducting offers better airflow than flexible ducting and is recommended for optimal performance. If you must use flexible ducting, keep it as straight as possible.
- Seal Everything: Air leaks reduce the efficiency of your ventilation system and can allow grease and moisture to escape into your walls.
- Consider Makeup Air: In tightly sealed homes with high CFM hoods, you might need a “makeup air” system to replace the air being exhausted. Consult a professional if you suspect this is necessary.
- Clean Regularly: Once installed, clean the hood filters and fan blades regularly to maintain optimal performance.
Common Issues and Troubleshooting
Even with careful installation, you might encounter a few hitches.
| Problem | Possible Cause | Solution |
|---|---|---|
| Hood Not Turning On | No power, loose wiring, tripped breaker. | Check circuit breaker, ensure power is on, re-check electrical connections. |
| Weak Airflow | Kinked ducting, blocked filters, undersized CFM. | Straighten ducting, clean/replace filters, ensure hood CFM meets cooking needs. |
| Noisy Operation | Loose parts, unbalanced fan, or vibration. | Tighten mounting screws, check fan for damage, add vibration dampening material if needed. |
| Grease Leaks | Poorly sealed duct joints, damaged ducting. | Seal all duct joints with HVAC tape, inspect ducting for holes and repair or replace. |
| Hood Not Flush/Level | Inaccurate mounting, uneven surface. | Re-mount hood, use shims to level if the wall is uneven. |
| Water Leaking Around Cap | Improperly installed flashing or sealant. | Re-seal the exterior vent cap and flashing, ensuring a watertight barrier. |
Frequently Asked Questions (FAQ)
Q: How high should I mount my range hood?
A: For electric stoves, mount the hood 24-30 inches above the cooktop. For gas stoves, it’s typically 24-36 inches. Always check your cooktop manufacturer’s recommendations, as some high-powered gas burners require more clearance.
Q: What is the difference between ducted and ductless hoods?
A: Ducted hoods vent air outside your home, removing smoke, grease, and odors effectively. Ductless hoods filter the air and recirculate it, which is less effective for air quality but easier to install.
Q: Can I use flexible ducting for my kitchen vent installation?
A: While possible, it’s best to use rigid metal ducting for better airflow. If you must use flexible ducting, keep it as straight and short as possible and ensure it’s sealed properly. Avoid sharp bends.
Q: Do I need a professional to install my kitchen hood vent?
A: While many DIYers can handle the installation, especially for under cabinet hoods, electrical work and complex duct runs can be challenging. If you’re not comfortable with electrical wiring or cutting through walls, hiring a qualified electrician or contractor is recommended.
Q: How do I ensure my range hood ducting is properly sealed?
A: Use HVAC-approved foil tape to seal all joints and connections in your ductwork. Ensure the tape is applied smoothly and covers the entire seam.
Q: What size ducting should I use?
A: Most range hoods come with a specified duct outlet size (e.g., 6-inch or 8-inch). Use ducting that matches this size for optimal airflow.
Conclusion
Installing a kitchen hood vent is a rewarding DIY project that significantly improves your kitchen’s air quality and overall comfort. By following these detailed steps for kitchen vent installation, from choosing the right equipment to the final ventilation hood install, you can achieve a professional result. Whether you’re tackling an under cabinet hood installation or a wall mount range hood installation, remember to prioritize safety, plan your range hood ducting carefully, and seal all connections meticulously. Enjoy your cleaner, fresher kitchen!