
Can you grout a kitchen backsplash yourself? Absolutely! With the right tools and a little patience, you can achieve a professional-looking finish for your kitchen backsplash. This comprehensive guide will walk you through every step of grouting tiles in your kitchen, from preparation to sealing, making it an achievable DIY project.
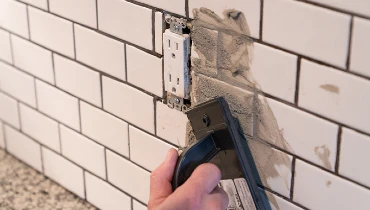
Image Source: www.mrhandyman.com
Preparing Your Workspace and Tiles
Before you even think about mixing tile grout, proper preparation is key. This ensures a clean, efficient process and a beautiful final result.
Gathering Your Supplies
Having all your materials ready before you start will save you time and frustration.
- Grout: Choose the type and grout color that best suits your tiles and kitchen aesthetic. Unsanded grout is typically used for narrow grout lines (1/8 inch or less), while sanded grout is better for wider spaces. Epoxy grout offers superior stain and water resistance but is trickier to work with.
- Grout Float: A rubber-faced tool for spreading grout.
- Grout Sponge: A large, dense sponge specifically designed for cleaning excess grout.
- Buckets (2): One for mixing grout and one for rinse water.
- Clean Rags or Microfiber Cloths: For wiping and polishing.
- Painter’s Tape: To protect surrounding surfaces.
- Utility Knife or Grout Removal Tool: For cleaning up edges and removing old grout if necessary.
- Stirring Stick or Drill with Mixing Paddle: For mixing grout.
- Safety Glasses and Gloves: To protect your eyes and skin.
- Dust Mask: Especially important if you’re working with powdered grout.
- Tile Spacing: Ensure consistent tile spacing was maintained during tile installation, as this directly impacts grout line consistency.
Cleaning Existing Grout Lines (If Applicable)
If you are regrouting an existing backsplash, grout removal is your first step.
- Inspect the Grout: Check for any loose, cracked, or missing grout.
- Use a Grout Removal Tool: Carefully scrape out the old tile grout. Work slowly and deliberately to avoid damaging the tiles or the tile adhesive beneath them. A rotary tool with a grout blade can speed up this process, but use it with extreme caution.
- Vacuum Thoroughly: Once all old grout is removed, vacuum the grout lines to eliminate dust and debris.
- Wipe Down: Dampen a clean cloth and wipe down the tiles and grout lines to remove any remaining dust.
Protecting Surrounding Areas
Shielding your countertops, walls, and cabinets from stray grout is crucial for a clean finish.
- Apply Painter’s Tape: Carefully apply painter’s tape along the edges of your countertops, adjacent walls, and any cabinets or fixtures that are close to the tiled area. This tape will catch any errant grout and protect these surfaces.
Mixing the Tile Grout
The consistency of your grout mixture is critical for proper grout application.
Achieving the Right Consistency
- Read the Manufacturer’s Instructions: Always refer to the specific instructions on your grout packaging. Different grout types have different water-to-grout ratios.
- Start with Water: Pour the recommended amount of cool, clean water into your mixing bucket.
- Add Grout Gradually: Slowly add the grout powder to the water while stirring.
- Mix Thoroughly: Mix the grout until it has a smooth, consistent texture, similar to peanut butter or thick frosting. Avoid making it too watery, as this will weaken the grout and make it difficult to apply.
- Let it Slake: Most cement-based grouts require a “slaking” period. This means letting the mixture sit for about 5-10 minutes after initial mixing to allow the chemicals to fully hydrate. Stir it again briefly after slaking.
Table 1: Grout Consistency Guide
| Desired Consistency | Description |
|---|---|
| Too Watery (Runny) | Will drip and run, hard to control, weak. |
| Ideal (Peanut Butter/Frosting) | Holds its shape, easy to spread, strong bond. |
| Too Dry (Crumbly) | Difficult to spread, may not cure properly. |
Applying the Grout
This is where your grout application really takes shape. Patience and thoroughness are key here.
Spreading the Grout
- Load the Grout Float: Scoop a generous amount of mixed grout onto your grout float.
- Apply at an Angle: Hold the float at a 45-degree angle to the tile surface.
- Work in Sections: Begin applying the grout to one section of the backsplash at a time. Use a back-and-forth motion to press the grout firmly into the tile spacing and cover the entire surface of the tiles.
- Diagonal Strokes: Work diagonally across the tiles. This motion helps push the grout into the joints and prevents you from pulling it out.
- Remove Excess: After covering an area, hold the float at a sharper angle (almost perpendicular) to the tile and scrape off the excess grout, again working diagonally. This initial scraping helps smooth the grout lines.
Cleaning Excess Grout
This is a critical step for achieving a clean tile surface.
- Wait for Initial Set: Allow the grout to set slightly. This usually takes about 15-30 minutes, depending on temperature and humidity. The grout should be firm enough that you can touch it without it sticking to your finger. You can test this by gently pressing a finger into a small grout line.
- Use the Grout Sponge: Dampen your grout sponge in a bucket of clean water and wring it out thoroughly. The sponge should be damp, not dripping wet.
- Gentle Wipes: In a circular or sweeping motion, gently wipe the sponge across the tile surface to remove the excess grout haze. Be careful not to dig into the grout lines, as this can dislodge the fresh grout.
- Rinse the Sponge Frequently: Rinse your grout sponge in the second bucket of clean water often, wringing it out well each time. This prevents you from spreading grout haze back onto the tiles.
- Switch Water Buckets: Once the rinse water becomes very cloudy, switch to fresh water.
Final Cleaning and Polishing
The final stages of grouting tiles involve ensuring a spotless finish.
Removing Grout Haze
After the initial cleaning with the sponge, a thin haze might remain on the tiles.
- Wait Longer: Let the grout dry for another hour or two.
- Buff with a Clean, Dry Cloth: Use a clean, dry microfiber cloth or soft rag to gently buff the tile surface. This will remove the remaining haze and bring out the shine of your tiles.
- Stubborn Haze: If some haze persists, lightly dampen a clean cloth and gently wipe the affected areas. Again, be careful not to disturb the grout lines.
Checking and Touching Up
- Inspect Grout Lines: Once the grout has had a few hours to dry further, inspect all the grout lines.
- Fill Low Spots: If you notice any areas where the grout has sunk slightly, you can mix a small amount of grout and carefully apply it with a small putty knife or your finger to fill these spots.
- Clean Edges: Use a utility knife or a damp cloth to carefully clean any grout that may have smeared onto the edges of the tiles or onto surrounding surfaces.
Curing and Sealing
Proper curing and sealing protect your tile grout and keep it looking its best.
Grout Curing Time
- Patience is Key: Grout needs time to cure fully. This can take anywhere from 24 to 72 hours, depending on the type of grout and environmental conditions.
- Avoid Moisture and Heavy Use: During the curing period, try to keep the backsplash dry and avoid heavy use of the kitchen that might splash water onto the grout.
Applying Grout Sealant
- Why Seal? Sealing your grout is a crucial step, especially in the kitchen where it can be exposed to grease, food stains, and moisture. A grout sealant acts as a barrier, preventing these elements from penetrating the porous grout material.
- When to Seal: Wait for the grout to cure completely, usually at least 72 hours, before applying sealant. Check the sealant manufacturer’s instructions for specific timings.
- Choose the Right Sealant: There are various types of grout sealants available, including penetrating sealants and topical sealants. For kitchen backsplashes, penetrating sealants are often preferred as they soak into the grout pores without leaving a film.
- Application: Apply the sealant using a small brush, a foam applicator, or a clean cloth. Work in small sections, ensuring you coat the grout lines evenly.
- Wipe Off Excess: Immediately wipe off any excess sealant from the tile surface with a clean cloth before it has a chance to dry.
- Multiple Coats: Some sealants may require a second coat after a specified drying time. Follow the product instructions carefully.
Maintenance and Cleaning
Proper maintenance will keep your grout looking fresh and new.
Regular Cleaning
- Gentle Cleaning: For routine cleaning, use a mild, pH-neutral cleaner and a soft cloth or sponge. Avoid abrasive cleaners or harsh chemicals, as these can damage the grout and sealant over time.
- Address Spills Immediately: Wipe up spills, especially greasy ones, as soon as possible to prevent them from staining the grout.
Using a Grout Cleaner
- For Tough Stains: If you encounter stubborn stains or buildup, you can use a dedicated grout cleaner.
- Follow Instructions: Always follow the specific instructions for the grout cleaner you choose. Some cleaners may require dilution or a specific application method.
- Test First: It’s a good idea to test any new grout cleaner in an inconspicuous area first to ensure it doesn’t discolor or damage the grout or tiles.
Re-sealing
- Periodic Re-sealing: Depending on the type of sealant used and the amount of wear and tear, you may need to reapply grout sealant every 6-12 months. A good indicator that it’s time to re-seal is if water no longer beads up on the grout surface.
Frequently Asked Questions (FAQ)
Here are some common questions people have when it comes to grouting a kitchen backsplash.
What is the best type of grout for a kitchen backsplash?
For most kitchen backsplashes, a stain-resistant and water-resistant grout is ideal. Unsanded grout is suitable for narrow grout lines (1/8 inch or less), while sanded grout is better for wider lines. Epoxy grout offers the best protection against stains and moisture but is more difficult to apply. Consider the grout color and its tendency to show stains when making your choice.
How long does it take to grout a kitchen backsplash?
The actual grouting process for a typical kitchen backsplash can take anywhere from 2-4 hours, depending on the size of the area and your experience level. However, you must factor in drying and curing times, which can extend the overall project duration to 2-3 days before it’s fully ready for regular use.
Can I use a different color grout than my tiles?
Yes, you can! Choosing a contrasting grout color can be a design choice to make your tiles stand out. Alternatively, a grout color that closely matches your tiles can create a more seamless look. Always get grout samples if possible to see how the color looks with your tiles before committing.
What happens if I don’t seal my grout?
If you don’t seal your grout, it will be more susceptible to staining from grease, food, and other kitchen spills. It can also absorb moisture, which can lead to mold or mildew growth in the long run. Sealing creates a protective barrier that makes cleaning easier and extends the life of your grout.
How do I fix grout that is crumbling?
If your grout is crumbling, it’s likely time for grout removal and regrouting. Carefully remove the damaged grout using a grout saw or utility knife, clean the area thoroughly, and then reapply new tile grout according to the steps outlined in this tutorial. Ensure you use the correct type of grout for the width of your tile spacing.
By following these detailed steps, you can confidently tackle the task of grouting your kitchen backsplash, transforming your kitchen’s appearance and adding a durable, beautiful finish.