
Can I replace my kitchen faucet myself? Yes, you absolutely can replace your kitchen faucet yourself with a little patience and the right tools. This guide will walk you through the entire process, from preparing your workspace to enjoying your brand-new faucet. Changing a kitchen faucet with a sprayer is a common DIY project that can significantly update the look and functionality of your kitchen. Whether you’re dealing with a leaky faucet, outdated style, or a broken sprayer, this comprehensive guide will equip you with the knowledge needed for a successful kitchen faucet installation.
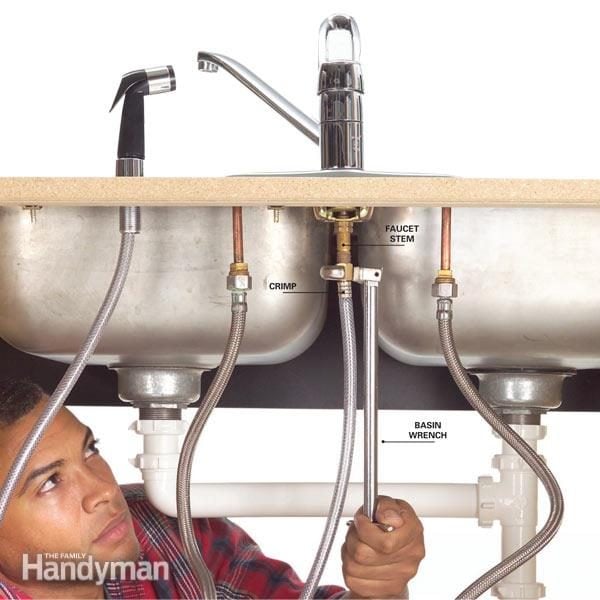
Image Source: www.familyhandyman.com
Why Replace Your Kitchen Faucet?
There are several reasons why you might consider replacing your kitchen faucet. Over time, faucets can develop leaks, become difficult to operate, or simply fall out of fashion. A malfunctioning sprayer can be particularly frustrating, making everyday tasks like washing dishes or rinsing vegetables a chore. A new faucet can not only fix these issues but also enhance your kitchen’s aesthetic, improve water efficiency, and even increase your home’s value. If you’re looking to replace kitchen faucet units that are showing their age, this guide is for you.
Getting Started: Preparation is Key
Before you dive into the actual kitchen faucet plumbing, proper preparation will make the job much smoother and prevent unnecessary stress.
Gathering Your Tools and Materials
Having all your tools and materials ready before you start will save you time and trips to the hardware store. Here’s a list of what you’ll likely need:
- New Kitchen Faucet with Sprayer: Ensure it’s compatible with your sink’s hole configuration.
- Adjustable Wrenches (2): For loosening and tightening nuts.
- Basin Wrench: This specialized tool is crucial for reaching nuts in tight spaces under the sink.
- Plumber’s Putty or Silicone Sealant: To create a watertight seal.
- Bucket: To catch any residual water.
- Towels or Rags: For cleaning up spills and drying surfaces.
- Safety Glasses: To protect your eyes from debris and dripping water.
- Gloves: To keep your hands clean and provide better grip.
- Flashlight or Headlamp: To see clearly under the sink.
- Screwdrivers (Phillips and Flathead): May be needed for certain mounting hardware.
- Pipe Thread Tape (Teflon Tape): For sealing threaded connections.
- Wire Brush or Steel Wool: To clean any corrosion or debris from pipes.
- Penetrating Oil (e.g., WD-40): For loosening stubborn nuts.
- Old Toothbrush: For cleaning tight spots.
Choosing Your New Faucet
When selecting a new faucet, consider the following:
- Number of Holes: Most sinks have one, two, three, or four holes. Ensure your new faucet matches the number of holes in your sink or comes with a deck plate to cover unused ones.
- Style: Choose a style that complements your kitchen décor. Options range from modern and sleek to traditional and ornate.
- Finish: Popular finishes include chrome, brushed nickel, stainless steel, matte black, and oil-rubbed bronze. Consider how easy each finish is to clean and how well it matches your other fixtures.
- Features: Think about features like pull-down or pull-out sprayers, touchless operation, or integrated soap dispensers.
- Compatibility with Undermount Sinks: If you have an undermount sink faucet replacement, ensure the faucet’s reach and height are suitable for your sink’s design and the available space above it.
Preparing Your Workspace
A clean and organized workspace is essential for a smooth DIY project.
- Clear Everything from Under the Sink: Remove all cleaning supplies, bins, or anything else stored in the cabinet.
- Protect Your Floor: Lay down old towels or rags on the cabinet floor to absorb any drips or spills.
- Ensure Good Lighting: Use a flashlight or headlamp to illuminate the area under the sink.
Step-by-Step Guide to Replacing Your Kitchen Faucet
Now that you’re prepared, let’s get down to the actual process of how to change a kitchen faucet with a sprayer.
Step 1: Disconnect the Water Supply
This is the most crucial safety step. You must shut off the water before proceeding.
- Locate the Shut-Off Valves: Look under the sink for two valves connected to the pipes coming from the wall. One is for hot water, and the other is for cold water.
- Turn Off the Valves: Turn the handles of both valves clockwise until they are fully closed. If your valves are old or stiff, you might need to use a wrench.
- Test the Water Flow: Turn on your old faucet to drain any remaining water in the lines and to confirm that the water supply is indeed shut off. Leave the faucet handles in the “on” position.
Step 2: Disconnect the Water Lines and Sprayer Hose
With the water off, you can now disconnect the existing connections.
- Place a Bucket: Position a bucket directly under the water supply connections to catch any residual water.
- Disconnect Water Supply Lines: Use an adjustable wrench to loosen the nuts connecting the flexible water supply lines to the shut-off valves. Remember that “righty-tighty, lefty-loosey.”
- Disconnect Sprayer Hose: Locate where the sprayer hose connects to the faucet body under the sink. This connection might be a threaded fitting or a quick-connect type. Use your wrench to disconnect it. You may need a basin wrench for this if the connection is in a tight spot.
- Remove the Counterweight (if applicable): If your sprayer has a hose with a counterweight, remove it from the hose. This weight helps the sprayer retract.
Step 3: Remove the Old Faucet
This is often the most challenging part, especially if the mounting hardware is old and corroded.
- Locate Faucet Mounting Hardware: Look under the sink where the faucet base meets the sink or countertop. You’ll find nuts, washers, and possibly mounting brackets that secure the faucet.
- Use the Basin Wrench: This is where the basin wrench truly shines. Insert the head of the basin wrench around the mounting nuts and turn the handle to loosen them. It might take some effort, especially if they are old.
- Remove Faucet Mounting Hardware: Once the nuts are loose enough, remove them and any accompanying washers or mounting plates.
- Lift Out the Old Faucet: Gently pull the old faucet upward from the top of the sink. You might need to wiggle it a bit to break any old sealant. If it’s stuck, carefully use a putty knife to break the seal around the base.
- Clean the Sink Surface: Use a putty knife, scraper, or steel wool to remove any old plumber’s putty, sealant, or mineral deposits from the sink where the old faucet was mounted. A clean surface ensures a good seal for the new faucet.
Step 4: Install the New Faucet
This is where your new fixture begins to take shape! The process for kitchen faucet installation will vary slightly depending on your faucet’s design, so always refer to the manufacturer’s instructions.
-
Prepare the New Faucet:
- Apply Plumber’s Putty or Sealant: Most faucets come with a rubber gasket for the base. If not, apply a bead of plumber’s putty or silicone sealant around the underside of the faucet base or deck plate. This creates a watertight seal between the faucet and the sink.
- Feed Hoses: Thread the new faucet’s hot and cold water supply lines and the sprayer hose down through the appropriate holes in the sink or countertop.
-
Position the New Faucet: Carefully lower the new faucet into place, ensuring it’s centered and aligned correctly.
-
Secure the Faucet from Below:
- Install Mounting Hardware: From underneath the sink, slide on any washers and then thread the mounting nuts onto the faucet shanks.
- Tighten the Nuts: Use your basin wrench or adjustable wrench to tighten the nuts securely. Be careful not to overtighten, as this can damage the sink or faucet. Ensure the faucet is straight and stable on the top side before fully tightening. Some faucets have screws that need to be tightened against the sink.
-
Connect the Sprayer Hose:
- Attach the Sprayer Hose: Connect the new sprayer hose to the designated outlet on the faucet body. Ensure it’s screwed on tightly by hand, then give it a snug turn with a wrench if needed.
- Reattach the Counterweight: Clip the counterweight back onto the sprayer hose at the position recommended by the manufacturer. This ensures smooth operation of the pull-down or pull-out sprayer.
-
Connect Water Supply Lines:
- Attach Supply Lines to Faucet: If your new faucet didn’t come with integrated supply lines, connect the new flexible supply lines to the faucet’s hot and cold inlets. Hand-tighten them, then use a wrench to snug them up a quarter to a half turn.
- Attach Supply Lines to Shut-Off Valves: Connect the other ends of the supply lines to the corresponding hot and cold shut-off valves. Again, hand-tighten, then use a wrench for a final snug turn. It’s often recommended to use new supply lines to avoid leaks.
Step 5: Test for Leaks and Completeness
The moment of truth! It’s time to see if everything is working and watertight.
- Turn On Water Supply: Slowly turn the hot and cold shut-off valves counter-clockwise to open them.
- Check for Leaks: Inspect all connections under the sink for any drips or leaks. Pay close attention to where the supply lines connect to the valves and the faucet, as well as the sprayer hose connection.
- Operate the Faucet: Turn on the new faucet. Check both hot and cold water flow.
- Test the Sprayer: Engage the sprayer function. Ensure the hose extends and retracts smoothly, and that the spray pattern works correctly. Check for leaks around the sprayer head and hose connection again.
- Tighten if Necessary: If you find any small drips, gently tighten the offending connection a quarter turn.
- Clean Up: Wipe down any wet surfaces and remove your bucket and tools.
Troubleshooting Common Issues
Even with careful work, you might encounter minor hiccups. Here are some common problems and solutions.
Leaking at Supply Line Connections
- Cause: Loose connections or damaged fittings.
- Solution: Turn off the water supply. Slightly tighten the connection. If it persists, you may need to disconnect, check the rubber washer or fitting for damage, and reconnect with pipe thread tape on the valve threads.
Sprayer Not Retracting Properly
- Cause: The counterweight is misplaced, or the hose is kinked.
- Solution: Check the counterweight’s position; consult your faucet’s manual for the correct placement. Ensure the hose is not caught on anything under the sink or bent sharply.
Low Water Pressure
- Cause: Air in the lines, or the aerator is clogged.
- Solution: Run the faucet on full blast for a minute or two to clear air pockets. Unscrew the aerator from the faucet spout (usually by hand) and clean any debris.
Leaking at the Faucet Base
- Cause: Insufficient or improperly applied plumber’s putty/sealant, or the mounting nuts are not tight enough.
- Solution: Turn off the water, relieve pressure, and tighten the mounting nuts. If the leak continues, you may need to remove the faucet, clean the old sealant, reapply putty or sealant, and reinstall.
Frequently Asked Questions (FAQ)
Q1: How long does it typically take to replace a kitchen faucet?
A: For a first-timer, expect it to take anywhere from 1 to 3 hours. Experienced DIYers can often do it in under an hour. Patience is key!
Q2: Can I replace a faucet without a basin wrench?
A: It’s very difficult. The basin wrench is specifically designed to reach those awkward nuts under the sink. You might be able to use a deep socket wrench in some cases, but it’s not ideal.
Q3: What if I have a single-hole faucet and my new faucet has three holes?
A: Most new faucets designed for multiple holes come with an optional deck plate that can cover the extra holes, effectively converting it to a single-hole installation.
Q4: Do I need to turn off the main water supply to my house?
A: No, usually the shut-off valves under the sink are sufficient. Only turn off the main supply if you don’t have individual shut-off valves for the sink.
Q5: What are some common kitchen faucet replacement parts I might need?
A: Besides the faucet itself, you might need new flexible water supply lines, plumber’s putty or silicone sealant, and possibly replacement O-rings or cartridges if you’re repairing an existing faucet rather than replacing it entirely.
Q6: I’m replacing a faucet on an undermount sink. Are there any special considerations?
A: Yes, with an undermount sink faucet replacement, access can be more confined. Ensure your new faucet has enough reach and height clearance over the sink bowl. The tightening nuts might be even harder to access, making a good basin wrench essential.
Q7: My old faucet is corroded and stuck. What can I do?
A: Apply penetrating oil (like WD-40) to the nuts and threads. Let it sit for 15-30 minutes (or longer for very stubborn corrosion). You may need to reapply it. Gently tap the nuts with a wrench to help the oil penetrate.
Q8: How do I know if I need to replace kitchen faucet plumbing components besides the faucet itself?
A: Inspect the shut-off valves for leaks or stiffness. If they are old and corroded, it’s a good idea to replace them while you’re already working under the sink. Also, consider replacing the flexible supply lines if they show any signs of wear or age.
By following these steps, you can confidently tackle the project of how to change a kitchen faucet with a sprayer. Enjoy your refreshed kitchen!