
Can you fix a kitchen faucet sprayer yourself? Yes, you can absolutely fix most kitchen faucet sprayer issues yourself with a few basic tools and this easy-to-follow guide.
A malfunctioning kitchen faucet sprayer can be a real nuisance. Whether it’s a weak spray, a leak, or it’s not working at all, the good news is that kitchen faucet sprayer repair is often a straightforward DIY project. This guide will walk you through the common problems and how to solve them, covering everything from faucet sprayer leaking to clogged faucet sprayer issues. We’ll even cover how to replace a kitchen faucet sprayer hose and installing a new faucet sprayer.
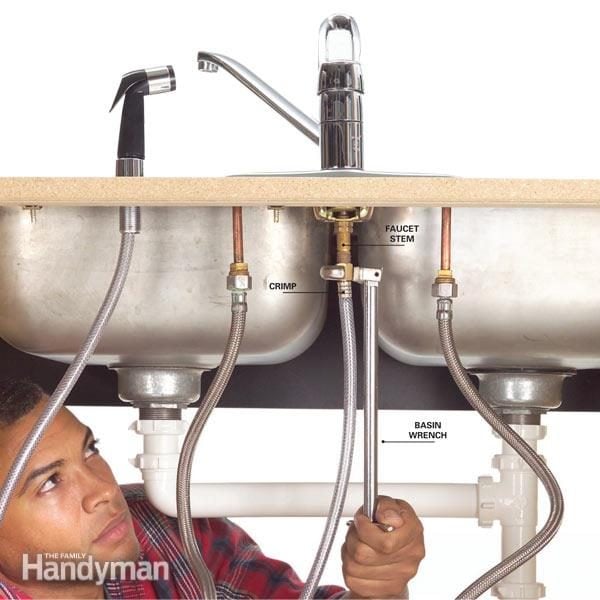
Image Source: www.familyhandyman.com
Why Your Faucet Sprayer Might Be Acting Up
Before we dive into the fixes, let’s explore the usual culprits behind a faucet sprayer not working correctly. Common issues include:
- Mineral Buildup: Hard water deposits can clog the sprayer nozzle.
- Worn Seals or O-rings: These small rubber parts can degrade over time, leading to leaks.
- Damaged Hose: Cracks or kinks in the sprayer hose can restrict water flow or cause leaks.
- Faulty Diverter Valve: This internal part switches water flow between the main spout and the sprayer.
- Low Water Pressure: While not directly a sprayer issue, it can make the sprayer seem weak.
Tools You’ll Likely Need
Gathering the right tools before you start will make the process much smoother. Here’s a typical list:
- Adjustable wrench
- Pliers (needle-nose and slip-joint)
- Screwdriver set (Phillips and flathead)
- Allen wrenches (hex keys)
- Bucket or towel (to catch drips)
- Vinegar (for descaling)
- Soft cloth
- Plumber’s tape (Teflon tape)
- Replacement O-rings or seals (if needed)
- New sprayer hose or nozzle (if required)
Troubleshooting Common Kitchen Faucet Sprayer Problems
Let’s get to the heart of the matter: fixing that stubborn sprayer.
1. The Faucet Sprayer is Leaking
A faucet sprayer leaking can manifest in a few ways: dripping from the nozzle itself, leaking at the connection point to the hose, or a leak along the hose itself.
H3: Leaks from the Sprayer Nozzle
This is often due to mineral deposits or a worn-out internal seal within the nozzle.
Steps to Fix a Leaky Sprayer Nozzle:
- Turn off the water supply: Locate the shut-off valves under the sink. Turn them clockwise until they are snug. Turn on the faucet to drain any remaining water.
- Detach the sprayer head: Most sprayer heads can be unscrewed by hand from the hose. If it’s stuck, use an adjustable wrench, but be gentle to avoid damaging the finish. You might need a towel to protect the finish.
- Inspect and clean the nozzle: Look for any visible debris or mineral buildup. Soak the nozzle in a bowl of white vinegar for a few hours, or overnight, to dissolve mineral deposits.
- Rinse and reassemble: After soaking, rinse the nozzle thoroughly with water. Use a small brush (like an old toothbrush) to gently scrub away any loosened deposits.
- Check for worn seals: Inside the sprayer head connection, you might find a small rubber washer or O-ring. If it looks brittle, cracked, or flattened, it needs to be replaced. You can usually find replacement O-rings at hardware stores.
- Reattach the sprayer: Screw the nozzle back onto the hose. Hand-tighten it first, then give it a gentle snug with the wrench if needed.
- Turn on water and test: Slowly turn the water supply valves back on. Check for leaks.
H3: Leaks at the Hose Connection
This usually points to a loose connection or a damaged washer.
Steps to Fix Leaks at the Hose Connection:
- Turn off water supply and drain: As before, shut off the water under the sink and drain the faucet.
- Tighten the connection: At the sprayer head, there’s a nut that connects the hose to the head. Try tightening this nut with an adjustable wrench. Don’t overtighten, as this can strip the threads.
- Inspect the washer: If tightening doesn’t help, disconnect the hose from the sprayer head (see step 2 above). Look for a rubber washer or O-ring inside the connector. If it’s damaged, replace it.
- Apply plumber’s tape: Wrap plumber’s tape around the threads of the hose connection point on the sprayer head. This helps create a watertight seal.
- Reassemble and test: Reconnect the hose to the sprayer head, hand-tighten, then gently snug with a wrench. Turn the water back on slowly and check for leaks.
H3: Leaks Along the Sprayer Hose
A leak directly from the hose usually means the hose itself is compromised. This often requires replacing the kitchen faucet sprayer hose.
Steps for Replacing the Kitchen Faucet Sprayer Hose:
- Shut off water and drain: Turn off the water supply under the sink and drain the faucet.
- Locate hose connections: The sprayer hose connects to the faucet body under the sink, and the sprayer head connects to the other end of the hose.
- Disconnect the old hose:
- Under the sink: You’ll see the sprayer hose connected to the faucet’s water supply line or the diverter assembly. Use an adjustable wrench to loosen the nut connecting the hose. Have a bucket or towel ready for residual water.
- At the sprayer head: Unscrew the sprayer head from the hose (as described in the nozzle leak section).
- Install the new hose:
- Connect to faucet: Before connecting the new hose to the faucet, apply plumber’s tape to the threads of the faucet connection point.
- Connect sprayer head: Ensure the new hose has the correct end for the sprayer head. Apply plumber’s tape to the threads of the new hose where it will connect to the sprayer head.
- Secure connections: Hand-tighten both ends of the new hose, then use an adjustable wrench to snug them up. Again, avoid overtightening.
- Turn on water and test: Slowly turn the water supply back on and check both connection points and the length of the hose for any leaks.
2. The Faucet Sprayer is Not Working (No Water or Weak Spray)
When your faucet sprayer not working as it should, it’s usually due to blockages or a faulty diverter.
H3: Weak Spray or No Spray from the Sprayer
This is a common symptom of a clogged faucet sprayer nozzle.
Steps to Clear a Clogged Faucet Sprayer:
- Turn off water supply and drain: Shut off the water under the sink and drain the faucet.
- Remove the sprayer head: Unscrew the sprayer head from the hose.
- Soak in vinegar: Place the sprayer head in a bowl of white vinegar. Let it soak for at least a few hours, or overnight, to dissolve mineral deposits.
- Brush and rinse: After soaking, use a small brush to gently scrub away any remaining buildup. Rinse the nozzle thoroughly with water.
- Check the hose: While the nozzle is off, check the sprayer hose for any kinks or blockages. You can try running water through it (with a bucket underneath) to see if it flows freely.
- Reassemble and test: Reattach the clean sprayer head and turn the water back on.
H3: Water Still Comes from the Main Spout When Sprayer is On
This indicates a problem with the diverter valve. The diverter is a mechanism inside the faucet body that directs water either to the main spout or to the sprayer hose.
Troubleshooting a Faulty Diverter:
- Check the diverter button/lever: Ensure the button or lever that switches between spray and stream is fully engaged. Sometimes, these can get stuck or worn.
- Inspect the diverter valve: This is more involved and might require disassembling parts of the faucet. The diverter is usually located where the sprayer hose connects to the faucet body.
- Turn off water and drain.
- Disconnect the sprayer hose from the faucet body.
- Depending on your faucet model, the diverter might be a separate cartridge or part of the main faucet valve. You may need to remove a retaining clip or screw.
- Examine the diverter: Look for mineral buildup, worn seals, or cracks. Clean any deposits. If seals are worn, you might need to replace the diverter assembly or specific O-rings associated with it.
- Reassemble carefully: Put everything back in the reverse order. Ensure all connections are secure.
- Test the diverter: Turn the water back on and check if water now diverts correctly to the sprayer.
3. Installing a New Faucet Sprayer
If your current sprayer is beyond repair or you want an upgrade, installing a new faucet sprayer is a relatively simple process. You can replace just the sprayer head, the entire hose assembly, or sometimes even the diverter.
Steps for Installing a New Faucet Sprayer Head and Hose:
- Purchase the correct replacement: Ensure you buy a replacement sprayer head and hose compatible with your faucet model. It’s helpful to know the brand and model of your faucet, or bring the old parts to the store.
- Turn off water and drain: Shut off the water supply under the sink and drain the faucet.
- Remove the old sprayer and hose:
- Disconnect the sprayer head from the hose.
- Disconnect the hose from the faucet body under the sink.
- Connect the new hose to the faucet: Apply plumber’s tape to the faucet’s connection threads. Screw the new hose onto the faucet body. Hand-tighten, then snug with a wrench.
- Connect the new sprayer head to the hose: Apply plumber’s tape to the hose threads. Screw the new sprayer head onto the hose. Hand-tighten, then snug with a wrench.
- Check for clearance: Make sure the hose has enough room to move freely without kinking.
- Turn on water and test: Slowly turn the water supply back on. Check all connections for leaks and test the sprayer function.
Kitchen Faucet Sprayer Maintenance Tips
Regular kitchen faucet sprayer maintenance can prevent many of these problems from occurring in the first place.
- Regular Cleaning: Wipe down your faucet and sprayer regularly with a soft cloth to prevent water spots and minor mineral buildup.
- Vinegar Soak: Periodically (every few months), soak the sprayer nozzle in vinegar for an hour or two to keep mineral deposits at bay.
- Check Connections: Occasionally, check the hose connections under the sink to ensure they are snug and not leaking.
- Gentle Use: Avoid yanking or twisting the sprayer hose aggressively, as this can stress the connections and the hose itself.
When to Call a Professional
While most kitchen faucet sprayer repairs are manageable for a DIY enthusiast, there are times when it’s best to call a plumber:
- If you’re uncomfortable working with plumbing.
- If you can’t identify the source of the leak or problem.
- If the issue involves the main faucet body and not just the sprayer.
- If you’ve tried the fixes and the problem persists.
- If you encounter significant corrosion or damage to your faucet or pipes.
Table: Common Faucet Sprayer Issues and Their Fixes
| Problem | Possible Cause(s) | Solution(s) |
|---|---|---|
| Faucet sprayer leaking | Worn seals/O-rings, loose connection, cracked hose | Replace seals/O-rings, tighten connections, replace hose, check nozzle |
| Clogged faucet sprayer | Mineral deposits | Soak nozzle in vinegar, brush clean |
| Sprayer not working/weak | Clogged nozzle, kinked hose, faulty diverter | Clean nozzle, check hose for kinks, inspect/replace diverter valve |
| Water from main spout always | Faulty diverter valve | Clean or replace diverter assembly |
| Leaky hose connection | Loose fitting, damaged washer | Tighten connection, replace washer, use plumber’s tape |
| Hose leaking | Crack or damage to the hose | Replace the entire sprayer hose |
Frequently Asked Questions (FAQ)
Q1: How do I know if I need to replace the entire kitchen faucet sprayer hose or just the nozzle?
A1: If the leak is coming from the hose itself, or if the hose is visibly cracked or damaged, you’ll need to replace the entire hose assembly. If the leak is only from the nozzle or its immediate connection, and the hose appears intact, you might only need to replace the nozzle or its internal seals.
Q2: Can I use any brand of sprayer hose or nozzle?
A2: It’s best to try and match the brand of your faucet for guaranteed compatibility. However, many sprayer hoses and nozzles use standard threading. If you can’t find an exact match, take your old part to the hardware store to compare sizes and thread types.
Q3: How often should I clean my faucet sprayer?
A3: For best performance and to prevent clogs, it’s a good idea to give your faucet sprayer a quick clean-up every few months. A longer soak in vinegar every 6-12 months can help tackle stubborn mineral buildup.
Q4: What is plumber’s tape used for?
A4: Plumber’s tape, also known as Teflon tape, is used to seal threaded pipe connections. When you wrap it around the threads of a faucet or hose connection, it creates a tighter, leak-proof seal.
Q5: My faucet sprayer has a button to switch between spray and stream. What if that button is stuck?
A5: A stuck button is often a sign of mineral buildup affecting the internal mechanism. Try soaking the entire sprayer head in vinegar. If that doesn’t work, you might need to disassemble the sprayer head to clean the mechanism more thoroughly, or consider a kitchen sprayer nozzle replacement.
By following these steps, you can effectively tackle most common problems with your kitchen faucet sprayer, saving you time and money. Remember to always turn off the water supply before starting any repair work. Happy fixing!