
What is a kitchen backsplash? A kitchen backsplash is a protective layer, usually made of tile, glass, or stone, placed on the wall behind your countertop and stove to shield it from spills, grease, and splashes. Can I install a backsplash myself? Yes, many backsplashes are suitable for DIY installation, especially simpler tile patterns. Who is a backsplash for? Anyone who wants to protect their kitchen walls, add style, and make cleaning easier.
Choosing the right kitchen backsplash can transform your cooking space from ordinary to extraordinary. It’s more than just a functional barrier; it’s a key design element that can tie together your cabinets, countertops, and overall kitchen aesthetic. With so many kitchen backsplash ideas and materials available, the decision can feel overwhelming. This guide aims to simplify the process, helping you find the perfect backsplash to suit your style, budget, and needs.
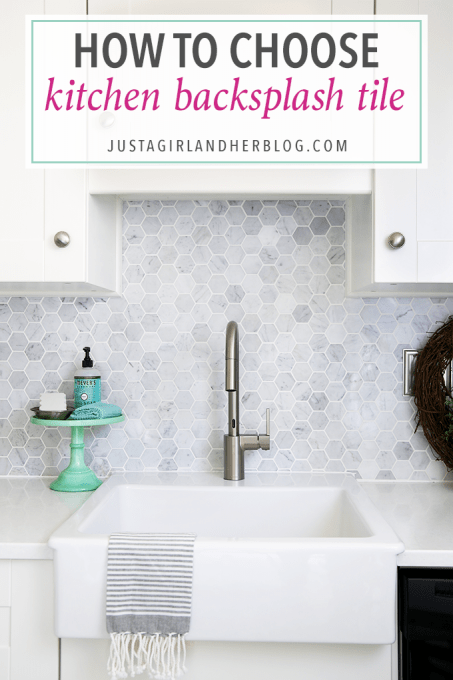
Image Source: justagirlandherblog.com
Why a Backsplash Matters
Before diving into specific choices, let’s appreciate why a backsplash is so important in any kitchen:
- Protection: This is its primary role. It guards your walls against splatters from cooking, water splashes from the sink, and general kitchen grime. This makes cleaning much easier and prevents stains and damage to your drywall.
- Style and Personality: A backsplash offers a fantastic opportunity to inject personality into your kitchen. It can be a focal point, a subtle accent, or a bold statement piece.
- Hygiene: Smooth, non-porous backsplash materials are easier to clean and can contribute to a more hygienic cooking environment.
- Increased Home Value: A well-chosen and professionally installed backsplash can add to your home’s appeal and potentially its market value.
Exploring Popular Backsplash Materials
The variety of backsplash materials available means you can achieve almost any look you desire. Each material has its own unique properties, aesthetics, and maintenance requirements.
1. Tile: The Timeless Choice
Tile remains the most popular choice for kitchen backsplashes, and for good reason. It’s durable, versatile, and comes in an endless array of styles, colors, and patterns.
Subway Tile Backsplash
The Subway tile backsplash is a classic for a reason. Its simple, rectangular shape, often laid in a brick or herringbone pattern, offers a clean, timeless look.
- Pros:
- Versatile: Works with almost any kitchen style, from modern to farmhouse.
- Affordable: Generally one of the most budget-friendly options.
- Easy to Clean: Smooth surfaces are simple to wipe down.
- DIY-Friendly: Relatively easy for beginners to install.
- Cons:
- Grout Lines: Can require regular cleaning to prevent staining.
- Can be Common: While classic, it might not feel unique if not customized.
- Material Options: Ceramic, porcelain, glass, and natural stone can all be found in subway tile shapes.
Mosaic Tile Backsplash
A Mosaic tile backsplash features small tiles of various shapes, colors, and materials, often pre-arranged on mesh backing for easier installation.
- Pros:
- Intricate Designs: Allows for complex patterns, gradients, and artistic flair.
- Visually Interesting: Adds texture and depth to your kitchen.
- Can Cover Irregularities: The small tile size can camouflage minor wall imperfections.
- Cons:
- Grout Intensive: More grout lines mean more cleaning and potential for staining.
- Can be Expensive: Depending on the materials and complexity, mosaics can be pricier.
- Installation Skill: Can be more challenging for DIYers, especially intricate patterns.
- Material Options: Glass, ceramic, porcelain, natural stone, metal, and even shell are common in mosaics.
Other Popular Tile Types:
- Ceramic Tile: Durable, affordable, and available in countless finishes. Glazed ceramic is easy to clean.
- Porcelain Tile: Similar to ceramic but denser and less porous, making it more durable and water-resistant.
- Glass Tile: Offers a sleek, modern look. It’s non-porous and reflects light beautifully, making kitchens feel brighter. Available in various forms:
- Glass Subway Tiles: A modern twist on the classic.
- Glass Mosaics: Delicate and often shimmering.
- Glass Sheets: Large panels for a seamless look.
- Natural Stone Tile: Includes marble, granite, slate, and travertine. Each offers unique beauty but requires sealing and can be more porous and prone to staining.
2. Stone: Natural Beauty and Durability
Natural stone backsplashes bring an organic elegance and a sense of luxury to your kitchen.
Granite Backsplash
A Granite backsplash is a fantastic choice for those seeking durability and a natural, sophisticated look.
- Pros:
- Extremely Durable: Resistant to heat, scratches, and stains (when sealed).
- Unique Patterns: Each slab of granite is one-of-a-kind.
- Adds Value: Increases the perceived value of your kitchen.
- Cons:
- Cost: Can be one of the more expensive backsplash materials.
- Requires Sealing: Needs regular sealing to maintain its stain resistance.
- Heavy: Can be challenging for DIY installation due to weight.
- Variations: Can be used as full slabs or as cut tiles.
Marble Backsplash
A Marble backsplash exudes timeless elegance and luxury.
- Pros:
- Classic Beauty: Unmatched sophistication and a soft, luxurious feel.
- Cool Surface: Ideal for baking preparation.
- Cons:
- Porous: Highly susceptible to staining from acidic foods (wine, lemon juice, tomato sauce). Requires frequent sealing.
- Soft: Can scratch or etch more easily than granite.
- High Maintenance: Requires careful cleaning and immediate spill cleanup.
- Cost: Generally more expensive than ceramic or porcelain.
- Considerations: Honed marble is less prone to etching than polished.
3. Other Notable Materials
- Stainless Steel: Modern, sleek, and very easy to clean. Great for a professional or industrial look, but can show fingerprints and scratches.
- Glass Sheets/Backpainted Glass: Provides a seamless, reflective surface. Very easy to clean and modern. Can be expensive and requires professional installation.
- Metal Tiles: Copper, brass, or tin tiles offer unique metallic finishes and can add warmth or industrial chic. They can be pricier and require specific cleaning methods.
- Wood: Less common due to its susceptibility to moisture and heat, but can be used in specific applications (e.g., reclaimed wood for a rustic look, sealed very carefully).
- Brick: Offers a rustic, industrial, or farmhouse charm. Can be porous and requires sealing. Grout lines need regular attention.
Key Considerations When Choosing Your Backsplash
Selecting the perfect backsplash involves balancing aesthetics, practicality, and your budget.
1. Style and Aesthetics
- Match Your Kitchen: Consider your cabinet style, countertop material, flooring, and overall kitchen theme.
- Modern Kitchens: Often benefit from sleek materials like glass, stainless steel, or geometric mosaics. Large format tiles or seamless glass sheets can enhance this look.
- Traditional Kitchens: Subway tiles, natural stone like granite or marble, or classic ceramic patterns work well.
- Farmhouse Kitchens: Look for subway tiles, brick, or natural stone with a more rustic finish.
- Transitional Kitchens: Blend elements of modern and traditional, allowing for more flexibility. A classic subway tile in a bolder color or an interesting pattern can bridge this gap.
- Color Palette:
- Complementary Colors: Choose a backsplash that either complements or contrasts with your countertops and cabinets.
- Neutral Backsplashes: White, beige, grey, or black tiles offer a timeless and versatile backdrop.
- Bold Backsplashes: A vibrant color or intricate pattern can serve as a statement piece, but ensure it doesn’t overpower the room.
- Texture and Finish:
- Glossy: Reflects light, making spaces feel larger and brighter. Easier to clean but can show water spots.
- Matte: Absorbs light, offering a softer look. Less prone to showing smudges or water marks.
- Textured: Adds depth and visual interest but can be harder to clean if the texture is deep.
2. Durability and Maintenance
- High-Traffic Areas: If your kitchen is a busy hub, opt for durable and low-maintenance materials like porcelain, granite, or glass.
- Near the Stove: Consider materials that are heat-resistant and easy to wipe clean from grease splatters. Metal, glass, and sealed stone are good options.
- Near the Sink: Water resistance is key. Porcelain, glass, and properly sealed stone are suitable.
- Grout Considerations: The amount and color of grout significantly impact maintenance. Lighter grout can stain more easily. Consider epoxy grout for superior stain resistance, or darker grout to hide spills.
3. Budget and Backsplash Cost
The Backsplash cost can vary wildly depending on the material, complexity of the design, and installation method.
- Affordable Options: Ceramic subway tiles, basic porcelain tiles, and vinyl or peel-and-stick options are generally the most budget-friendly.
- Mid-Range Options: Glass tiles, more intricate ceramic patterns, some natural stone tiles (like travertine), and metal tiles often fall into this category.
- High-End Options: Marble, granite slabs, intricate mosaic designs, custom glass, and exotic stones are typically the most expensive.
Cost Breakdown Factors:
| Factor | Impact on Cost |
|---|---|
| Material | Natural stone, glass, and metal are usually pricier. |
| Complexity of Design | Intricate patterns, custom cuts, and detailed mosaics cost more. |
| Installation | Professional installation adds significantly to the cost. |
| Size of Area | Larger areas require more material and labor. |
| Preparation | If the wall needs significant prep, costs increase. |
4. Backsplash Installation: DIY vs. Professional
Deciding on Backsplash installation is a crucial step.
DIY Kitchen Backsplash
A DIY kitchen backsplash can save money and be a rewarding project.
- Pros:
- Cost Savings: Eliminates professional labor fees.
- Customization: Full control over the process.
- Sense of Accomplishment: A great way to personalize your home.
- Cons:
- Time Commitment: Can be time-consuming, especially for beginners.
- Potential for Errors: Mistakes can be costly to fix and affect the final look.
- Tool Requirements: You’ll need specific tools like tile cutters, trowels, spacers, and grout floats.
- Best for DIY: Ceramic or porcelain subway tiles, simple mosaic patterns on mesh backing, and peel-and-stick options.
Professional Installation
Hiring a professional guarantees a high-quality finish.
- Pros:
- Expertise: Professionals have the skills and experience for a perfect finish.
- Efficiency: They can complete the job quickly and correctly.
- Wider Material Choice: They can handle complex materials like large stone slabs or intricate glass installations.
- Cons:
- Higher Cost: Professional labor fees can significantly increase the overall backsplash cost.
- Scheduling: You’ll need to coordinate with their availability.
The Backsplash Design Process: Step-by-Step
Let’s outline a systematic Backsplash design approach.
Step 1: Define Your Style and Inspiration
- Browse magazines, Pinterest, Houzz, and Instagram for kitchen backsplash ideas.
- Save images that appeal to you and look for common themes (colors, materials, patterns).
- Consider your existing kitchen elements: cabinets, countertops, appliances, flooring.
Step 2: Choose Your Material(s)
- Based on your style, budget, and maintenance preferences, narrow down your material options.
- Get samples of potential materials to see how they look in your kitchen’s lighting with your actual cabinets and countertops.
Step 3: Select Your Pattern and Layout
- For tiles, decide on the laying pattern (e.g., running bond, stacked, herringbone, diagonal).
- Consider the grout color. A contrasting grout can highlight the tile pattern, while a matching grout creates a more cohesive look.
Step 4: Measure and Calculate
- Measure the height and width of the area to be covered. Don’t forget to account for outlets and windows.
- Add an extra 10-15% to your measurements to account for cuts, waste, and potential breakage.
Step 5: Budgeting
- Factor in the cost of materials, adhesive, grout, sealant (if needed), and any tools or professional labor.
- Compare quotes if you’re hiring a professional.
Step 6: Installation Planning
- If DIY, gather all necessary tools and familiarize yourself with the installation process. Watch tutorials for specific tile types or patterns.
- If hiring a professional, book them in advance and confirm the scope of work.
Frequently Asked Questions (FAQ)
Q1: How high should a kitchen backsplash go?
A: The standard height for a kitchen backsplash is typically from the countertop to the bottom of the upper cabinets. However, you can extend it higher, all the way to the ceiling, for a more dramatic look or for better wall protection, especially behind the stove.
Q2: What is the easiest backsplash to clean?
A: Backsplashes made of large, smooth, non-porous materials with minimal grout are the easiest to clean. Examples include large-format porcelain tiles, glass sheets, stainless steel, and solid surface materials like quartz or granite slabs.
Q3: Can I put a backsplash over existing tile?
A: In some cases, yes. If the existing tile is in good condition, flat, and securely adhered, you might be able to install a new thin tile or material directly over it. However, it’s crucial to ensure the surface is clean and properly prepped. For thicker materials or if the existing tile is uneven, removal is usually recommended for a professional finish.
Q4: What’s the difference between granite and marble for a backsplash?
A: Granite is much harder, denser, and less porous than marble. This makes granite more resistant to stains, etching, and scratches, requiring less maintenance. Marble is softer, more porous, and prone to etching from acids (like lemon juice) and staining. Marble offers a softer, more luxurious look, while granite provides superior durability.
Q5: How much grout do I need for my backsplash?
A: It’s best to calculate your needs based on the total square footage of your backsplash area, the size of your tiles, and the width of your grout lines. Most tile manufacturers provide grout calculators on their websites, or your tile supplier can help you estimate. It’s always wise to buy a little extra.
Choosing your kitchen backsplash is an exciting part of the renovation process. By considering your style, the practicality of the materials, your budget, and the installation method, you can confidently select a backsplash that enhances your kitchen’s beauty and functionality for years to come.