
Yes, you can absolutely paint your kitchen cabinets with chalk paint for a beautiful and updated look! Chalk painting kitchen cabinets is a popular and accessible DIY project that can completely transform your space without the need for extensive priming or sanding. This guide will walk you through everything you need to know to achieve stunning DIY chalk painted cabinets.
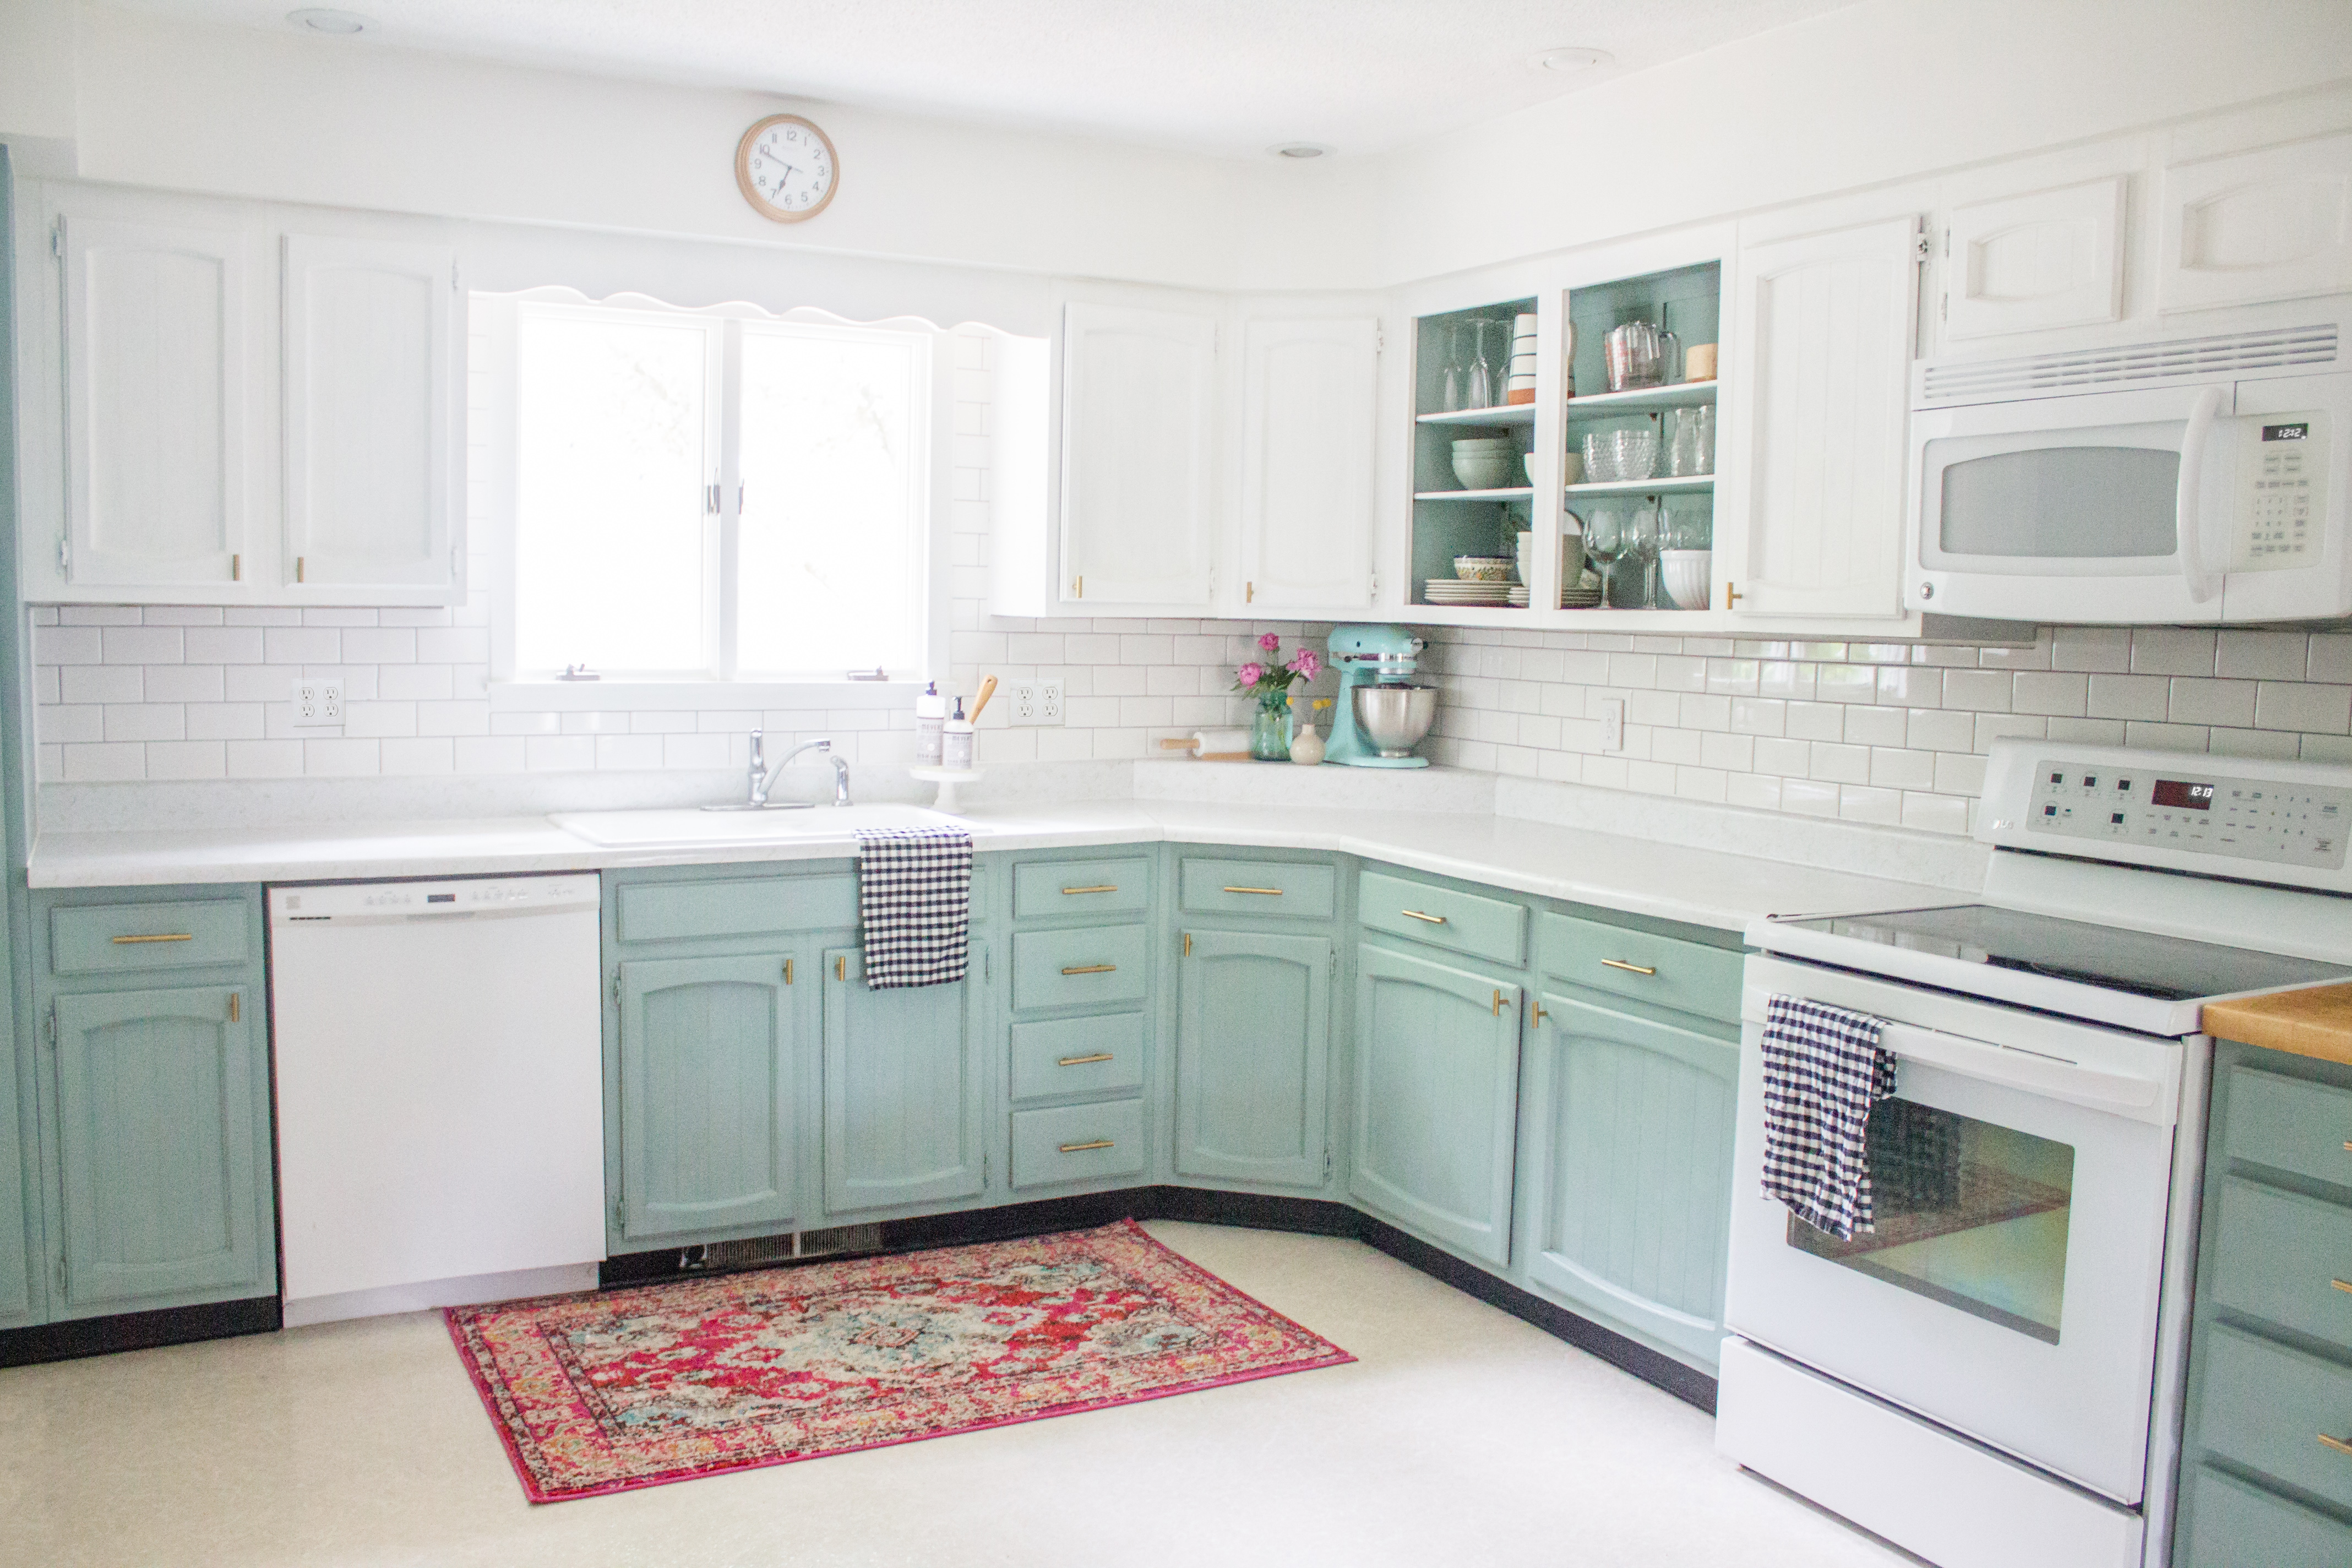
Image Source: hollandavenuehome.com
Why Choose Chalk Paint for Your Kitchen Cabinets?
Chalk paint has gained immense popularity in the DIY world, especially for furniture and cabinets, for several compelling reasons. Its unique formulation offers several advantages that make it a fantastic choice for a chalk paint cabinet makeover.
The Magic of Chalk Paint
- Minimal Prep Work: Unlike traditional cabinet paints, chalk paint adheres exceptionally well to most surfaces with little to no sanding or priming required. This drastically cuts down on the time and effort involved in preparing your cabinets.
- Versatile Finish: Chalk paint provides a matte, velvety finish that is perfect for achieving a vintage, distressed, or modern farmhouse look. It’s also incredibly forgiving, allowing you to easily correct mistakes.
- Easy to Distress: If you love a Shabby Chic or antique aesthetic, chalk paint makes it simple to distress your cabinets. A light sanding reveals the layers beneath, adding character and depth.
- Good Coverage: Typically, chalk paint offers excellent coverage, meaning you often need fewer coats than with other paint types.
- Low VOCs: Many chalk paint brands are low in Volatile Organic Compounds (VOCs), making them a healthier choice for your home environment.
What Makes Chalk Paint Different?
Chalk paint contains chalk (calcium carbonate), kaolin clay, and pigments. This unique blend creates a porous surface that grips onto paint without the need for harsh chemicals or extensive sanding. It’s the porous nature that allows it to adhere so well and be so easy to distress. When you want to paint your kitchen cabinets with chalk paint, you’re opting for a user-friendly and aesthetically pleasing method.
The Best Chalk Paint for Cabinets: What to Look For
When embarking on painting kitchen cabinets with chalk paint, selecting the best chalk paint for cabinets is crucial. Not all chalk paints are created equal, and some are better suited for high-traffic areas like kitchens.
Key Features to Consider:
- Durability: Kitchen cabinets are subject to a lot of wear and tear, including moisture, grease, and frequent touch. Look for chalk paints known for their durability or those that are specifically formulated for furniture and cabinetry.
- Sheen: While most chalk paints have a matte finish, some brands offer variations with a slight sheen, which can be more practical for kitchens. However, the matte finish can be easily enhanced with a durable topcoat.
- Color Selection: Chalk paint comes in an incredible array of colors. Consider your kitchen’s existing decor and choose a palette that complements your style.
- Brand Reputation: Established brands often have a track record of quality and consistency. Research popular chalk paint brands known for their excellent adhesion and finish.
Popular Chalk Paint Brands:
While many brands offer chalk paint, a few are consistently praised for their performance on cabinets:
- Annie Sloan Chalk Paint: The originator of chalk paint, Annie Sloan is renowned for its creamy texture and extensive color line. It’s a premium choice and a favorite for many DIYers.
- Fusion Mineral Paint: While technically a mineral paint, Fusion behaves similarly to chalk paint with excellent adhesion and durability. It often requires less sealing.
- Dixie Belle Paint: This brand offers a wide range of colors and has specific lines, like “Silk All-In-One Mineral Paint,” that are excellent for cabinets and often don’t require a separate topcoat.
- Rust-Oleum Chalked Ultra Matte Paint: A more budget-friendly option found at major retailers, this paint offers good coverage and a chalky finish.
- BEHR Premium Plus Ultra Interior Paint (with chalk finish additive): For a more readily available option, you can add a chalk finish additive to a good quality latex paint.
Pro Tip: For kitchens, it’s highly recommended to use a durable topcoat like furniture wax or polycrylic over your chalk paint for added protection.
Your Step-by-Step Guide to Chalk Painting Kitchen Cabinets
Ready to transform your kitchen? Here’s a detailed breakdown of how to chalk paint kitchen cabinets. This process, when followed carefully, will yield beautiful and lasting results for your chalk paint cabinet makeover.
Step 1: Prep for Chalk Painted Cabinets – The Foundation of Success
Even though chalk paint requires less prep, prep for chalk painted cabinets is still a critical step. Skipping this can lead to adhesion issues and a less-than-perfect finish.
Gathering Your Supplies:
- Screwdriver: To remove hardware.
- Degreaser/Cleaner: TSP (trisodium phosphate) or a strong kitchen degreaser.
- Rags or Sponges: For cleaning.
- Drop Cloths: To protect your floors and countertops.
- Painter’s Tape: To mask off areas you don’t want to paint.
- Sanding Block or Fine-Grit Sandpaper (150-220 grit): For minor scuff sanding.
- Microfiber Cloths: For dusting.
- Chalk Paint: Your chosen brand and color.
- Paintbrushes: High-quality synthetic or natural bristle brushes.
- Paint Rollers: Small foam rollers for smooth surfaces.
- Chalk Paint Wax or Polycrylic Topcoat: For sealing and durability.
- Wax Brush or Applicator Pads: For wax application.
- Clean Rags: For buffing wax.
- Optional: Primer (if cabinets are very glossy or dark): A bonding primer can be helpful.
Preparing Your Cabinets:
- Empty Cabinets: Remove all items from your cabinets and drawers.
- Remove Hardware: Unscrew door hinges, drawer pulls, and knobs. Place them in a baggie so you don’t lose any pieces. Consider upgrading your hardware for an even bigger impact!
- Clean Thoroughly: This is arguably the most important step. Kitchen cabinets accumulate grease, grime, and food splatters.
- Use a strong degreaser like TSP or a heavy-duty kitchen cleaner. Mix according to package directions.
- Wipe down all surfaces of your cabinets, doors, and drawer fronts. Pay close attention to areas around the stovetop and sink.
- Rinse thoroughly with clean water and a damp rag. Ensure all cleaner residue is removed, as this can interfere with paint adhesion.
- Allow cabinets to dry completely.
- Light Scuff Sanding (Optional but Recommended): While chalk paint adheres well, a light scuff sand can create a better “tooth” for the paint to grip onto, especially on very smooth or laminate surfaces.
- Use a sanding block or fine-grit sandpaper (150-220 grit).
- Lightly go over all surfaces you plan to paint. You don’t need to remove the existing finish, just create a dull surface.
- Wipe away all dust with a damp cloth, then a dry microfiber cloth. Ensure no dust remains.
- Tape Off Areas: Use painter’s tape to protect any areas you don’t want to paint, such as cabinet interiors, countertops, or appliance edges.
Step 2: Applying the Chalk Paint
Now for the fun part: painting! Painting kitchen cabinets with chalk paint is a straightforward process.
Application Techniques:
- Stir, Don’t Shake: Chalk paint can settle. Stir the paint gently but thoroughly. Avoid shaking, as this can create air bubbles.
- Apply First Coat:
- Start with a thin, even coat. Use a good quality brush or a small foam roller.
- Work in sections, painting in the direction of the wood grain if applicable.
- Don’t worry about perfect coverage on the first coat; it’s normal for it to look a bit streaky.
- Allow the first coat to dry completely. Drying times vary depending on humidity and paint brand, but typically range from 30 minutes to a few hours.
- Apply Second Coat:
- Apply a second coat in the same manner as the first.
- This coat should provide much better coverage.
- Allow the second coat to dry completely.
- Apply Third Coat (If Needed): For deeper colors or to ensure uniform coverage, a third coat may be necessary.
Tips for a Smooth Finish:
- Use the Right Tools: High-quality brushes and rollers make a big difference.
- Thin Coats are Key: Multiple thin coats are always better than one thick coat.
- Avoid Overworking the Paint: Apply and move on; let the paint do its work.
Step 3: Distressing Your Cabinets (Optional)
If you love the look of chalk painted cabinet ideas with a bit of age and character, this step is for you. How to distress chalk painted cabinets is surprisingly simple.
The Distressing Process:
- Ensure Paint is Fully Dry: Wait at least 24 hours after your last coat of paint.
- Choose Your Distress Areas: Common areas to distress include edges, corners, and raised panels, mimicking natural wear and tear.
- Lightly Sand:
- Use a sanding block or fine-grit sandpaper (150-220 grit).
- Gently rub the sandpaper over the areas you want to distress.
- The chalk paint will easily wear away, revealing the wood or primer color underneath.
- Start with a light touch and gradually increase pressure as needed. You can always remove more paint, but you can’t put it back!
- Wipe Away Dust: Use a clean, dry microfiber cloth to wipe away the dust created by sanding.
Step 4: Finishing Your Chalk Painted Cabinets – Protection and Shine
This is a crucial step for ensuring your chalk paint cabinet finishing is durable and long-lasting. Chalk paint, by itself, is not very durable.
Sealing Your Cabinets:
You have two main options for sealing chalk paint: wax or a water-based polycrylic.
Option A: Furniture Wax
Furniture wax provides a beautiful, soft sheen and protects the chalk paint. It’s the traditional method for sealing chalk paint.
- Type of Wax: Use a high-quality furniture wax specifically designed for painted surfaces. Clear wax is standard, but dark wax can be used for an aged look.
- Application:
- Ensure your paint is completely dry and any distressed areas have been wiped clean of dust.
- Apply the wax with a good-quality wax brush or an applicator pad. Work in thin, even coats.
- Work in small sections, applying the wax in the direction of the paint strokes.
- Allow the wax to “haze over” (become dull) for about 10-20 minutes, depending on humidity.
- Buff the waxed surface with a clean, lint-free cloth (like an old cotton t-shirt or microfiber cloth). This brings out the sheen.
- Apply a second thin coat of wax for extra durability, repeating the buffing process.
- Curing Time: Wax takes about 30 days to fully cure and harden. During this time, be gentle with your cabinets and avoid harsh cleaning.
Option B: Polycrylic Topcoat
A water-based polycrylic (like Minwax Polycrylic) offers superior durability, especially in a kitchen environment. It’s a great choice if you want a more robust finish and are concerned about wax not being durable enough.
- Type of Topcoat: Choose a water-based polycrylic in a matte, satin, or semi-gloss finish. Matte will maintain the chalky feel, while satin or semi-gloss will add more sheen and washability.
- Application:
- Ensure your paint is completely dry and any distressed areas are dust-free.
- If you used a dark chalk paint, consider using a water-based polycrylic in a “clear” or “low-sheen” formula to avoid yellowing the paint.
- Apply thin, even coats using a high-quality synthetic brush or a foam roller. Avoid overworking the product.
- Allow each coat to dry completely according to the manufacturer’s instructions (typically 1-2 hours).
- Lightly sand between coats with very fine-grit sandpaper (220-320 grit) for a smoother finish. Wipe away dust with a damp cloth, then a dry cloth.
- Apply 2-3 coats for best results.
- Curing Time: Polycrylic cures relatively quickly but takes about 7 days to reach full hardness.
Which to Choose? Wax vs. Polycrylic:
| Feature | Furniture Wax | Polycrylic Topcoat |
|---|---|---|
| Sheen | Soft, matte, velvety | Matte, Satin, Semi-Gloss, Gloss |
| Durability | Moderate, requires reapplication over time | High, very durable |
| Application | Easy, buffing required | Easy, light sanding between coats recommended |
| Feel | Smooth, slightly textured | Smooth, depending on sheen level |
| Best For | Decorative pieces, low-traffic areas, vintage look | Kitchen cabinets, high-traffic areas, modern look |
For chalk paint cabinet finishing in a kitchen, polycrylic is generally the more practical and durable choice.
Step 5: Reassembling Your Cabinets
Once your doors and drawers are fully painted and sealed, it’s time to put everything back together.
- Reattach Hardware: Screw your original or new hardware back onto the cabinet doors and drawers.
- Rehang Doors and Reinsert Drawers: Carefully reattach the doors to the cabinet frames using the hinges. Slide the drawers back into place.
- Clean Up: Remove all painter’s tape and drop cloths. Give your newly painted cabinets a final wipe-down.
Maintaining Your Chalk Painted Cabinets
Proper chalk paint cabinet cleaning and maintenance will ensure your beautiful DIY project lasts for years to come.
Routine Cleaning:
- For Waxed Finishes:
- Use a soft, damp cloth for everyday spills and smudges.
- Avoid abrasive cleaners or scrub brushes.
- For tougher spots, use a very mild soap solution and wipe immediately.
- If the wax finish starts to wear thin, reapply a thin coat of wax and buff as needed.
- For Polycrylic Finishes:
- These are much more durable and can be cleaned with a damp cloth and mild dish soap.
- You can also use non-abrasive all-purpose cleaners.
- Avoid harsh chemicals or excessive scrubbing.
Important Considerations:
- Curing Time: Remember that both wax and polycrylic need time to fully cure. Be gentle with your cabinets for the first month to avoid chipping or scratching the finish.
- Heat and Moisture: While durable, extreme heat (like from a toaster oven vent directly hitting the cabinet) or prolonged exposure to moisture can still affect the finish over time.
Chalk Painted Cabinet Ideas for Inspiration
The beauty of chalk paint is its versatility. Here are some chalk painted cabinet ideas to spark your creativity:
- Classic White or Cream: A timeless choice that brightens any kitchen and pairs well with almost any countertop or backsplash.
- Soft Grays or Blues: Offer a subtle pop of color while maintaining a sophisticated feel.
- Deep Greens or Navies: Create a dramatic and luxurious statement.
- Two-Tone Kitchens: Paint upper cabinets white or cream and lower cabinets a darker shade like charcoal or navy for visual interest.
- Distressed Finish: Achieve a charming vintage look by lightly sanding edges and corners.
- Chalk Paint and Stencil Accents: Add decorative stencils to cabinet doors for a unique touch.
- Clear Wax vs. Dark Wax: Use clear wax for a natural look or dark wax to highlight details and create an aged patina.
Frequently Asked Questions (FAQ)
Q1: Do I need to prime before chalk painting kitchen cabinets?
A1: Generally, no. Chalk paint adheres well to most surfaces without primer. However, if your cabinets are very slick, glossy, laminate, or a very dark color you want to cover with a light color, applying a bonding primer can improve adhesion and reduce the number of chalk paint coats needed.
Q2: Can I use chalk paint on laminate cabinets?
A2: Yes, you can! Laminate can be tricky, but chalk paint usually adheres well. Thorough cleaning and a light scuff sand are essential. Some people also prefer to use a bonding primer specifically designed for slick surfaces before chalk painting laminate.
Q3: How many coats of chalk paint do I need?
A3: Typically, two coats are sufficient for good coverage. However, this can vary depending on the paint color, the original cabinet color, and the brand of chalk paint used. Some deep colors or light colors over dark surfaces might require a third coat.
Q4: Do I have to seal chalk paint?
A4: Absolutely yes. Chalk paint itself is quite fragile and not durable enough for a kitchen environment on its own. You must seal it with a furniture wax or a durable topcoat like polycrylic to protect it from moisture, grease, and wear.
Q5: How long does chalk paint take to dry?
A5: Chalk paint usually dries to the touch within 30 minutes to an hour. However, drying times can vary based on humidity and paint thickness. It’s important to let it dry completely between coats, which might take a few hours. Full curing, however, takes much longer (up to 30 days for wax, 7 days for polycrylic).
Q6: Can I paint my cabinet interiors with chalk paint?
A6: While technically possible, it’s generally not recommended for cabinet interiors. The porous nature of chalk paint can make it difficult to clean in the enclosed space, and it might absorb odors. A more durable and washable paint, like a semi-gloss enamel, is usually a better choice for interiors.
Q7: What is the best way to clean chalk painted cabinets?
A7: For routine cleaning, use a soft, damp cloth. For tougher messes, a mild soap and water solution is usually sufficient for a polycrylic finish. For waxed finishes, use minimal water and avoid abrasive cleaners. Always gently wipe dry.
Q8: Can I get a smooth finish with chalk paint?
A8: Chalk paint naturally has a matte, sometimes slightly textured finish. To achieve a smoother finish, use high-quality brushes, apply thin coats, and consider a light sanding between coats of your topcoat (polycrylic).
By following these detailed steps, you can confidently tackle your DIY chalk painted cabinets project and achieve a beautiful, updated kitchen that you’ll love. Happy painting!