
Can I adjust my kitchen cupboard hinges? Yes, you absolutely can! What is the purpose of adjusting kitchen cupboard hinges? Adjusting cupboard hinges allows you to perfectly align your cabinet doors, fix sagging, ensure smooth opening and closing, and improve the overall look and functionality of your kitchen. This guide will walk you through the simple steps of cabinet hinge adjustment to achieve that flawless finish.
Sagging cabinet doors or doors that don’t close properly are common kitchen frustrations. Fortunately, these issues are usually a simple fix involving cabinet hinge adjustment. With a screwdriver and a little patience, you can tackle cupboard door alignment and say goodbye to wonky doors. Whether you’re dealing with fixing sagging cabinet doors or just want to fine-tune their position, this guide covers how to adjust cabinet hinges for most common types.
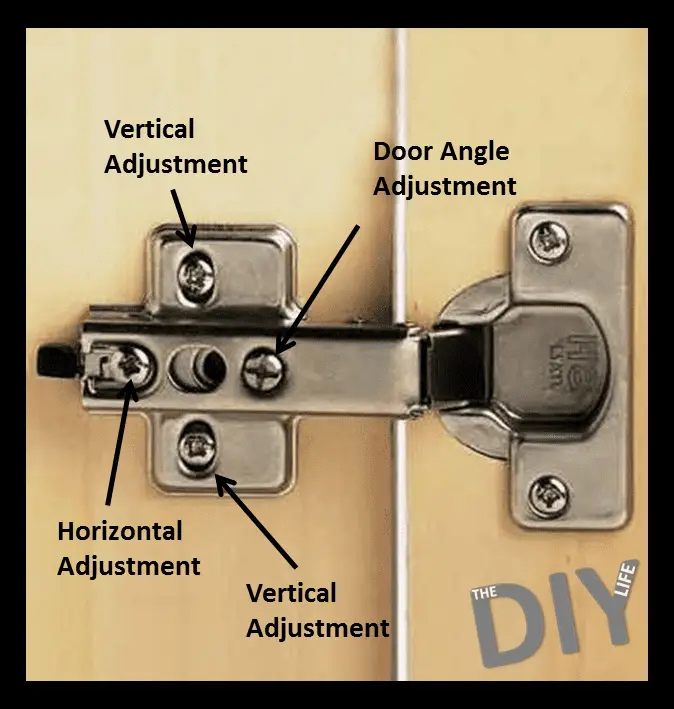
Image Source: www.the-diy-life.com
Why Adjust Your Cabinet Hinges?
Several reasons might prompt you to learn how to adjust cabinet hinges:
- Misalignment: Doors might not sit flush with the cabinet frame, leaving gaps.
- Sagging: Over time, doors can droop, especially heavier ones, affecting their alignment.
- Rubbing: Doors may rub against adjacent cabinets or the frame, making them difficult to open or close.
- Uneven Gaps: The space between doors or between a door and the frame might be inconsistent.
- Aesthetic Improvement: Simply wanting a perfectly polished and professional look for your kitchen.
- Self-Closing Issues: If your cabinets have self-closing mechanisms, they might not be engaging correctly due to misalignment.
Tools You’ll Need
Before you start, gather these essential tools:
- Phillips Head Screwdriver: Most cabinet hinges use Phillips screws.
- Flathead Screwdriver: Some older hinges or specific adjustment screws might require a flathead.
- Measuring Tape or Ruler: To check for even gaps.
- Level: To ensure doors are hanging straight.
- Wooden Shims or Cardboard Strips: Useful for temporarily supporting doors or creating small adjustments.
- A Helper (Optional but Recommended): An extra pair of hands can be incredibly helpful, especially when supporting heavier doors.
Identifying Your Cabinet Hinges
The type of hinge you have will determine the specific adjustment screws you’ll be working with. Most modern kitchen cabinets use concealed hinges (also known as European or Euro hinges). These are hidden within the cabinet door when closed, offering a clean look.
Common Concealed Hinge Types and Their Adjustments
Concealed hinges typically offer three-way adjustment:
- In-Out (Depth Adjustment): This moves the door closer to or further away from the cabinet frame.
- Up-Down (Height Adjustment): This adjusts the door’s vertical position.
- Left-Right (Side-to-Side Adjustment): This moves the door left or right within the cabinet opening.
Let’s break down how to adjust cabinet hinges for each type.
Overlay Cabinet Hinge Adjustment
Overlay hinges are the most common for concealed systems. The door sits on top of the cabinet frame. You’ll typically see two or three screws on the hinge arm that attaches to the cabinet itself.
- Screw 1 (Usually closest to the door): This is often the in-out adjustment screw. Turning it usually moves the door forward or backward.
- Screw 2 (Further from the door): This is typically the left-right adjustment screw. Turning it moves the door horizontally.
- Screw 3 (Sometimes on the mounting plate, or a slot): This screw or slot facilitates up-down adjustment. You might need to loosen this screw slightly, reposition the door, and then retighten.
Inset Cabinet Hinge Adjustment
Inset hinges are less common but are used when the cabinet door sits inside the cabinet frame. These adjustments can be a bit more intricate, and you might find fewer adjustment screws directly on the hinge. Often, the adjustment is made at the mounting plate attached to the cabinet frame.
- Horizontal Adjustment: Loosen the screws holding the mounting plate to the cabinet. Shift the plate horizontally as needed. Re-tighten.
- Vertical Adjustment: Some mounting plates have slots that allow for up-down adjustment when the screws are loosened.
- Depth Adjustment: This might involve a specific screw on the hinge arm itself, similar to overlay hinges, or it might be integrated into the mounting plate’s design.
Self-Closing Hinge Adjustment
Many concealed hinges have a self-closing hinge adjustment feature. This is usually a spring mechanism.
- Spring Tension: Some hinges have a screw that adjusts the tension of the spring. Tightening this screw increases the closing force and speed, while loosening it reduces it. Be cautious not to overtighten, as this can damage the spring or hinge.
- Door Sag: If the self-closing mechanism isn’t engaging properly, it might be due to door sag, which is addressed by the other adjustments.
Step-by-Step Guide to Adjusting Cabinet Hinges
Follow these steps to get your doors looking perfect. It’s best to tackle one door at a time.
Step 1: Assess the Problem
Before you touch any screws, identify exactly what’s wrong with the door.
- Is it crooked? Use a level.
- Are the gaps uneven? Measure the gaps on all sides.
- Does it sag? Check the top corners.
- Does it rub? See where contact is being made.
Step 2: Prepare the Door
It’s often easier to make adjustments with the door slightly ajar.
- For minor adjustments: You might be able to do this with the door closed or slightly open.
- For significant adjustments: It might be helpful to have your helper support the door, or you can prop it open with shims.
Step 3: Locate the Adjustment Screws
Open the cabinet door wide. Look at the hinge. You should see at least two screws attached to the hinge arm that connects to the cabinet.
- Overlay Hinges: The screws are usually on the part of the hinge attached to the cabinet frame.
- Inset Hinges: The adjustment points might be on the hinge itself or the mounting plate.
Step 4: Making the Adjustments
Here’s where the actual cabinet hinge screw adjustment comes into play. Remember to make small adjustments and check the results after each turn.
Adjusting for Left-Right Alignment
This is for doors that are not centered in the opening or are too close to one side.
- Identify the side-to-side screw. This is typically the screw furthest from the door’s edge on the hinge arm.
- Turn the screw:
- To move the door to the left: Turn the screw clockwise.
- To move the door to the right: Turn the screw counter-clockwise.
- Check the door: Close the door gently and see if the alignment has improved. You may need to adjust both hinges on a single door to achieve the desired effect.
Adjusting for Up-Down Alignment
This addresses sagging doors or doors that are too high or too low.
- Identify the up-down adjustment. This can be the trickiest.
- Method 1 (Screw on Hinge Arm): Some hinges have a dedicated up-down adjustment screw, often requiring you to loosen a slightly longer screw on the hinge arm that is slotted into the mounting plate. Once loosened, you can slide the door up or down.
- Method 2 (Mounting Plate Screws): On the mounting plate attached to the cabinet frame, you might find two screws. Loosening these slightly allows you to tilt or slide the door up or down.
- Make the adjustment:
- To raise the door: Adjust the screws to lift it.
- To lower the door: Adjust the screws to lower it.
- Tighten and check: Retighten any loosened screws and check the door’s position. Repeat if necessary.
Adjusting for In-Out (Depth) Alignment
This is for doors that stick out too far or are too close to the cabinet frame, or if the door face isn’t flush.
- Identify the depth screw. This is usually the screw closest to the door on the hinge arm.
- Turn the screw:
- To move the door further in (recess it): Turn the screw clockwise.
- To move the door further out: Turn the screw counter-clockwise.
- Check the door: Close the door and observe the change.
Adjusting Door Tension (Self-Closing Hinge Adjustment)
If your self-closing hinges are too fast, too slow, or not closing at all:
- Locate the spring adjustment screw. This might be visible on the hinge body.
- Adjust the tension:
- Increase tension (faster/firmer close): Turn the screw clockwise.
- Decrease tension (slower/gentler close): Turn the screw counter-clockwise.
- Test: Open and close the door to see how the tension feels.
Step 5: Fine-Tuning and Checking
Once you’ve made the primary adjustments, take a step back.
- Close all doors: Ensure they all align and sit flush.
- Check for even gaps: Use your measuring tape. The gap between doors and around the frame should be consistent.
- Open and close doors: Make sure they move smoothly without sticking or rubbing.
- Test the self-closing feature: If applicable, ensure it works reliably.
Step 6: Repeat for Other Doors
If you have multiple doors that need adjustment, repeat the process for each one. It’s a good idea to do them one at a time to avoid confusion.
Troubleshooting Common Hinge Issues
Sometimes, even after adjustment, problems persist. Here’s a look at common issues and solutions.
Door Still Sagging After Adjustment
- Loose Mounting Plate Screws: Check the screws that attach the hinge mounting plate to the cabinet frame. Ensure they are tight.
- Worn Out Hinges: If the hinge itself is loose, bent, or worn, it might need replacement. This is a form of cabinet hinge repair.
- Heavy Door: Very heavy doors can put significant stress on hinges. Ensure you’re using appropriate hinges and that they are properly installed.
Doors Not Closing Properly
- Obstruction: Check for anything blocking the door’s path (e.g., a drawer front, a shelf).
- Hinge Binding: Ensure the hinge is not binding due to overtightening of screws or misalignment of the hinge cup.
- Spring Tension: The self-closing hinge adjustment might need to be set to a firmer tension.
Doors Rubbing Against Each Other
- Side-to-Side Adjustment: This is the primary adjustment for this issue. Ensure the doors are centered correctly.
- Door Overlay: If the doors have too much overlay, they might hit each other. Adjust the depth screws to recess the doors slightly.
Visible Hinge Screws After Adjustment
- Hinge Type: Some hinge styles naturally expose more of the hinge mechanism.
- Mounting Plate Issues: If the mounting plate screws are what you’re seeing, ensure they are fully tightened and that the plate is seated correctly.
Replacing Cabinet Hinges
If your hinges are old, damaged, or you simply want to update the style, replacing them is also a manageable DIY task. This falls under cabinet hinge repair in a broader sense.
How to Replace Cabinet Hinges
- Identify the Hinge Type: Take a picture of your current hinges and their measurements. Visit a hardware store or online retailer to find matching replacements. You can also look for brands or model numbers on the hinges themselves.
- Remove the Old Hinges:
- Support the cabinet door.
- Unscrew the hinge arms from the cabinet door.
- Unscrew the mounting plates from the cabinet frame.
- Install New Hinges:
- Attach the new hinge arms to the cabinet door, using the existing screw holes if possible.
- Attach the new mounting plates to the cabinet frame.
- Once the hinges and plates are installed, you’ll likely need to perform cabinet hinge adjustment to get the doors perfectly aligned, similar to the steps above.
Table: Common Hinge Adjustments and Their Effects
| Adjustment Type | Screw Location | Effect on Door |
|---|---|---|
| Left-Right | Usually the screw furthest from the door edge | Moves door left or right within the frame |
| Up-Down | Often a slotted screw on the hinge arm or plate | Moves door up or down |
| In-Out (Depth) | Usually the screw closest to the door edge | Moves door closer to or further from the cabinet frame |
| Self-Closing Tension | Specific screw on the hinge body (if applicable) | Controls the speed and force of the closing action |
Frequently Asked Questions (FAQ)
Q1: How often should I adjust my cabinet hinges?
A1: You don’t need to adjust them regularly. Adjustments are typically only needed when you notice a door is misaligned, sagging, or not closing correctly due to settling of the house, wear and tear, or after heavy use.
Q2: Can I adjust cabinet hinges without removing the doors?
A2: For most modern concealed hinges, yes, you can perform all three types of adjustments (up-down, left-right, in-out) with the doors still attached. This is one of the benefits of these hinge types.
Q3: What if my hinges don’t look like the ones in the guide?
A3: While concealed hinges are common, older kitchens or custom cabinetry might use different hinge styles (e.g., butt hinges, surface-mount hinges). The adjustment methods will vary. For butt hinges, adjustment is usually achieved by slightly loosening the mounting screws, shimming the hinge leaf, and then retightening. If you’re unsure, consult the manufacturer of your cabinets or hinges, or look for specific guides for your hinge type.
Q4: How do I know which screw to turn?
A4: In most concealed hinges, the screws are intuitively placed. The one furthest from the door edge usually controls side-to-side movement, the one closer controls in-out depth, and up-down adjustment often involves a slotted screw or slightly loosening mounting plate screws. Make small turns and observe the effect.
Q5: My doors still aren’t aligned after adjusting. What else could be wrong?
A5: If you’ve made all possible hinge adjustments and the doors are still not right, the issue might be with the cabinet structure itself. The cabinet box might be out of square or warped. In such cases, you might need to shim the mounting plates or, in severe cases, reinforce the cabinet structure. Worn-out hinges can also prevent proper alignment, requiring replacement.
Learning how to adjust cabinet hinges is a valuable skill for any homeowner. It empowers you to maintain the appearance and functionality of your kitchen with simple, readily available tools. By understanding cabinet hinge adjustment and the role of each cabinet hinge screw adjustment, you can achieve perfectly aligned cupboard door alignment, tackle fixing sagging cabinet doors, and keep your kitchen looking its best. Whether you’re performing cabinet hinge repair by replacement or fine-tuning existing ones, this guide provides the knowledge you need for a DIY success.