
Can I adjust kitchen cupboard doors myself? Yes, you can absolutely adjust kitchen cupboard doors yourself with a few simple tools and some patience. Most kitchen cabinet hinge adjustment issues can be resolved with basic screwdriver techniques.
Are your kitchen cupboard doors looking a bit wonky? Do they not close quite right, or perhaps they sag in the middle? Don’t worry, this is a common problem, and often it’s something you can fix yourself. Adjusting kitchen cupboard doors is a straightforward DIY task that can make a big difference to the look and function of your kitchen. We’ll guide you through the process of cabinet door alignment, fixing sagging cabinet doors, and ensuring your cupboard doors close smoothly every time. Whether you have traditional overlay doors or inset doors, the principles of adjustment are similar.
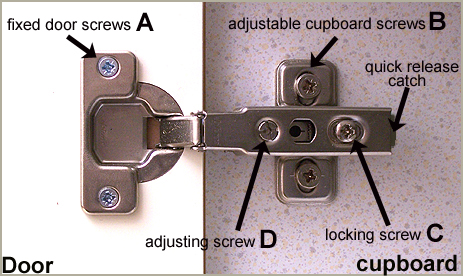
Image Source: www.handymanknowhow.co.uk
Why Do Kitchen Cupboard Doors Need Adjusting?
Over time, various factors can cause your kitchen cabinet doors to lose their alignment. These can include:
- Humidity and Temperature Fluctuations: Wood, the primary material for most cabinet doors, expands and contracts with changes in humidity and temperature. This movement can subtly shift the doors and their hinges.
- Wear and Tear: Hinges, especially in high-traffic kitchens, can loosen over time. Screws might become slightly stripped, or the hinge mechanism itself might wear down.
- Improper Installation: Sometimes, doors are not perfectly aligned from the start. This can be due to slight miscalculations during the initial installation or settling of the cabinetry over time.
- Weight of the Door: Heavier doors, or doors with items stored inside that add extra weight, can put stress on the hinges, potentially leading to sagging.
- Impacts: Accidental bumps or knocks can also misalign doors or damage hinges.
Tools You’ll Likely Need
Before you start, gather these essential tools:
- Screwdriver Set: You’ll primarily need Phillips head and flathead screwdrivers. It’s good to have a few sizes on hand. A magnetic tip can be very helpful.
- Tape Measure: For checking clearances and gaps.
- Level: To ensure your doors are perfectly vertical and horizontal.
- Pencil: To mark any necessary adjustments.
- Soft Cloth or Rag: To protect surfaces and wipe away dust.
- Optional: Drill with appropriate bits: For tightening or replacing screws if needed.
- Optional: Cabinet Shims: Thin pieces of wood or plastic that can help prop doors into position.
Deciphering Your Cabinet Hinges: The Key to Adjustment
Most modern kitchen cabinets use adjustable hinges for cabinets. These ingenious pieces of hardware are designed to allow for adjustments in three main directions:
- In/Out (Depth): This adjustment moves the door closer to or further away from the cabinet frame.
- Up/Down (Height): This controls the vertical position of the door.
- Left/Right (Horizontal): This adjustment moves the door sideways to ensure a consistent gap between doors or between the door and the cabinet frame.
Look closely at your hinges. You’ll typically find two or three adjustment screws on each hinge. The location and type of screws can vary depending on the hinge manufacturer (e.g., Blum, Hettich, Salice).
Common Hinge Types and Their Adjustment Screws
-
Overlay Hinges: These are the most common. They mount to the face of the cabinet frame.
- Screw 1 (Depth): Often located on the arm of the hinge that attaches to the door. Turning this screw moves the door in or out.
- Screw 2 (Left/Right): Usually the screw that attaches the hinge cup to the mounting plate on the cabinet frame. Loosening this screw slightly allows you to slide the hinge left or right.
- Screw 3 (Up/Down): This is often the mounting screw that secures the hinge arm to the mounting plate. Some hinges have a dedicated up/down adjustment screw. If not, slightly loosening the primary mounting screw and using a shim can achieve vertical adjustment.
-
Inset Hinges: These hinges sit within a recess (a “cup”) in the door itself.
- The adjustment screws are typically located on the hinge cup and its mounting plate. The principles for left/right, up/down, and in/out adjustments are similar, but the screws might be in different positions on the hinge body.
Table 1: Common Hinge Adjustment Screw Functions
| Screw Location/Type | Adjustment Direction | How to Adjust |
|---|---|---|
| Hinge Arm Screw | In/Out (Depth) | Turn screw to move door closer or further away. |
| Mounting Plate Screw | Left/Right | Loosen screw, slide hinge, retighten screw. |
| Main Mounting Screw | Up/Down | Loosen screw, reposition, retighten; or use shims. |
| Dedicated Up/Down Screw | Up/Down | Turn screw to raise or lower the door. |
| Soft Close Mechanism Screw | Closing Speed | Adjust screw to control how slowly the door closes. |
Step-by-Step Guide to Adjusting Kitchen Cabinet Doors
The key to smooth adjustment is to make small, incremental changes and check the results after each adjustment.
Step 1: Assess the Problem
Open and close the problematic door several times. Note exactly what’s wrong:
- Uneven Gaps: Is the gap between the door and the cabinet frame or adjacent door inconsistent?
- Door Rubbing: Does the door rub against the frame or another door?
- Sagging Door: Does the bottom of the door hang lower than the top, or does it not sit flush with the frame?
- Door Not Closing Properly: Does the door catch on something or not sit flush when closed?
Step 2: Identify the Type of Hinge and Adjustment Screws
With your tools ready, examine the hinges on the problematic door. Most kitchen cabinet door sagging or alignment issues can be traced back to these adjustable hinges.
Step 3: Making the Adjustments
Here’s how to tackle common alignment issues:
Adjusting for Left/Right Alignment (Cabinet Door Alignment)
This is often the easiest adjustment. It’s used to correct doors that are not centered in the opening or have uneven side gaps.
- Locate the Left/Right Adjustment Screw: This is usually the screw that attaches the hinge to the mounting plate on the cabinet frame.
- Loosen the Screw Slightly: Use your screwdriver to loosen this screw just enough so that the hinge can move sideways. Do not remove the screw entirely.
- Nudge the Door: Gently push the door left or right until the gap is even on both sides. Use your tape measure to ensure symmetry.
- Retighten the Screw: Once the door is in the correct position, carefully retighten the screw.
- Check: Open and close the door a few times to ensure it moves smoothly and stays aligned. If it’s still not perfect, repeat the process.
Tip: If you have two doors that meet in the middle, adjust one door at a time. You might need to slightly adjust both doors to achieve perfect alignment.
Adjusting for Up/Down Alignment (Cupboard Door Leveling)
This is for doors that are too high, too low, or seem to sag.
-
Method 1: Dedicated Up/Down Screw: Some hinges have a specific screw dedicated to vertical adjustment.
- Locate the Screw: This screw is often found on the mounting plate or the hinge arm.
- Turn the Screw: Turning it one way will raise the door, and turning it the other will lower it. Make small turns.
- Check: Open and close the door to see the effect. Repeat until the door is at the correct height.
-
Method 2: Using Mounting Screws (If No Dedicated Screw): If your hinges don’t have a specific up/down adjustment screw, you can use the screws that attach the hinge to the mounting plate.
- Loosen Mounting Screws: Loosen the screws holding the hinge to the mounting plate slightly.
- Use Shims (If Needed):
- To raise the door, place a thin shim (like a piece of cardboard or a thin plastic shim) behind the mounting plate at the top screw hole.
- To lower the door, place a shim behind the mounting plate at the bottom screw hole.
- Reposition and Retighten: Gently reposition the hinge with the shim in place and retighten the screws.
- Check: Open and close the door to see if it’s level. You might need to experiment with shim thickness or position.
Adjusting for In/Out Alignment (Depth Adjustment)
This adjustment helps to pull a door that sticks out too far closer to the cabinet, or push a door that’s too far in further out, ensuring it sits flush with the frame or other doors.
- Locate the Depth Adjustment Screw: This is usually found on the hinge arm that attaches directly to the door. It’s often a longer screw.
- Turn the Screw:
- Tightening the screw typically moves the door away from the cabinet frame (out).
- Loosening the screw typically moves the door closer to the cabinet frame (in).
- Make Small Adjustments: Turn the screw a quarter or half turn at a time.
- Check: Close the door to see if it’s now flush with the cabinet face. Repeat until the desired depth is achieved.
Step 4: Addressing Specific Problems
Fixing Sagging Cabinet Doors
Sagging is a common issue, especially with larger or heavier doors. It’s usually a result of hinge wear or loosening screws.
- Check Hinge Screws: First, ensure all screws attaching the hinges to both the door and the cabinet frame are tight. If screws are stripped, you might need to use slightly larger screws or wood filler and re-drill.
- Tighten the Vertical Adjustment: If your hinges have an up/down adjustment screw, try tightening it slightly to lift the door.
- Use Shims: For doors that are significantly sagging and don’t have a dedicated up/down adjustment screw, you might need to strategically place shims. Place a shim behind the top screw of the hinge that is closest to the sagging side of the door. This will help to angle the hinge and lift the door.
- Reinforce Hinges: In severe cases, you might need to replace worn-out hinges or add a reinforcing bracket. However, for most minor sagging, the adjustments above should suffice.
Ensuring Smooth Closing (Cupboard Door Closer Adjustment)
Many modern kitchen cabinets come with soft close hinges, which prevent doors from slamming shut. If your soft close mechanism is too fast, too slow, or not working at all, it can be adjusted.
- Locate the Soft Close Mechanism: This is typically a small cylindrical or piston-like component integrated into the hinge.
- Find the Adjustment Screw: There’s usually a small screw on the soft close mechanism itself.
- Adjust the Closing Speed:
- To make the door close slower: Turn the screw in one direction (often clockwise, but check your hinge manual).
- To make the door close faster: Turn the screw in the opposite direction.
- Test: Open and close the door to check the soft close function. Make small adjustments until you achieve the desired smooth closing action.
Dealing with Doors That Don’t Sit Flush
This usually involves a combination of left/right and in/out adjustments.
- Check the Gap: Ensure the gap between the door and the frame is consistent. Use the left/right adjustment screws if needed.
- Check the Flushness: If the door sits proud of the frame, you’ll need to adjust the depth. Loosen the depth adjustment screw to move the door closer to the cabinet body until it’s flush.
- Consider Both Hinges: Remember to check both hinges on the door, as they might require slightly different adjustments.
Step 5: Fine-Tuning and Final Checks
After making your adjustments, open and close the doors several times.
- Are they smooth?
- Do they align perfectly?
- Is the gap consistent?
- Do they close softly (if applicable)?
Make any further small adjustments as needed. Sometimes, it takes a few tries to get it just right.
Common Issues and DIY Cabinet Door Repair
Sometimes, the problem isn’t just alignment but also the hardware itself.
- Loose Hinges: If screws won’t tighten because the holes are stripped, you can try a couple of DIY cabinet door repair methods:
- Toothpick Method: Insert a few wooden toothpicks into the stripped screw hole with a little wood glue. Let it dry, then break off the excess and re-drill a pilot hole for the screw.
- Wood Filler: Use a good quality wood filler. Apply it to the stripped hole, let it dry completely according to the product instructions, then drill a new pilot hole and re-insert the screw.
- Worn-Out Hinges: If your hinges are old, rusty, or visibly damaged, they might not be adjustable enough. It may be time to replace them. This is also a DIY-friendly task. Measure your existing hinges carefully to find replacements of the same type and size.
- Cabinet Door Sagging Beyond Repair: If a door is made of particleboard or MDF and has started to sag significantly, the material itself might be compromised. In such cases, replacement of the door might be the only long-term solution.
When to Call a Professional
While most kitchen cabinet hinge adjustment and DIY cabinet door repair tasks are manageable for the average homeowner, there are times when it’s best to seek professional help:
- Extensive Damage: If your cabinet doors or frames are warped, cracked, or severely damaged.
- Complex Hinge Systems: Some high-end cabinets have very specialized or integrated hinge systems that can be tricky to adjust without proper knowledge.
- Lack of Confidence: If you’re not comfortable working with tools or making adjustments, it’s better to avoid potential damage.
- Persistent Problems: If you’ve tried adjusting your doors multiple times and they still aren’t right, a professional might be able to diagnose a less obvious issue.
Frequently Asked Questions (FAQ)
Q1: How often should I adjust my kitchen cupboard doors?
A1: You generally don’t need to adjust them regularly. Only adjust them when you notice issues like sagging, misalignment, or doors not closing properly.
Q2: My cabinet doors are slightly warped. Can I adjust them?
A2: Minor warping might be compensated for with hinge adjustments, especially the depth and left/right screws. However, significant warping is difficult to correct through hinge adjustments alone and might require professional attention or door replacement.
Q3: What’s the difference between overlay and inset doors when adjusting?
A3: Overlay doors sit on top of the cabinet frame, while inset doors sit within the frame. The adjustment principles are the same (left/right, up/down, in/out), but the way the hinges mount and the screws are located can differ.
Q4: I have multiple doors that are misaligned. Should I adjust them all at once?
A4: It’s best to tackle one door at a time. Adjusting one door might affect the alignment of adjacent doors, so it’s easier to manage by making adjustments incrementally and checking as you go.
Q5: How do I know if I have soft close hinges?
A5: Soft close hinges have a visible mechanism, usually a small cylinder or piston, integrated into the hinge body. When you push a soft close door closed, it will move slowly and quietly in the final inches of travel.
By following these steps, you can effectively adjust your kitchen cupboard doors, improve their functionality, and enhance the overall appearance of your kitchen. Happy adjusting!