
Yes, you can adjust kitchen cabinet hinges to fix alignment issues like doors that don’t close properly, gaps, or doors that sag. This is a common fix that often only requires a screwdriver and a little patience. Achieving perfect cabinet door alignment is a satisfying DIY task that can significantly improve the look and function of your kitchen.
Kitchen cabinets are the workhorses of your cooking space. Over time, hinges can loosen, doors can get bumped, or settling in the house can cause misalignment. Fortunately, most modern cabinet hinges are designed with adjustability in mind, allowing you to fine-tune their position. This guide will walk you through the process of adjusting your cabinet hinges, ensuring your doors hang straight, close flush, and operate smoothly. We’ll cover the basics of different hinge types, the tools you’ll need, and step-by-step instructions for common alignment problems. Proper kitchen cabinet maintenance can extend the life of your cabinets and keep them looking their best.
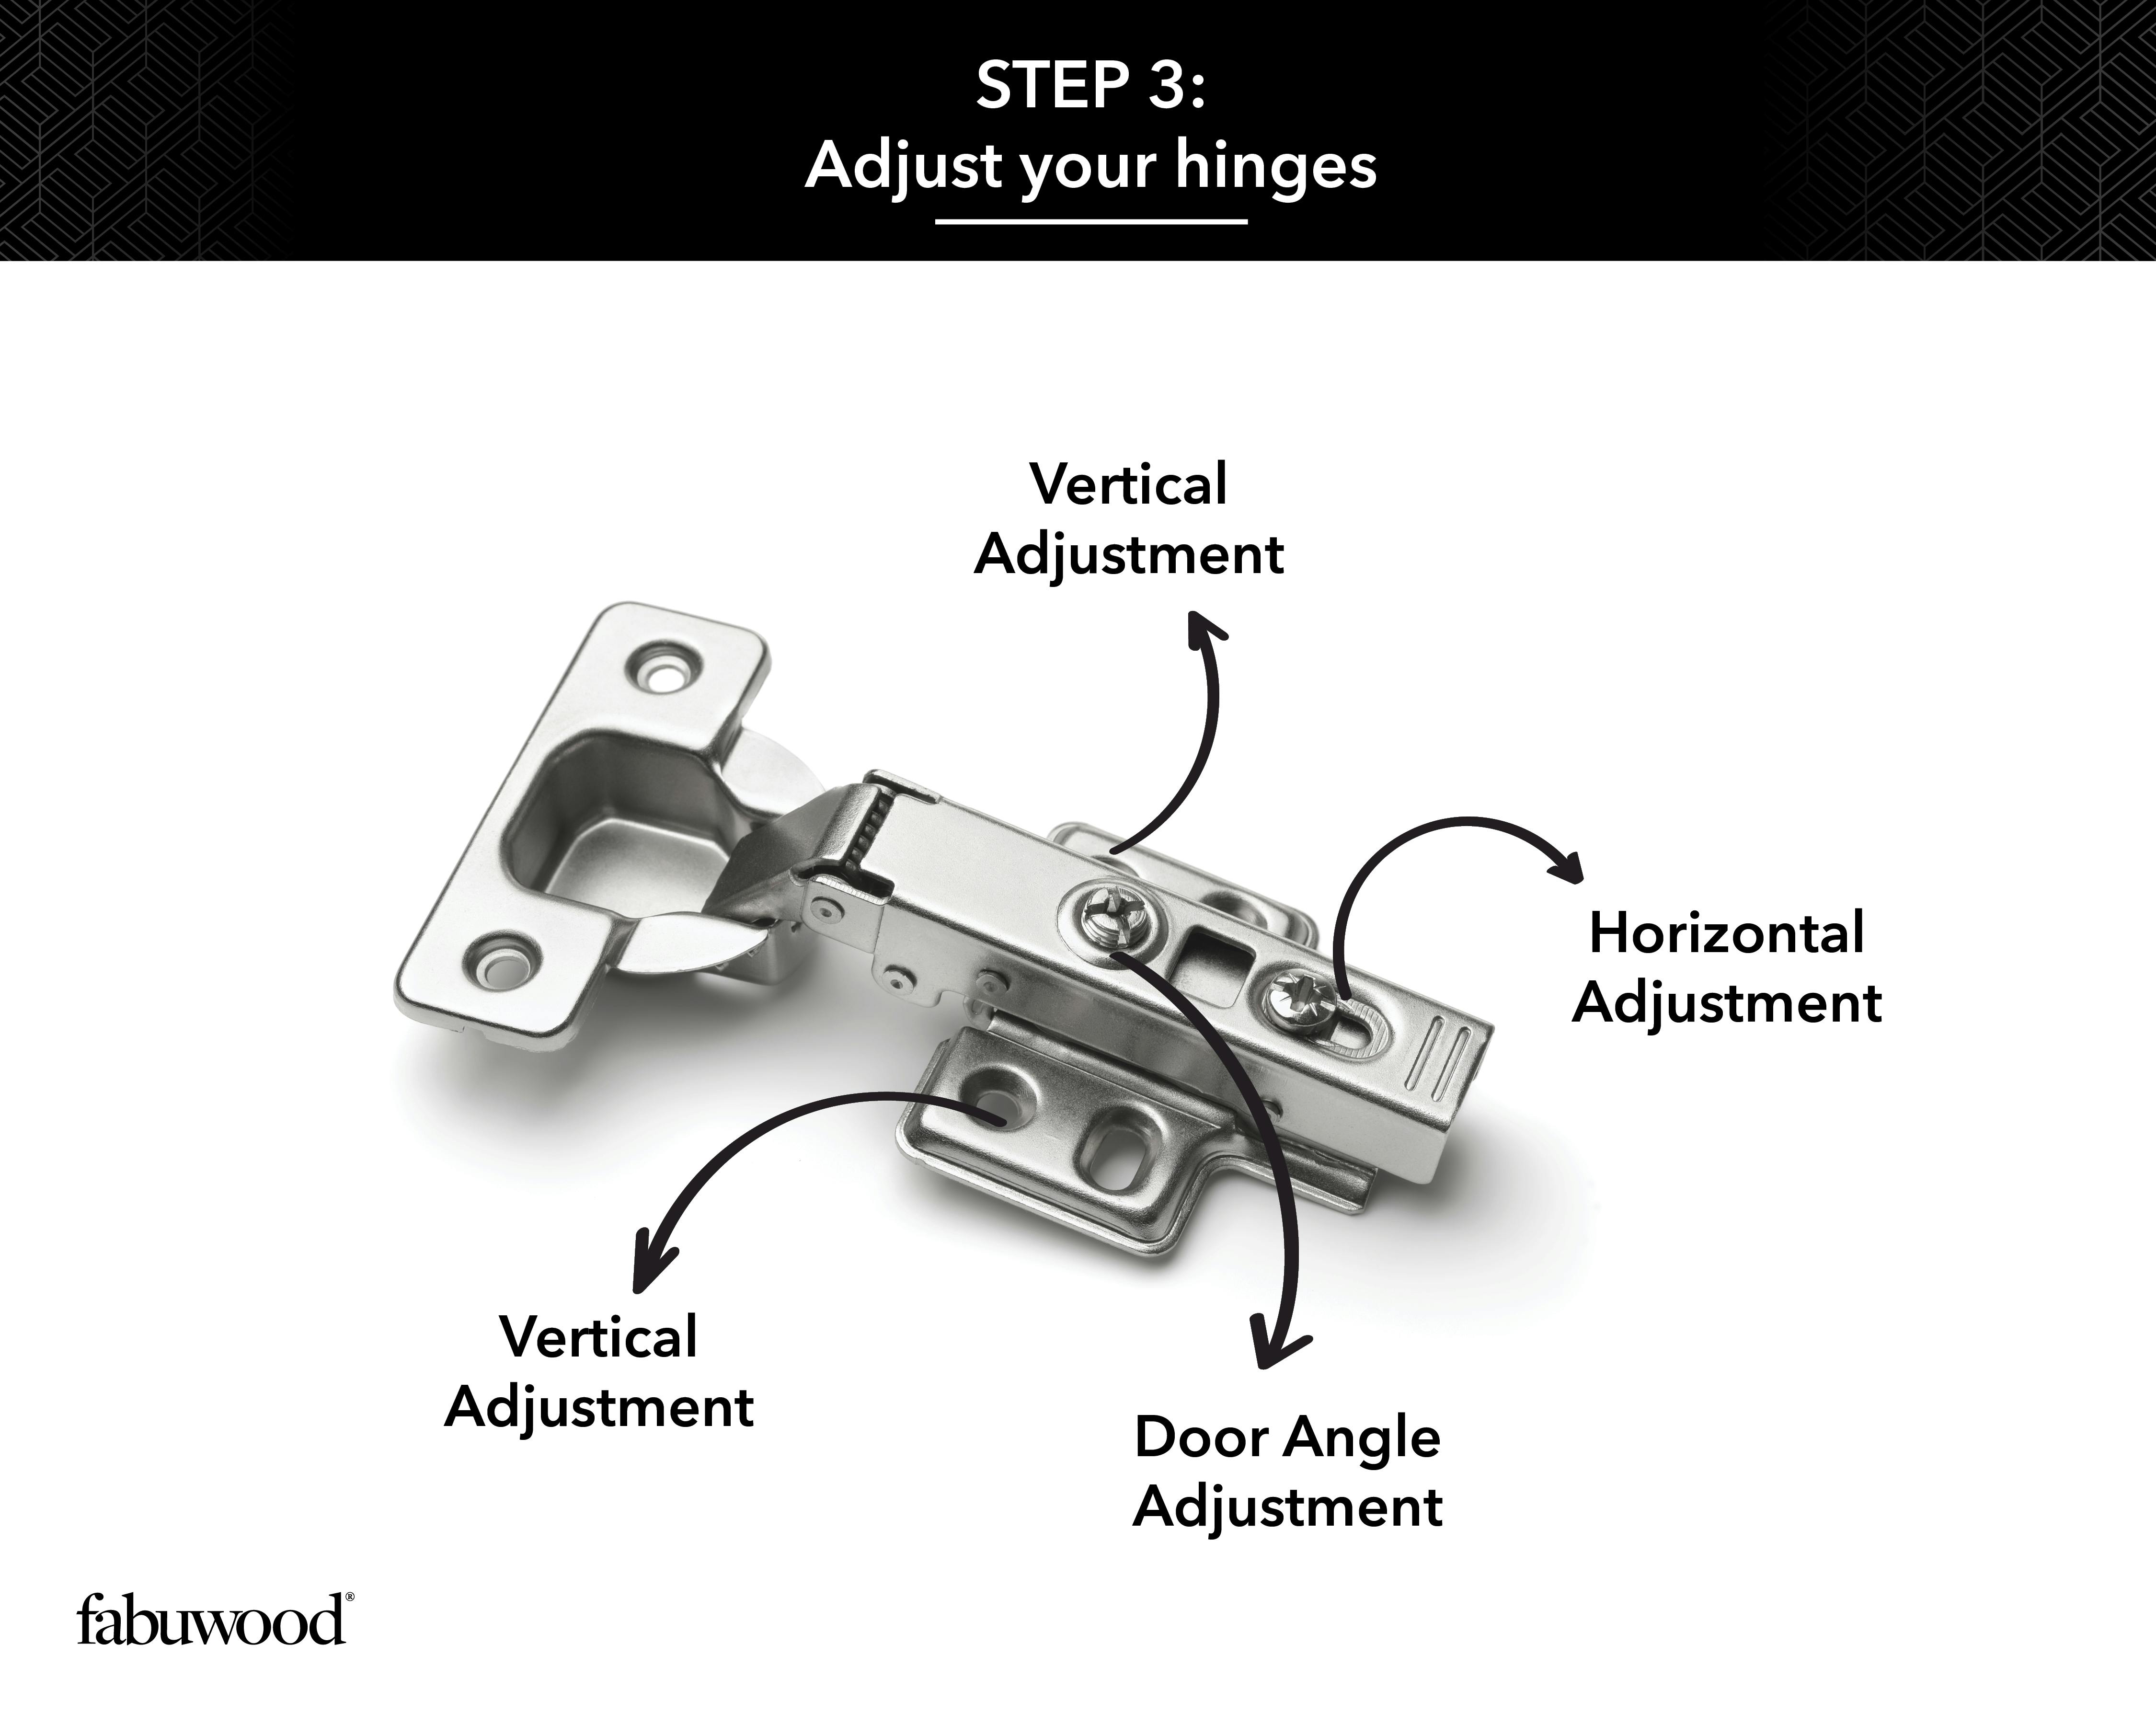
Image Source: images.ctfassets.net
Deciphering Your Cabinet Hinges: Types and Adjustments
Before you grab a screwdriver, it’s helpful to know what kind of hinges you have. Different hinge styles have different adjustment mechanisms. The most common types you’ll find in kitchens today are:
- Overlay Hinges: These are the most prevalent for face-frame cabinets. The hinge cup sits in a mortise on the back of the door, and the mounting plate attaches to the cabinet frame. They allow the door to sit on top of the cabinet frame when closed.
- Inset Hinges: These are used for cabinets without a face frame, where the door sits inside the cabinet opening. The hinge barrel is typically visible on the inside of the cabinet.
- Concealed Hinges (European Hinges): These are very common in modern kitchens, especially for frameless cabinets. The hinge cup is hidden within a large bore hole in the door, and a mounting plate attaches to the cabinet side. They offer a clean, minimalist look.
The beauty of most modern cabinet hardware is the ability to adjust them in multiple directions. The specific screws you’ll be looking for are typically called hinge adjustment screws.
Key Adjustment Screws to Locate
Most adjustable hinges have at least two, and often three, adjustment screws. Familiarizing yourself with their functions is key to successful door hinge adjustment.
| Screw Type | Common Location | Adjustment Direction | What it Adjusts |
|---|---|---|---|
| Depth Screw | Usually the screw closest to the back of the hinge. | Inward/Outward | How far the door sits into or out from the cabinet |
| Side/Lateral Screw | Typically the screw on the hinge arm. | Left/Right | Sideways alignment of the door |
| Height/Up-Down Screw | Often integrated into the mounting plate. | Up/Down | Vertical alignment of the door |
Some older or simpler hinges might only have one or two screws, usually controlling side-to-side and depth. If you have soft close hinges, the adjustment screws might be slightly different in design, but their purpose remains the same – to fine-tune the door’s position.
Tools You’ll Need for Hinge Adjustment
The good news is you don’t need a professional toolkit for this task. Most hinge adjustments can be made with a few basic tools:
- Screwdriver: A Phillips head screwdriver is most common, but some hinges might use flathead screws. It’s best to have a few sizes on hand. A magnetic tip can be a lifesaver for those tiny screws that love to fall.
- Painter’s Tape: This is incredibly useful for marking the original position of the hinge or door before you start. It also helps prevent scratching the cabinet finish.
- A Helper (Optional but Recommended): Especially for larger doors or if you’re adjusting multiple hinges at once, having an extra pair of hands can make the process much smoother.
- Level (Optional): For very precise adjustments, a small level can help ensure doors are perfectly plumb and level.
Pre-Adjustment Steps: Setting the Stage
Before you start turning screws, take a moment to assess the problem and prepare.
- Identify the Problem: Is the door crooked, sticking out, not closing flush, or rubbing against another door or cabinet? Pinpointing the exact issue will help you determine which adjustments are needed.
- Observe the Gaps: Look at the gaps around the door. Are they even? If one side has a wider gap than the other, you know which direction you need to move the door.
- Mark the Starting Point (Optional but Smart): If you’re unsure, you can use painter’s tape to mark the current position of the door on the cabinet frame. This gives you a reference point if you need to revert.
Step-by-Step Guide to Adjusting Cabinet Hinges
The process for adjusting hinges varies slightly depending on the type of hinge, but the principles are the same. We’ll cover the most common adjustments for overlay and concealed hinges.
Adjusting Overlay Hinges (Face Frame Cabinets)
Overlay hinges are attached to the cabinet frame and the door. They typically allow for three-way adjustment: in/out, left/right, and up/down.
1. Adjusting for Side-to-Side Alignment (Gap Control):
- Locate the Screw: Find the screw on the hinge that controls the side-to-side movement. This is usually the screw that passes through a slotted hole in the hinge arm and into the mounting plate attached to the cabinet frame.
- Loosen Slightly: Use your screwdriver to loosen this screw just enough so the hinge arm can move.
- Move the Door: Gently push or pull the door to adjust its position left or right. You’re aiming to create even gaps between the door and the adjacent cabinet or stile.
- Tighten the Screw: Once the door is in the desired position, hold it steady and tighten the screw.
- Test: Open and close the door to see if the adjustment worked. You might need to repeat this on multiple hinges if the door is twisted.
2. Adjusting for Depth (Inward/Outward):
- Locate the Screw: This screw is usually found on the hinge cup itself or on the arm where it connects to the cup. It typically goes directly into the hinge arm.
- Turn the Screw:
- Turning clockwise usually pushes the door away from the cabinet.
- Turning counter-clockwise usually pulls the door closer to the cabinet.
- Adjust in Small Increments: Make small turns and check the door’s position after each adjustment. You’re aiming for the door to sit flush with the cabinet frame without being too far in or out.
- Check Multiple Hinges: If a door is leaning forward or backward, you may need to adjust the depth screws on both the top and bottom hinges to compensate.
3. Adjusting for Height (Up/Down):
- Locate the Screw: This adjustment often involves the screws that attach the mounting plate to the cabinet frame. On some hinges, there’s a specific screw designed for vertical adjustment, often on the mounting plate itself. On others, you might need to slightly loosen the screws holding the mounting plate, adjust the door’s height, and then re-tighten.
- Loosen Mounting Screws (if necessary): If your hinge has dedicated height adjustment screws, use those. If not, loosen the two screws holding the mounting plate to the cabinet frame just a bit.
- Adjust the Door: Carefully lift or lower the door until it’s at the correct height. Check the gaps at the top and bottom.
- Re-tighten: Tighten the mounting plate screws firmly.
- Test: Open and close the door.
Table: Overlay Hinge Adjustment Summary
| Problem | Adjustment Needed | Screw to Turn | Direction of Turn (General) |
|---|---|---|---|
| Door too far left/right | Side-to-side alignment | Side/Lateral Adjustment Screw | Loosen, reposition, tighten |
| Door too far in or out | Depth adjustment | Depth Adjustment Screw | Clockwise (out), Counter-clockwise (in) |
| Door too high or too low | Height adjustment | Mounting Plate Screws or Height Screw | Loosen, reposition, tighten |
| Door sagging (bottom edge) | May need to raise the bottom hinge or lower the top hinge | Side/Lateral & Height Screws | Varies based on hinge design |
| Door rubbing on top/bottom | Height adjustment | Mounting Plate Screws or Height Screw | Loosen, reposition, tighten |
Adjusting Concealed (European) Hinges
Concealed hinges are incredibly versatile and offer precise three-way adjustments directly from the front of the hinge. This makes door hinge adjustment much easier, especially if you’re dealing with cabinet door sagging.
1. Adjusting for Side-to-Side Alignment:
- Locate the Screw: This is usually the screw furthest from the hinge cup, often the first one you see when you open the cabinet door.
- Turn the Screw:
- Turning clockwise typically moves the door away from the hinge side (towards the opposite side).
- Turning counter-clockwise typically moves the door towards the hinge side.
- Adjust and Test: Make small turns, checking the door’s alignment with the adjacent cabinet or door. Aim for an even gap.
2. Adjusting for Depth (Inward/Outward):
- Locate the Screw: This is often the middle screw on the hinge arm.
- Turn the Screw:
- Turning clockwise usually pushes the door further into the cabinet.
- Turning counter-clockwise usually pulls the door out from the cabinet.
- Fine-tune: This adjustment is crucial for making sure the door sits flush with the cabinet face when closed.
3. Adjusting for Height (Up/Down):
- Locate the Screw: This is typically the screw closest to the hinge cup, which fastens the hinge arm to the mounting plate.
- Loosen Slightly: Loosen this screw slightly.
- Adjust the Door: Carefully push the door up or down to align it.
- Re-tighten: Hold the door in place and re-tighten the screw firmly.
- Alternative Height Adjustment: Some concealed hinges have a separate height adjustment screw on the mounting plate itself. If you can’t achieve the desired height by loosening the main connection screw, look for this secondary adjustment point.
Table: Concealed Hinge Adjustment Summary
| Problem | Adjustment Needed | Screw to Turn | Direction of Turn (General) |
|---|---|---|---|
| Door too far left/right | Side-to-side alignment | Side/Lateral Adjustment Screw | Clockwise (away), Counter-clockwise (towards) |
| Door too far in or out | Depth adjustment | Depth Adjustment Screw | Clockwise (in), Counter-clockwise (out) |
| Door too high or too low | Height adjustment | Height Adjustment Screw (or mounting plate screws) | Loosen, reposition, tighten |
| Door sagging | Raise the hinge at the back, or lower the front | Depth and/or Side Screws | Varies; usually involves depth and side adjustments |
| Door rubbing on top/bottom | Height adjustment | Height Adjustment Screw | Loosen, reposition, tighten |
Addressing Specific Problems
Fixing Cabinet Door Sagging
Cabinet door sagging is a common issue, often caused by gravity, wear and tear on the hinges, or the weight of the door itself. It usually manifests as the bottom edge of the door being further away from the cabinet frame than the top edge.
- Concealed Hinges: For concealed hinges, you’ll typically adjust the side adjustment screw on the hinge that’s closest to the cabinet frame. Turning this screw away from the cabinet frame (counter-clockwise) on the hinge that is closest to the sagging edge will pull that side of the door in, effectively lifting the sagging corner. You might also need to adjust the depth screw.
- Overlay Hinges: With overlay hinges, you might need to loosen the screws holding the mounting plate to the cabinet frame slightly. Gently push the top of the door inward (towards the cabinet) and slightly upwards, then re-tighten the screws. You may also need to adjust the side screws on both the top and bottom hinges to compensate.
Dealing with Gaps and Uneven Spacing
If the gaps between your doors are uneven, it’s a clear sign you need to adjust the side-to-side (lateral) screws.
- Identify the Door: Determine which door is out of alignment.
- Measure the Gaps: Note the difference in the gaps on each side of the door.
- Adjust: Loosen the lateral adjustment screw on the hinge(s) that need to move the door. Turn the screw to move the door into the desired position, creating even gaps. Remember that adjusting one hinge can affect the other, so you might need to make minor adjustments to both.
Ensuring Doors Close Flush
If your doors don’t sit flush with the cabinet frame when closed, you’ll likely need to adjust the depth screws.
- Assess Flushness: Check if the door is proud (sticking out) or recessed (too far in).
- Adjust Depth: Use the depth adjustment screw. Turn it to push the door in or pull it out until it’s flush with the cabinet face.
Advanced Tips and Tricks
- Work on One Hinge at a Time: Especially when you’re starting out, adjust one screw on one hinge, test, and then move to the next. This prevents over-adjustment and makes it easier to backtrack if you make a mistake.
- Small Adjustments Are Key: Turn screws only a quarter or half turn at a time. It’s easier to make more adjustments than to undo a big one.
- Check Both Hinges: If a door is crooked or sagging, it’s likely that both the top and bottom hinges need adjustment. Make sure to check and adjust them symmetrically.
- Lubrication: If the hinges are stiff or noisy, a quick spray of silicone lubricant can help. Avoid oil-based lubricants, which can attract dust and grime.
- Replace Worn Hinges: If you find that even with adjustment, a hinge is loose, wobbly, or the adjustment screws don’t hold, it might be time to replace the hinge. This is a relatively simple hinge repair that can revive an entire cabinet door. When replacing, try to find an identical match or a compatible concealed hinge that fits the existing cutouts. You may need to buy new cabinet hardware if you’re unsure of the exact type.
- Overlay vs. Inset: For inset hinges, the adjustment screws are often directly accessible on the hinge barrel, allowing for similar side-to-side and in/out adjustments. Vertical adjustments might require loosening the mounting screws on the cabinet frame.
When to Call a Professional
While most hinge adjustments are DIY-friendly, there are times when professional help might be best:
- Damaged Hinges: If a hinge is broken or severely corroded, replacement might be necessary, and a professional can ensure the correct fit.
- Cabinet Structure Issues: If the cabinet frame itself is warped or damaged, hinge adjustments might only be a temporary fix.
- Unfamiliar Hinge Types: If you have antique or unusual hinges that don’t seem to have standard adjustment screws, it might be wise to consult an expert.
- Multiple Doors Out of Alignment: If many doors across your kitchen are problematic, there might be a larger structural issue.
Frequently Asked Questions (FAQ)
Q: How many turns of the hinge adjustment screw should I make at a time?
A: Start with small adjustments, like a quarter or half turn. This allows you to see the effect and make incremental corrections.
Q: My cabinet door still sags after adjusting the hinges. What else could be wrong?
A: Sagging can sometimes be due to worn-out hinges or even the cabinet door itself becoming warped over time. If the hinge adjustment doesn’t work, consider if the hinge needs replacing or if the door is the issue.
Q: Can I adjust hinges on older cabinets?
A: Many older cabinets have simpler, non-adjustable hinges. If you can’t find any screws to turn, your hinges might not be adjustable. In this case, you might need to shim the hinge or consider replacing the hinges with adjustable ones.
Q: What if my cabinet doors don’t close properly or are hard to open/close?
A: This usually points to an alignment issue that hinge adjustment can fix. Check for rubbing, ensure hinges are lubricated, and use the adjustment screws to square up the doors.
Q: Do soft close hinges have different adjustments?
A: Soft close hinges have the same basic adjustment screws as standard hinges (side, depth, height). The soft-close mechanism is integrated into the hinge arm and typically doesn’t affect the adjustment screws themselves, though the overall hinge might be slightly larger.
Q: How often should I check my cabinet hinges?
A: It’s good practice to check your cabinet hardware and hinges as part of your regular kitchen cabinet maintenance, perhaps once or twice a year. This allows you to catch minor alignment issues before they become major problems.
By following these steps and understanding the function of each adjustment screw, you can effectively tackle most cabinet door alignment issues. This simple kitchen cabinet maintenance task can significantly enhance the appearance and usability of your kitchen, making it a more enjoyable space to work and live in.