
Can you tighten cabinet hinges on kitchen cabinets? Yes, you absolutely can! Tightening loose cabinet hinges is a common and achievable DIY kitchen cabinet repair that can significantly improve the look and function of your cabinets. If your cabinet door sagging or you’re dealing with loose cabinet hinges, this guide will walk you through how to fix it.
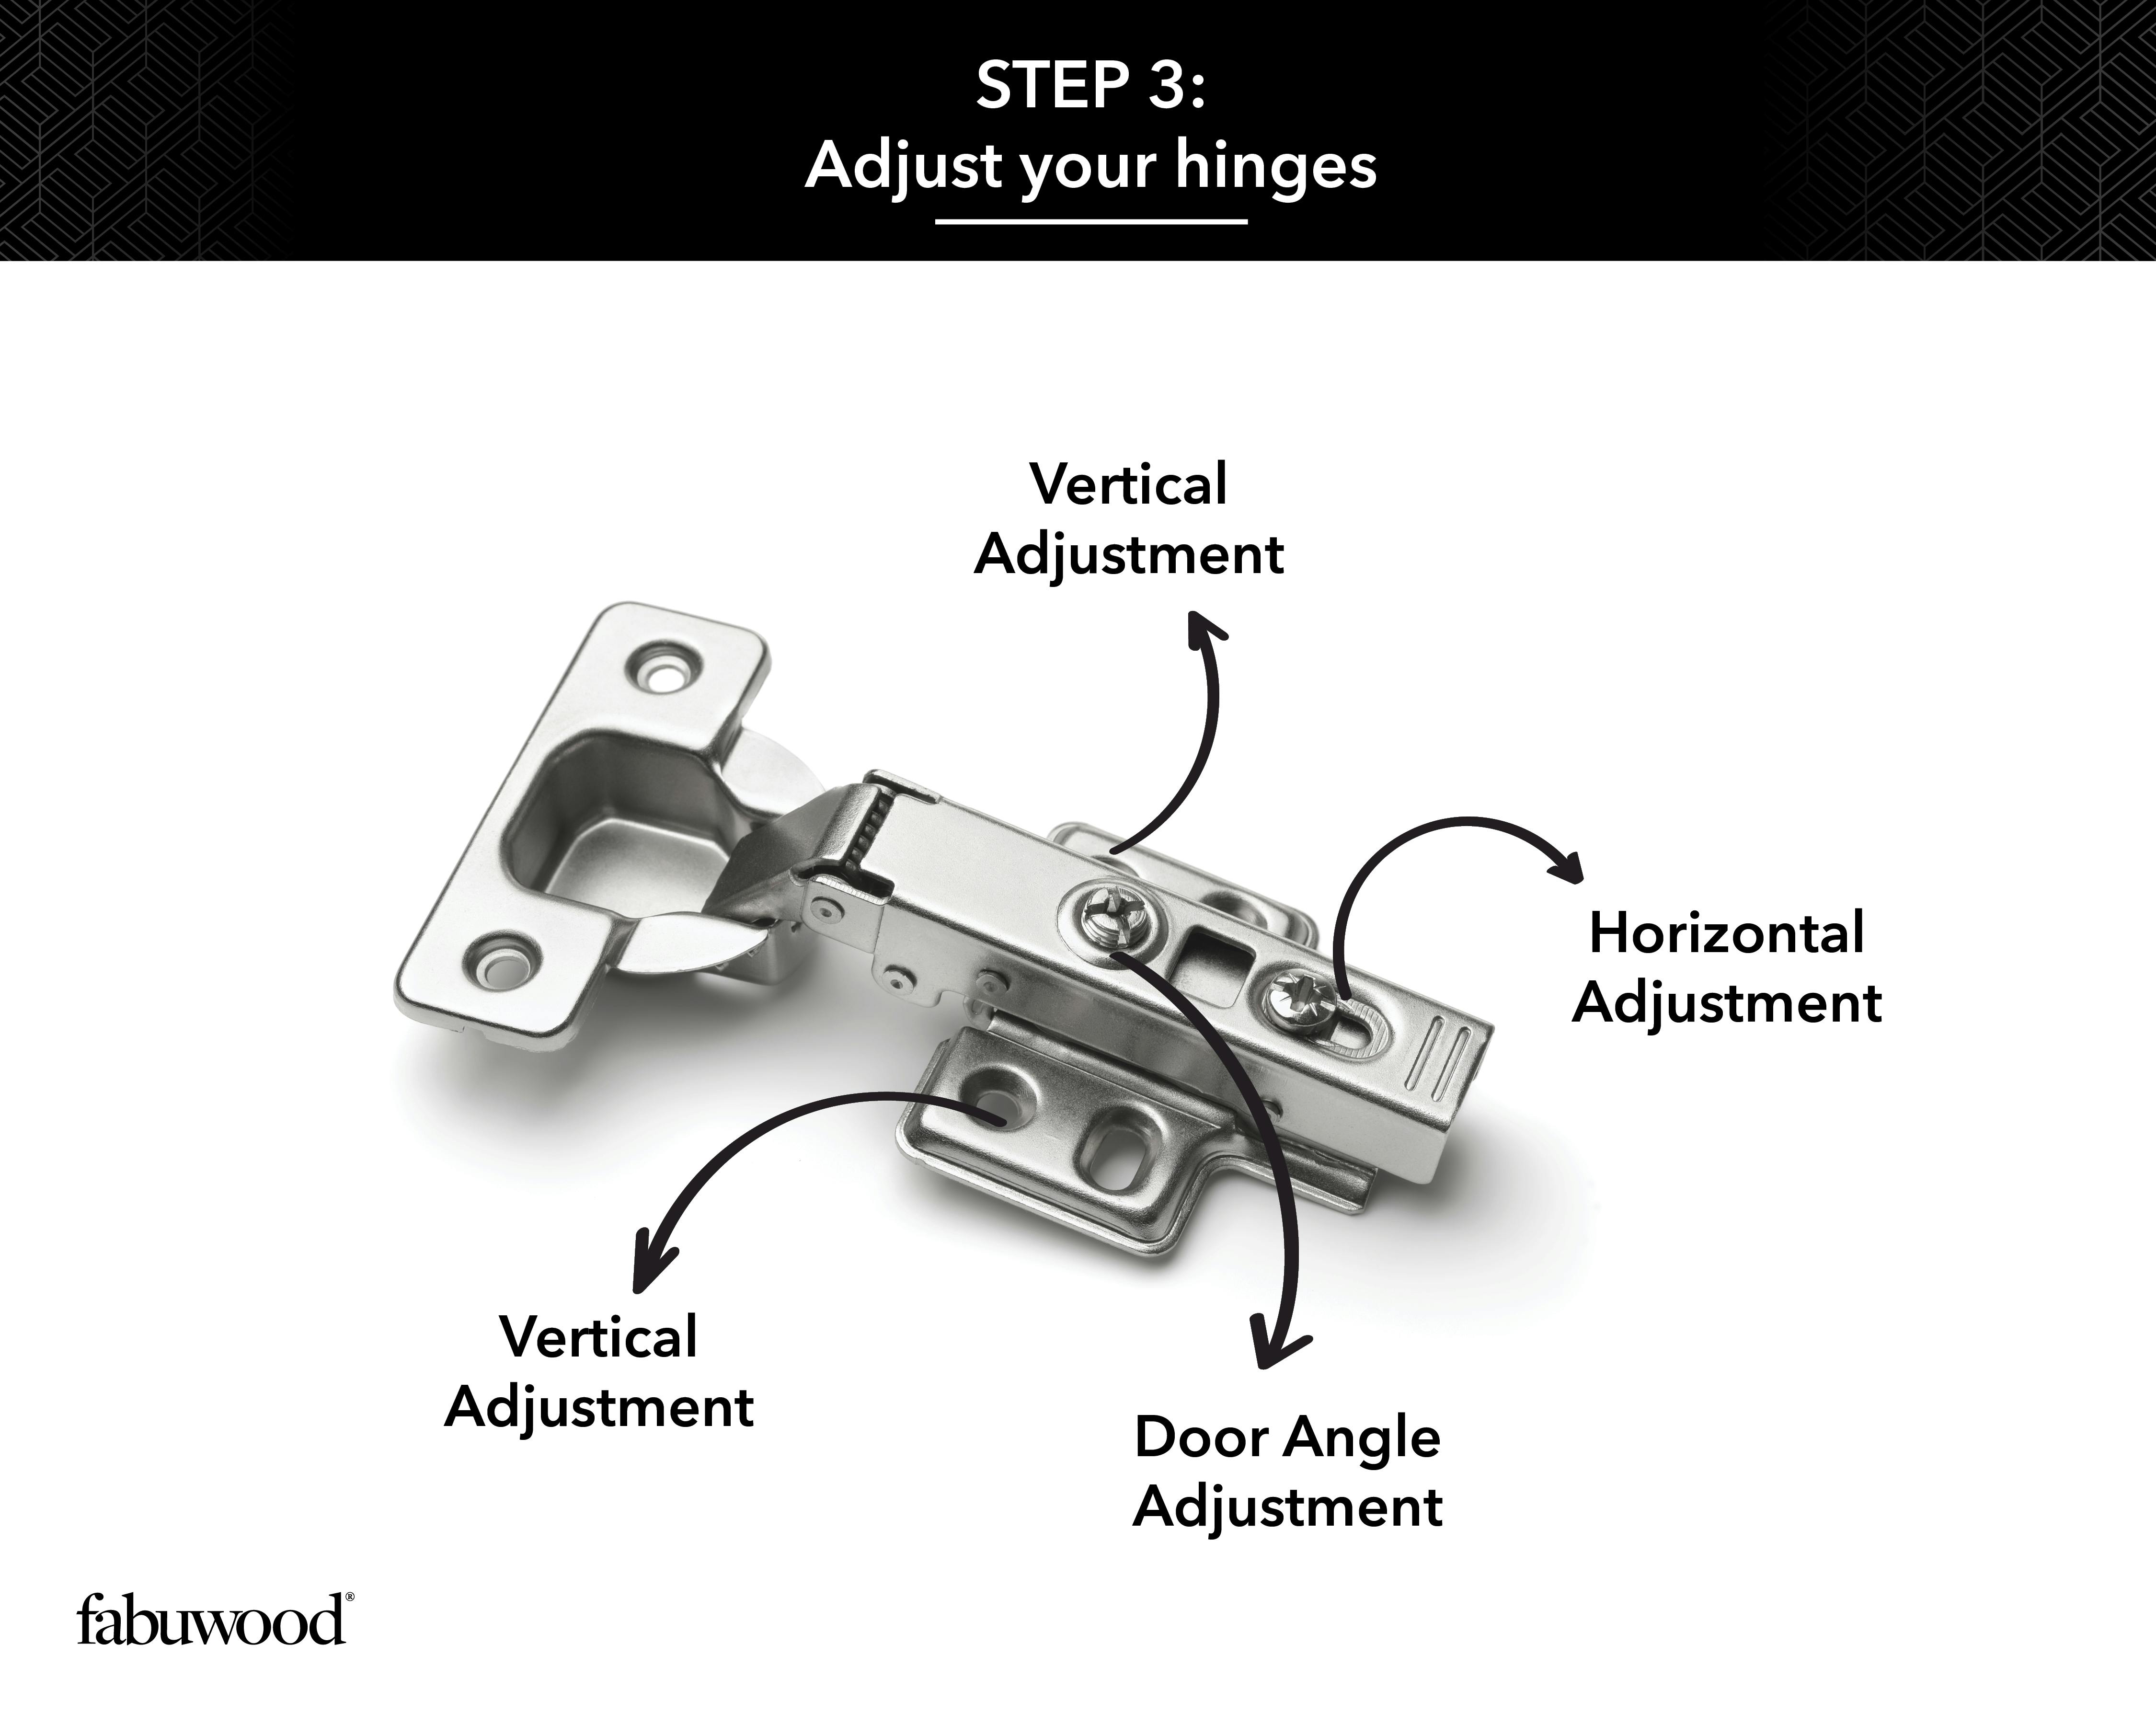
Image Source: images.ctfassets.net
Why Your Cabinet Hinges Need Attention
Over time, the constant opening and closing of cabinet doors can lead to wear and tear on the hinges. This can result in loose cabinet hinges, causing your cabinet doors to sag, misalign, or even feel wobbly. Addressing cabinet hinge maintenance promptly can prevent further damage and keep your kitchen looking its best. Ignoring these issues can lead to more extensive kitchen cabinet repair down the line.
Identifying the Problem: What to Look For
Before you can fix it, you need to know what you’re looking for. Common signs that your cabinet hinges need tightening include:
- Cabinet Door Sagging: The most obvious sign. If a door hangs lower on one side than the other, the hinges are likely loose.
- Uneven Gaps: Doors that don’t sit flush with the cabinet frame or have uneven gaps between them.
- Difficulty Closing: Doors that rub against the frame or don’t close smoothly.
- Wobbly Doors: If the door feels loose at the hinge points when you gently push or pull it.
- Squeaky Cabinet Hinges: While sometimes just needing lubrication, persistent squeaks can also indicate loose screws or worn hinges.
- Visible Looseness: You might even be able to see that the cabinet hinge screws are not fully seated in the wood.
Tools You’ll Need for a Tightening Job
Gathering the right tools makes this DIY cabinet repair much easier. You likely have most of these items already in your toolbox.
Essential Tools Checklist:
- Screwdriver: A Phillips head screwdriver is most common for cabinet hinges. Having a set with various sizes is helpful. Sometimes, a flathead screwdriver might be needed for older or different hinge types.
- Putty Knife or Spreader: For applying wood filler if needed.
- Wood Filler or Toothpicks/Wooden Dowels: For stripped screw holes.
- Hammer (Optional): To gently tap in toothpicks or dowels.
- Drill with Screwdriver Bits (Optional): Can speed up the process, but be careful not to overtighten.
- Level (Optional): To check cabinet door alignment after tightening.
- Safety Glasses: Always protect your eyes when working with tools.
- Rag or Paper Towels: For cleaning up any dust or debris.
Step-by-Step Guide to Tightening Cabinet Hinges
This process is generally straightforward. We’ll cover tightening screws and addressing stripped screw holes.
Step 1: Assess the Hinge and Door
Open the cabinet door you’re working on. Get a good look at the hinges. Are they surface-mounted (visible on the outside) or European-style/concealed (hidden inside the cabinet)? The tightening process is similar for both, but identifying the type helps in knowing what to expect.
Check each screw on both parts of the hinge: the part attached to the cabinet frame and the part attached to the cabinet door itself.
Step 2: Tighten the Cabinet Hinge Screws
This is the core of the fix.
- Locate the Screws: You’ll see screws holding the hinge plate to the cabinet frame and screws holding the hinge arm to the cabinet door.
- Gentle Tightening: Using your Phillips head screwdriver, turn each screw clockwise. Go slowly and apply gentle pressure. The goal is to snug them up, not to force them. Overtightening can strip the screws or damage the wood.
- Test the Door: After tightening a few screws, gently close and open the door to see if the cabinet door sagging has improved. If it has, continue tightening the remaining screws on that hinge.
- Repeat for All Hinges: Do this for every hinge on the problematic door. If multiple doors are affected, repeat the process for each.
Step 3: Addressing Loose Screws in Stripped Holes
Sometimes, the screws won’t tighten because the hole they’re in has become too large – this is called a stripped screw hole. The wood fibers that held the screw threads have been worn away.
Option A: Toothpicks or Wooden Dowels (The Classic Fix)
This is a tried-and-true method for DIY cabinet repair.
- Remove the Hinge: Completely unscrew the hinge from the cabinet door or frame where the stripped hole is located.
- Prepare the Filling Material:
- Toothpicks: Grab a few wooden toothpicks.
- Wooden Dowel: If you have a wooden dowel (a small rod of wood), you can cut a small piece to fit.
- Apply Adhesive (Optional but Recommended): Put a tiny drop of wood glue on the toothpicks or dowel piece.
- Insert Filling Material: Stuff the toothpicks (break them off so they are flush with the surface) or the dowel piece into the stripped screw hole. You want to fill the hole snugly.
- Let it Dry: Allow the glue to dry completely. This usually takes at least 30 minutes, but check the glue’s instructions.
- Trim Flush: Once dry, use a putty knife or utility knife to carefully trim any excess wood flush with the cabinet surface.
- Re-drill a Pilot Hole (Recommended): Use a drill bit slightly smaller than your screw diameter to create a new pilot hole in the center of the filled area. This gives the screw something to grip.
- Reattach the Hinge: Screw the hinge back into place. The new wood material should provide a firm grip for the cabinet hinge screws.
Option B: Wood Filler
Wood filler is another effective way to repair stripped screw holes.
- Remove the Hinge: Unscrew the hinge from the cabinet door or frame.
- Apply Wood Filler: Use a putty knife to apply wood filler into the stripped screw hole. Pack it in firmly.
- Smooth and Level: Scrape away any excess filler so it’s flush with the surface.
- Let it Dry: Allow the wood filler to dry completely according to the product’s instructions. This can take several hours or overnight depending on the type.
- Sand (Optional): Once dry, you can lightly sand the area if needed for a perfectly smooth finish.
- Re-drill a Pilot Hole: As with the toothpick method, drill a pilot hole slightly smaller than your screw diameter into the hardened wood filler.
- Reattach the Hinge: Securely screw the hinge back into the repaired hole.
Step 4: Adjusting Cabinet Hinges for Better Alignment
Sometimes, simply tightening screws won’t fix the problem entirely, especially if the cabinet door sagging is due to the hinge’s adjustment capabilities. Many modern cabinet hinges, particularly European-style ones, have adjustment screws that allow you to fine-tune the cabinet door alignment.
How to Adjust Cabinet Hinges:
- Identify Adjustment Screws: Look closely at your hinges. You’ll typically find one or more screws that don’t seem to be directly holding the hinge to the wood. These are often for adjustment.
- In-Out Adjustment: One screw usually controls how far the door sits in relation to the cabinet frame (depth).
- Up-Down Adjustment: Another screw might allow for slight vertical movement of the door.
- Side-to-Side Adjustment: A third screw often allows you to move the door left or right.
- Make Small Adjustments: Turn these adjustment screws slightly (a quarter or half turn at a time) and check the door’s position.
- Collaborative Adjustments: You may need to adjust screws on multiple hinges to achieve perfect cabinet door alignment. It often takes a bit of trial and error.
Table: Common Hinge Adjustment Screw Functions
| Screw Type | Typical Adjustment Made | How to Adjust |
|---|---|---|
| Front Screw | Door depth (in/out) | Turn screw clockwise to move door away from frame |
| Middle Screw | Vertical position (up/down) | Turn screw to raise or lower the door |
| Rear Screw | Horizontal position (left/right) | Turn screw to shift door left or right |
| Note: Hinge designs vary. Consult the hinge manufacturer if unsure. |
Step 5: Reattaching the Cabinet Door (If Removed)
If you had to remove the door to work on it, now is the time to reattach cabinet door.
- Align the Hinge Arms: Position the door so the hinge arms align with the mounting plates on the cabinet frame.
- Insert Screws: Start the screws into their respective holes.
- Tighten Gradually: Tighten the screws evenly on both hinges. Avoid fully tightening one before starting the other.
- Check Alignment: Once the door is reattached, check its alignment and make any necessary fine-tuning adjustments with the hinge screws or adjustment screws as described in Step 4.
Dealing with Squeaky Cabinet Hinges
If your primary issue is squeaky cabinet hinges, tightening the screws might help if looseness is the cause. However, more often, squeaks are due to friction or a lack of lubrication.
Lubricating Hinges:
- Clean the Hinges: Wipe down the hinges with a dry cloth to remove dust and grime.
- Apply Lubricant:
- Household Oil: A few drops of light machine oil (like 3-in-One oil) can work well.
- WD-40: While a penetrant and water displacer, WD-40 also offers temporary lubrication. Be aware it can attract dust over time.
- Silicone Spray: A good, clean lubricant that doesn’t attract as much dust.
- White Lithium Grease: A heavier-duty lubricant, good for older or very stiff hinges.
- Work it In: Open and close the cabinet door several times to distribute the lubricant evenly.
- Wipe Excess: Clean up any drips or excess lubricant with a rag.
Important: If the squeak persists after lubrication and tightening, the hinge might be worn out and need replacement.
When to Consider Replacing Hinges
While tightening and adjusting are often enough, there are times when cabinet hinge maintenance might not be sufficient, and you’ll need to consider replacing the hinges:
- Severely Damaged Hinges: If hinges are bent, rusted, or physically broken, they need replacement.
- Worn-Out Mechanisms: If adjustment screws no longer hold or the hinge itself feels loose and flimsy even after tightening, the internal mechanism is likely worn.
- Outdated Styles: If you’re renovating and want a different look or functionality (e.g., soft-close hinges), replacement is the way to go.
- Persistent Problems: If you’ve tried tightening, adjusting, and lubricating, and the cabinet door sagging or alignment issues continue, replacement is probably the next step.
Pro Tips for a Flawless Finish
- Start Small: Make minor adjustments and test frequently. It’s easier to add more adjustment than to undo over-adjustment.
- Work on One Hinge at a Time: If you’re removing hinges to repair stripped holes, work on one hinge and its corresponding door holes at a time. This prevents you from mixing up parts or forgetting where things go.
- Use a Magnetic Screwdriver: This helps prevent screws from falling into the cabinet abyss.
- Take Pictures: Before you start, take a picture of your cabinet doors and hinges. This can be helpful reference if you get confused during the process.
- Clean Up: After your DIY cabinet repair, wipe down the cabinet doors and surrounding areas to remove any dust or debris.
Frequently Asked Questions (FAQ)
Q1: How do I know if my cabinet hinges are loose?
A1: Signs include cabinet door sagging, uneven gaps between doors, doors that rub against the frame, or a wobbly feel when you gently push the door. You might also see that the cabinet hinge screws are not fully seated.
Q2: What if the screw hole is stripped and the screw won’t tighten?
A2: You can repair stripped screw holes by filling them with wooden toothpicks and glue, or with wood filler. After the filler dries, drill a new pilot hole and reattach the hinge. This is a common part of DIY cabinet repair.
Q3: Can I adjust my cabinet hinges without removing the door?
A3: Yes, most modern cabinet hinges have visible adjustment screws that allow you to fine-tune the cabinet door alignment (up/down, in/out, left/right) while the door is still attached.
Q4: What’s the best lubricant for squeaky cabinet hinges?
A4: Light household oil, silicone spray, or white lithium grease are good choices for lubricating squeaky cabinet hinges. WD-40 can be used as a temporary solution but may attract dust.
Q5: How often should I perform cabinet hinge maintenance?
A5: Regular checks (perhaps once or twice a year) are recommended. Tighten any loose screws as needed and lubricate hinges if you notice any stiffness or squeaking. This proactive cabinet hinge maintenance can prevent bigger issues.
By following these steps, you can effectively tighten hinges on your kitchen cabinets, resolving issues like cabinet door sagging and loose cabinet hinges. This simple DIY cabinet repair will restore the smooth operation and polished look of your kitchen cabinetry.