
Image Source: i.ytimg.com
How To Restain Kitchen Cabinets: Pro Results at Home
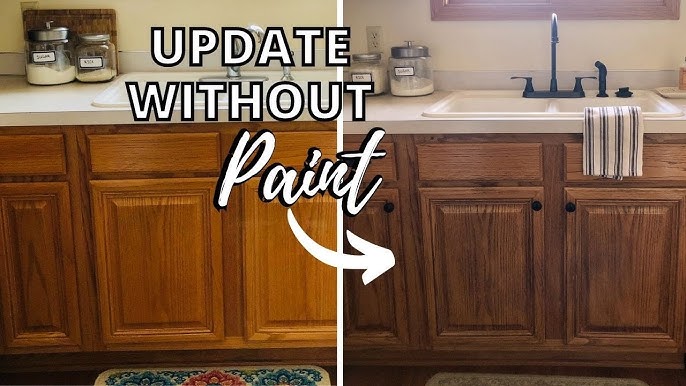
Can you restain kitchen cabinets yourself? Yes, absolutely! Restaining kitchen cabinets is a rewarding DIY project that can dramatically update your kitchen’s look without the expense of professional kitchen cabinet refinishing. This guide will walk you through the entire cabinet staining process, offering tips and techniques to achieve professional-looking results right in your own home. We’ll cover everything from preparing your cabinets to applying the final protective coat, ensuring your DIY cabinet makeover is a success.
Deciding to Restain: When is it the Right Choice?
Before diving in, it’s crucial to determine if restaining is the best approach for your cabinets. Restaining works best when the existing wood finish is worn, scratched, or you simply want a color change, but the cabinet doors and drawers themselves are in good structural condition. If your cabinets are damaged, warped, or made of a material that doesn’t readily accept stain (like laminate or heavily painted particleboard), then cabinet painting vs staining might be a better consideration, or even full replacement.
When Restaining is Ideal:
- Worn or Faded Finish: Over time, the original finish can degrade, leaving cabinets looking dull. Restaining can revive their color and vibrancy.
- Desire for a Color Change: If you love the wood grain but dislike the current color, restaining is a fantastic way to achieve a new look.
- Minor Surface Imperfections: Scratches and minor wear can often be covered with a darker stain.
- Solid Wood Construction: Restaining adheres best to solid wood or good quality wood veneers.
When to Reconsider Restaining:
- Damaged or Warped Doors/Drawers: Structural issues need repair or replacement before refinishing.
- Laminate or Veneer with Peeling: If the top layer is damaged, stain won’t adhere properly.
- Heavily Painted Cabinets: Painting over paint is usually the better option. Removing all paint to restain can be a massive undertaking.
- Particleboard or MDF: These materials often don’t take stain well and can swell if exposed to too much moisture during the process.
Gathering Your Supplies: The Essential Toolkit
To achieve pro results, you’ll need the right tools and materials. Investing in quality supplies will make the process smoother and the final outcome more impressive.
Key Supplies for Restaining:
- Screwdrivers/Drill: To remove cabinet doors and hardware.
- Chemical Stripper (if needed): For removing old, thick finishes.
- Scrapers: Putty knives or specialized stripping knives.
- Sandpaper: Various grits (80, 120, 180, 220) for sanding and smoothing.
- Sanding Block or Orbital Sander: For efficient sanding.
- Tack Cloths: To remove dust after sanding.
- Denatured Alcohol or Mineral Spirits: For cleaning and degreasing.
- Gloves: Chemical-resistant gloves for stripping and staining.
- Safety Glasses: To protect your eyes.
- Respirator Mask: Crucial for protecting your lungs from dust and fumes.
- Drop Cloths or Plastic Sheeting: To protect floors and surrounding areas.
- Wood Conditioner (optional but recommended): Helps ensure even stain absorption.
- Wood Stain: Your chosen color (see our section on the best wood stain for kitchen cabinets).
- Stain Applicators: High-quality natural bristle brushes, foam brushes, or lint-free cloths.
- Polyurethane or Protective Topcoat: For durability and protection.
- Applicators for Topcoat: High-quality synthetic bristle brushes or foam brushes.
- Rags: Clean, lint-free rags for wiping excess stain and cleaning.
- Painter’s Tape: For masking off areas you don’t want to stain.
Step-by-Step Guide to Restaining Your Kitchen Cabinets
Let’s break down the cabinet staining process into manageable steps. Patience and attention to detail are your best friends here.
Step 1: Preparation is Paramount: Cleaning Kitchen Cabinets Before Staining
This is arguably the most crucial step for a successful restaining project. Thorough cleaning ensures the stain adheres properly and eliminates any grease or grime that could interfere with the finish.
- Remove Hardware: Take off all door handles, hinges, and drawer pulls. Keep them in a labeled bag so you know where each piece goes.
- Remove Doors and Drawers: Carefully detach all cabinet doors and remove all drawers. This allows for easier access and a more even application of stain.
- Deep Clean: Mix a solution of warm water with a degreaser (like TSP substitute or a mild dish soap). Use a sponge or cloth to scrub down every surface of the cabinet doors, drawer fronts, and cabinet frames. Pay close attention to areas around handles and corners where grease tends to build up.
- Rinse Thoroughly: Wipe down all surfaces with a clean, damp cloth to remove any soap residue. Let everything air dry completely. You can use a fan to speed up the drying process.
Step 2: Dealing with the Old Finish: Stripping and Sanding
Depending on the existing finish, you might need to strip it before sanding.
Stripping the Old Finish (If Necessary)
If the current finish is thick, damaged, or you’re going from a very dark to a very light stain, stripping might be required.
- Choose Your Stripper: Opt for a chemical stripper designed for wood finishes. Follow the manufacturer’s instructions carefully, as these products can be harsh.
- Apply Stripper: Use a cheap brush to apply a liberal, even coat of stripper to a small section at a time.
- Let it Work: Allow the stripper to sit for the recommended time, usually until the finish begins to bubble and lift.
- Scrape Away: Use a putty knife or scraper to gently lift the softened finish. Work with the grain of the wood.
- Repeat if Needed: You may need to apply a second coat of stripper for stubborn finishes.
- Neutralize: After stripping, use a neutralizing agent recommended by the stripper manufacturer (often denatured alcohol or mineral spirits) to wipe down the surface and remove any remaining stripper residue.
Sanding Wood Cabinets: The Foundation for a Smooth Finish
Sanding is essential to remove any remaining finish, create a smooth surface, and open the wood grain for stain absorption.
- Start with Coarse Grit (if stripping): If you stripped the cabinets, start with 80 or 100-grit sandpaper to remove any stubborn remnants of the old finish.
- Progress to Finer Grits: For a smooth finish, you’ll need to progress through sandpaper grits.
- 120-grit: This grit is good for removing minor imperfections and evening out the surface after stripping or initial sanding.
- 180-grit: This is a common grit for preparing wood for stain. It smooths out the surface nicely without making the wood too smooth, which can prevent stain from penetrating.
- 220-grit: Use this for a final smoothing pass. It will create a silky-smooth surface.
- Sand with the Grain: Always sand in the direction of the wood grain. Sanding against the grain will create visible scratches that will show through the stain.
- Use a Sanding Block or Orbital Sander: A sanding block is good for detailed work and doors, while an orbital sander speeds up the process for larger cabinet frames.
- Corners and Details: Use sandpaper folded into a small pad or a sanding sponge for those hard-to-reach areas and routed edges.
- Clean Dust: After each sanding stage, thoroughly wipe down the cabinets with a tack cloth or a vacuum with a brush attachment to remove all dust. Dust left behind will ruin your finish.
Step 3: Applying Wood Conditioner (Optional but Recommended)
If your cabinets are made of woods like pine, maple, or birch, which can absorb stain unevenly (leading to blotchiness), applying a pre-stain wood conditioner is highly recommended.
- Purpose of Wood Conditioner: It acts as a sealer, preventing the wood from soaking up too much stain in some areas and too little in others.
- Application: Apply the wood conditioner evenly with a brush or cloth, following the manufacturer’s instructions.
- Drying Time: Allow the conditioner to dry for the recommended time (usually 15-30 minutes) but don’t let it sit too long or dry completely before staining. Check the product label.
Step 4: Applying Wood Stain: Bringing Color to Life
This is where your cabinets start to transform. Choosing the best wood stain for kitchen cabinets depends on your desired look and the type of wood. Oil-based stains offer durability and a rich finish, while water-based stains are easier to clean up and dry faster but may raise the grain.
- Choose Your Stain: Consider the wood type, desired color, and whether you want an oil-based or water-based product. Test samples on scrap wood if possible.
- Stir, Don’t Shake: Stir the stain thoroughly with a stir stick. Shaking can introduce air bubbles that will mar the finish.
- Test a Small Area: Before applying to your cabinet doors, test the stain on an inconspicuous area or a piece of scrap wood from the same cabinets to ensure you like the color and how it absorbs.
- Apply Evenly:
- With a Brush: Dip your high-quality natural bristle brush into the stain and apply it to the wood, brushing in the direction of the grain. Work in manageable sections.
- With a Cloth: For a more rustic or hand-rubbed look, use a lint-free cloth. Apply the stain generously and rub it into the wood along the grain.
- Wipe Off Excess Stain: After allowing the stain to penetrate for the time recommended by the manufacturer (usually 5-15 minutes), use a clean, lint-free cloth to wipe off the excess stain, again working with the grain. Leaving too much stain on the surface will result in a sticky, uneven finish.
- Second Coat (for Deeper Color): If you desire a deeper, richer color, you can apply a second coat of stain after the first coat has dried. Repeat the application and wiping process.
- Drying Time: Allow the stain to dry completely. This can take anywhere from 4 to 24 hours, depending on the type of stain and humidity. Ensure good ventilation.
Step 5: Applying the Protective Topcoat: Sealing Your Work
The topcoat is crucial for protecting your newly stained cabinets from moisture, grease, and wear. Polyurethane is a popular and durable choice.
- Choose Your Topcoat: Oil-based polyurethane offers excellent durability and a warm amber tone. Water-based polyurethane dries clear and is easier to clean up but may require more coats for similar protection. For kitchen cabinets, a satin or semi-gloss finish is often preferred for its balance of sheen and durability.
- Apply Thin, Even Coats: Use a high-quality synthetic bristle brush or a foam brush. Apply the topcoat in thin, even coats, working with the grain. Avoid applying it too thickly, as this can lead to drips and an uneven finish.
- Smooth Between Coats: After the first coat dries completely, lightly sand the surface with 220-grit or 320-grit sandpaper to remove any dust nibs or imperfections. Wipe thoroughly with a tack cloth to remove all dust.
- Apply Subsequent Coats: Apply additional coats, sanding lightly and cleaning between each layer. Typically, 2-3 coats are recommended for kitchen cabinets, but more can be applied for extra durability.
- Curing Time: Allow the final coat to cure fully before reattaching hardware and re-hanging doors. This can take several days to a week, depending on the product. Avoid heavy use of the cabinets during this period.
Cabinet Resurfacing Techniques: Beyond Simple Restaining
While restaining is a great option, there are other cabinet resurfacing techniques that can achieve a similar update, especially if your cabinets aren’t solid wood or you’re looking for a different aesthetic.
- Veneering: Applying a thin layer of real wood veneer over existing cabinet surfaces can give them a brand-new look, allowing you to change the wood species or color. This requires precision and careful application.
- Laminating: Similar to veneering, this involves applying a plastic laminate sheet to the cabinet surfaces. It’s durable and comes in many patterns and colors but can look less natural than wood.
- Painting: As mentioned earlier, painting is a viable alternative if your cabinets are laminate, particleboard, or if you prefer a solid color over a wood grain look. The process involves thorough cleaning, sanding, priming, and multiple coats of paint.
Cabinet Painting vs Staining: Making the Right Choice
When considering a kitchen cabinet update, the debate between cabinet painting vs staining often arises. Both have their pros and cons, and the best choice depends on your cabinets’ material, your desired aesthetic, and your DIY comfort level.
| Feature | Staining | Painting |
|---|---|---|
| Material Suitability | Best for solid wood or high-quality wood veneers. | Works well on most cabinet materials, including laminate and particleboard. |
| Aesthetic | Highlights wood grain and natural beauty. Offers a warm, rich look. | Provides a uniform, opaque color. Offers a modern or classic look depending on color. |
| Durability | Can be very durable if properly sealed with a good topcoat. | Can be very durable if high-quality paint and primer are used and properly applied. |
| Prep Work | Requires thorough sanding and possibly stripping. | Requires thorough cleaning, sanding, and priming. |
| Application | Involves applying stain and wiping off excess. Requires practice for evenness. | Involves priming and applying multiple thin coats of paint. Can be more forgiving for beginners. |
| Color Options | Limited by wood type and the stain color itself. | Virtually unlimited color choices. |
| Maintenance | Easy to wipe clean. Minor scratches can be touched up with stain. | Easy to wipe clean. Scratches may require repainting. |
| DIY Difficulty | Can be challenging to achieve a perfectly even finish initially. | Generally considered more beginner-friendly. |
Tips for Achieving Pro Results
- Work in Good Lighting: Adequate lighting helps you see imperfections and apply finishes evenly.
- Ventilation is Key: Ensure your workspace is well-ventilated, especially when using chemical strippers and oil-based finishes. Open windows and use fans.
- Patience Pays Off: Rushing any step, especially drying times, can lead to a poor finish.
- Invest in Quality Brushes and Supplies: Cheap brushes can leave bristles behind, and poor-quality stain or topcoat won’t last.
- Cleanliness is Crucial: Dust is the enemy of a good finish. Keep your workspace as clean as possible.
- Label Everything: If you remove doors and drawers, label them clearly so you know exactly where they go back.
Frequently Asked Questions (FAQ)
Q1: Can I restain kitchen cabinets that are currently painted?
A1: While it’s possible, it’s a very labor-intensive process. You would need to completely strip all the paint back to bare wood, which can be difficult and time-consuming. For painted cabinets, painting them a new color is usually a more practical approach.
Q2: What is the best wood stain for kitchen cabinets?
A2: For kitchen cabinets, oil-based stains are often preferred for their durability and rich color. Brands like Minwax, General Finishes, and Varathane offer excellent oil-based stains. Consider a satin or semi-gloss polyurethane topcoat for the best protection.
Q3: How long does it take to restain kitchen cabinets?
A3: The timeline varies depending on the size of your kitchen, the condition of your cabinets, and whether you need to strip old finishes. Typically, it can take anywhere from a weekend to a week or more, allowing for drying and curing times between steps.
Q4: Do I need to use a wood conditioner before staining?
A4: It’s highly recommended, especially for woods like pine, maple, or birch, which can absorb stain unevenly and result in a blotchy appearance. Wood conditioner helps ensure a more uniform stain color.
Q5: How many coats of stain should I apply?
A5: One coat of stain will provide a lighter color. For a deeper, richer color, you can apply a second coat. Allow the first coat to dry completely before applying the second. Always wipe off excess stain after each application.
By following these detailed steps and tips, you can confidently tackle the project of restaining your kitchen cabinets. The result will be a beautifully updated kitchen that feels brand new, all achieved with your own hands.