
Image Source: sewwoodsy.com
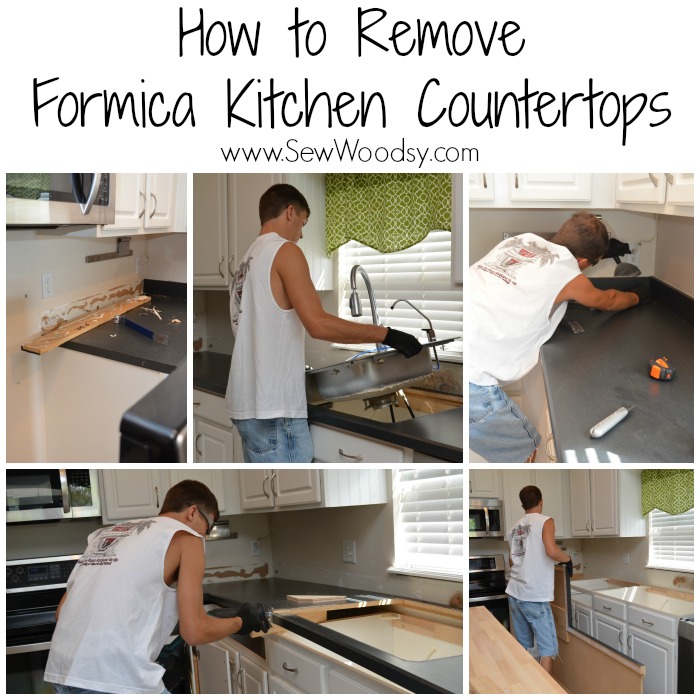
How To Remove Kitchen Countertops Safely and Easily
Can you remove kitchen countertops yourself? Yes, you absolutely can remove kitchen countertops yourself with the right tools and knowledge, making it a manageable DIY project for a kitchen renovation. This guide will walk you through the process of DIY countertop removal step-by-step, ensuring safety and efficiency. Whether you’re upgrading to granite, quartz, or simply doing a laminate countertop replacement, knowing how to properly detach your old tops is crucial. We’ll cover everything from preparation and essential tools to the actual demolition and disposal.
Getting Ready for Countertop Removal
Proper preparation is key to a smooth and safe countertop removal. Before you even pick up a tool, you need to assess your situation and gather what you need.
Assessing Your Countertop Type
The method of removal can vary slightly depending on what your current countertops are made of.
- Laminate Countertops: These are typically attached with adhesive or screws. They are generally lighter and easier to remove.
- Solid Surface (e.g., Corian): These are glued down. You’ll likely need to cut through the adhesive.
- Natural Stone (Granite, Marble, Quartz): These are heavy and often attached with adhesive or clips. They can be brittle, so caution is paramount.
- Tile Countertops: These involve grout and tiles, requiring specific tools for separation.
Gathering Your Essential Tools
Having the right tools makes the job significantly easier and safer. Here’s a list of what you’ll likely need for safe countertop removal:
- Safety Gear: Safety glasses or goggles, work gloves, and a dust mask are non-negotiable.
- Screwdrivers: Both Phillips and flathead screwdrivers are useful for removing any visible fasteners.
- Pry Bar: A good quality pry bar will help in loosening the countertop from the cabinets.
- Putty Knife or Scraper: Useful for breaking adhesive bonds.
- Utility Knife: Essential for cutting through caulk or sealant around the edges.
- Hammer: For tapping pry bars or breaking apart sections if necessary.
- Reciprocating Saw (Optional but Recommended): This is a powerful tool for cutting through glued-down countertops or stubborn adhesives. Ensure you have the right blades (wood or demolition blades).
- Tile Saw (If you have tile countertops): A tile saw for countertops is necessary if you need to cut tiles to make removal easier or if they are bonded with very strong adhesive.
- Grout Removal Tools (If you have tile countertops): This includes grout saws, scrapers, or oscillating multi-tools with grout blades for efficient grout removal tools.
- Buckets and Tarps: For collecting debris and protecting your floors.
- Crowbar: For heavier demolition tasks.
- Chisel: To help chip away adhesive or stubborn connections.
- Stud Finder (Optional): To locate any hidden fasteners or support brackets.
- Caulking Gun and Caulk Remover (If applicable): For removing any sealant.
- Large Flathead Screwdriver or Chisel: For scraping away old adhesive.
Preparing the Kitchen Area
Before you start the countertop demolition, clear the workspace.
- Empty Cabinets: Remove everything from the cabinets beneath the countertops. This reduces weight and prevents items from falling.
- Protect Floors: Lay down drop cloths or tarps to protect your flooring from scratches and debris.
- Disconnect Plumbing (If Necessary): If your sink is attached to the countertop, you’ll need to shut off the water supply and disconnect the plumbing. Have a bucket ready to catch any residual water.
- Disconnect Electrical (If Necessary): If you have an outlet or lighting integrated into the countertop, ensure the power is turned off at the breaker box.
- Remove the Sink and Faucet: This is typically the first step if your sink is part of the countertop assembly. Unscrew the mounting clips from underneath the sink. Then, disconnect the faucet, water supply lines, and drainpipe.
The Step-by-Step Process of Countertop Removal
Now that you’re prepared, let’s get to the actual removal. The sequence and specific actions will depend on how your countertops are installed.
Step 1: Inspect for Fasteners and Sealant
Begin by closely inspecting the edges of your countertops.
- Caulking: Look for any caulk or silicone sealant where the countertop meets the backsplash or wall. Use a sharp utility knife or a caulk removal tool to carefully cut through this seal.
- Screws or Clips: Check underneath the countertop, especially along the cabinet edges. You might find screws or metal clips that secure the countertop to the cabinets. Remove any visible screws with a screwdriver.
Step 2: Detach the Countertop from the Cabinets
This is where you start separating the countertop from its base.
For Glued-Down Countertops (Most Common)
- Loosening the Adhesive:
- Start by using a putty knife or scraper to try and get under the edge of the countertop. Gently work it back and forth to break the adhesive bond.
- If the adhesive is stubborn, a reciprocating saw can be a lifesaver. Insert a thin blade between the countertop and the cabinet. Cut along the seam, being careful not to damage the cabinets below. Go slow and steady.
- For very strong adhesives, you might need to apply gentle heat with a heat gun to soften it before prying. Be cautious not to overheat the material.
For Screwed-Down Countertops (Less Common)
- Simply unscrew any fasteners you identified in Step 1.
- Once all screws are removed, you may still need to pry to break any adhesive or caulk bonds.
Step 3: Removing Tile Countertops
If you have tile, the process is different and involves tackling the grout and tiles individually.
Breaking Down Tile Countertops
- Grout Removal:
- Use a grout saw or a manual grout scraper to carefully remove the grout between the tiles. This is a tedious process but essential for freeing the tiles.
- An oscillating multi-tool with a grout blade attachment will significantly speed up this part. It vibrates to efficiently remove grout without damaging the tiles much.
- Tile Removal:
- Once the grout is removed, try to lift individual tiles with a putty knife.
- If tiles are very well adhered, you might need to break them. Place a chisel on the edge of a tile and tap it with a hammer. Wear your safety glasses!
- For larger sections of tile, you might use a hammer and chisel or even a small sledgehammer to break them into smaller, manageable pieces. Be prepared for a lot of dust and sharp fragments.
- Consider using a tile saw for countertops if you need to cut tiles into smaller, more manageable pieces to pry them up, especially around edges or difficult areas.
Removing the Underlayment
After the tiles are gone, you’ll likely be left with an underlayment (often cement board or plywood) adhered to the cabinets.
- Underlayment Removal:
- This underlayment is typically screwed or adhered to the cabinet base. Locate and remove any screws.
- Use a pry bar to lift the underlayment sections. It may come up in pieces.
- If it’s glued down, you might need to use your reciprocating saw to cut through the adhesive or material holding it in place.
Step 4: Lifting and Removing the Countertop Sections
Once you’ve broken the bonds, it’s time to lift the countertop off the cabinets.
- With Help: Countertops, especially stone ones, are very heavy. Always have at least one other person to help you lift.
- Pry Gently: Use your pry bar strategically to lift the countertop sections just enough to get a grip.
- Avoid Bending or Snapping: Try to lift evenly. Don’t force it in one spot, as this can cause the countertop to crack or break, making it harder to handle and dispose of.
Step 5: Cleaning Up the Cabinetry
After the countertop is off, you’ll have adhesive residue, caulk, and possibly some debris left on the cabinets.
- Scrape Away Residue: Use a putty knife or scraper to remove any remaining adhesive or caulk. A solvent like Goo Gone can help with sticky residue.
- Clean Surfaces: Wipe down the cabinet tops to ensure they are clean and ready for the new countertop installation.
Dealing with Old Countertop Disposal
Proper disposal of your old countertops is an important part of the kitchen renovation process.
Planning for Old Countertop Disposal
- Check Local Regulations: Different municipalities have different rules for disposing of large construction debris. Some require special pick-up, while others allow you to take it to a transfer station or landfill.
- Break Down Large Pieces: If you have stone countertops, breaking them into smaller pieces can make them easier to transport and dispose of. Use a sledgehammer and wear protective gear.
- Recycling Options: Some materials, like certain types of solid surface or laminate, may be recyclable. Investigate this option if it’s available in your area.
Transportation and Disposal
- Vehicle: Ensure you have a vehicle large enough to transport the old countertops. A pickup truck or a trailer is often necessary for larger pieces.
- Secure Load: If transporting, secure the pieces tightly to prevent them from shifting or falling out of your vehicle.
- Disposal Site: Take the old countertops to your local landfill, transfer station, or recycling center as per their guidelines.
Tips for Safe Countertop Removal
Safety should always be your top priority during any demolition project.
- Never Work Alone: Especially when dealing with heavy materials like stone.
- Wear Protective Gear: Always wear safety glasses, gloves, and a dust mask.
- Be Mindful of Sharp Edges: Old countertops, especially broken tile or stone, can have very sharp edges.
- Turn Off Utilities: Ensure water and electricity are disconnected if they are connected to the countertop area.
- Lift with Your Legs: When lifting heavy sections, bend your knees and lift with your legs, not your back.
- Use the Right Tools: Using the wrong tool can lead to injury or damage to your cabinets. A reciprocating saw is much better for cutting adhesive than a brute-force hammer.
- Take Breaks: Demolition can be strenuous. Take breaks to avoid fatigue, which can lead to accidents.
Considerations for Different Countertop Materials
While the general steps are similar, some materials require specific attention.
Removing Laminate Countertops
Laminate countertops are usually the easiest to remove.
- Adhesive: Often glued to a particleboard or plywood substrate.
- Removal Method: Primarily involves cutting sealant, removing any screws from underneath, and then prying or using a reciprocating saw to cut through the adhesive.
- Lightweight: Generally lighter, making them easier to handle.
Removing Solid Surface Countertops
Solid surface materials are glued directly to the cabinets.
- Adhesive: Strong adhesive bonds are typical.
- Removal Method: Requires cutting through the adhesive. A reciprocating saw is often necessary. Some can be lifted after carefully scoring the adhesive around the edges.
- Weight: Heavier than laminate but lighter than stone.
Removing Granite, Marble, or Quartz Countertops
These are the heaviest and potentially most dangerous to remove due to their weight and brittleness.
- Adhesive/Clips: Usually glued with adhesive and sometimes secured with clips.
- Removal Method: Extreme caution is needed.
- Weight is Key: You absolutely need multiple people to lift.
- Reciprocating Saw: Essential for cutting adhesive. Use with care to avoid damaging cabinets or the countertop itself if you plan to reuse it.
- Brittle: Stone can crack easily if not supported or lifted evenly. If it cracks, it will be very sharp.
- Consider Professional Help: If you are not comfortable with the weight or potential for damage, hiring professionals for removal might be wise.
Removing Tile Countertops
This is often the most labor-intensive DIY removal.
- Grout and Tile: Requires removing grout first, then tiles, and then the underlayment.
- Tools: A grout saw or oscillating tool is crucial for grout. Hammer and chisel or a pry bar for tiles. Grout removal tools are essential here.
- Underlayment Removal: The cement board or plywood underlayment must also be detached from the cabinets.
- Debris: Expect a lot of small, sharp pieces of tile and grout.
Preparing for New Countertop Installation
Once your old countertops are removed and disposed of, it’s time to prepare for the new ones.
- Inspect Cabinets: Check the condition of your cabinets. Ensure they are level and structurally sound.
- Make Repairs: Fix any damage to the cabinets.
- Install Support (If Needed): Some new countertops, especially heavier stone ones, might require additional support brackets installed on the cabinets.
- Clean Surfaces: Ensure the cabinet tops are perfectly clean and level for the new countertop installation.
Frequently Asked Questions (FAQ)
Q1: How much time does it take to remove kitchen countertops?
A1: The time can vary greatly depending on the countertop material, how it was installed, and your experience. Laminate or tile might take a few hours, while a large granite slab could take a similar amount of time with a helper.
Q2: Can I reuse my old countertops?
A2: It depends on their condition and material. Laminate and solid surface can be tricky to remove without damage. Granite, marble, or quartz are more durable but still require careful handling. If they are in good condition and you’re happy with them, proper removal allows for reuse.
Q3: What’s the hardest part of countertop removal?
A3: The hardest part is typically dealing with stubborn adhesive, the sheer weight of stone countertops, or the meticulous nature of removing tile and grout.
Q4: Do I need to disconnect the sink and faucet?
A4: Yes, if your sink is integrated with the countertop, you must disconnect the plumbing. Always turn off the water supply first and have a bucket ready for residual water.
Q5: What if my countertops are glued down very securely?
A5: For securely glued countertops, a reciprocating saw is often the best tool. Carefully cut along the seam between the countertop and the cabinets. A heat gun can sometimes help soften stubborn adhesive, but use it with caution to avoid damaging surrounding materials.
By following these detailed steps and prioritizing safety, you can successfully tackle the task of countertop demolition and pave the way for your exciting new kitchen.