
Can you remove a kitchen countertop yourself? Yes, with the right tools and a bit of patience, you can absolutely tackle DIY countertop removal. This guide will walk you through the process, whether you’re dealing with laminate, granite, butcher block, or tile, and prepare you for a successful kitchen countertop replacement. Removing old countertops is a crucial step in any kitchen renovation countertop project, and knowing how to do it safely and efficiently can save you money and a lot of hassle.
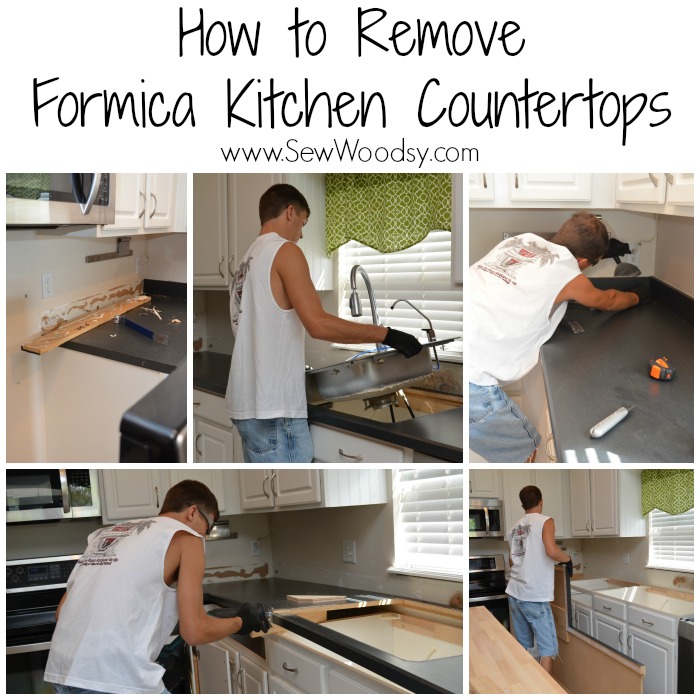
Image Source: sewwoodsy.com
Preparing for Countertop Demolition
Before you even think about grabbing a pry bar, thorough preparation is key. This isn’t just about gathering tools; it’s about planning, protecting your space, and ensuring your safety. Proper preparation makes the actual countertop demolition much smoother and less risky.
Essential Tools and Materials
Gathering everything you need beforehand saves time and prevents interruptions. Here’s a checklist to get you started:
- Safety Gear:
- Safety glasses or goggles
- Work gloves
- Dust mask or respirator (especially for tile and some laminate types)
- Sturdy work boots
- Demolition Tools:
- Pry bar (various sizes can be helpful)
- Hammer
- Putty knife or scraper
- Utility knife
- Screwdrivers (Phillips and flathead)
- Reciprocating saw with various blades (wood, metal, demolition)
- Caulking gun and caulk remover
- Chisels (cold chisel for stubborn materials)
- Rubber mallet
- Protection and Cleanup:
- Drop cloths or old blankets
- Painter’s tape
- Heavy-duty trash bags or a dumpster
- Broom and dustpan
- Shop vacuum
- Bucket and cleaning supplies
Safely Shutting Off Utilities
This is a non-negotiable step. Before you start any demolition, you must ensure all utilities connected to your countertop are safely shut off.
Shutting Off Water
If you have a sink or faucet attached to the countertop, you’ll need to turn off the water supply.
- Locate Shut-Off Valves: Look under the sink for two shut-off valves, one for hot water and one for cold. They typically have small knobs or levers.
- Turn Off Valves: Turn the knobs clockwise until they are snug. Don’t overtighten.
- Test: Turn on the faucet to drain any remaining water in the lines. Let it run until no more water comes out.
Disconnecting Plumbing
Once the water is off, you can disconnect the plumbing.
- Bucket Placement: Place a bucket directly under the P-trap (the U-shaped pipe under the drain) to catch any residual water.
- Loosen Connections: Use pliers or a pipe wrench to carefully loosen the slip nuts connecting the P-trap and drain pipe.
- Remove Drain Assembly: If your sink is attached, you’ll need to unscrew the drain flange from inside the sink bowl. A specialized drain wrench might be helpful here.
Disconnecting Electrical (If Applicable)
If you have any under-cabinet lighting, outlets, or garbage disposals integrated into the countertop, you’ll need to address the electricity.
- Locate Breaker: Go to your home’s electrical panel. Find the circuit breaker that controls the kitchen outlets or specific appliances connected to the countertop.
- Flip Breaker: Flip the breaker to the “OFF” position.
- Verify Power is Off: Use a non-contact voltage tester to confirm that there is no power at any outlets or fixtures connected to that circuit. Test it on a known live circuit first to ensure the tester is working.
Protecting Your Kitchen
A little protection goes a long way in minimizing damage and cleanup time.
- Cover Cabinets and Floors: Lay down drop cloths or old blankets over your cabinets and floors. Secure them with painter’s tape. Pay extra attention to areas near the demolition zone.
- Remove Appliances and Fixtures: Take out the sink, faucet, dishwasher, oven, or any other appliances or fixtures that are attached to or around the countertop. This makes removal easier and protects these items.
- Clear the Area: Remove all items from the countertop, from decorative pieces to small appliances. Clear a path for moving the old countertop sections out of the kitchen.
Removing Different Types of Countertops
The method for removing a kitchen countertop depends heavily on the material it’s made from. Each material has its own challenges and techniques for safe removal.
Laminate Countertop Removal
Laminate countertops are common in many homes and are generally the easiest to remove. They consist of a thin plastic laminate layer bonded to a particleboard or MDF core.
The Process
- Check for Fasteners: Look underneath the countertop, along the front edge of the cabinets. You’ll likely find screws or clips that hold the laminate countertop in place.
- Remove Screws/Clips: Use a screwdriver or drill to remove all visible screws and fasteners. Be mindful of the depth you’re unscrewing; you don’t want to damage the cabinet tops unnecessarily.
- Cut Sealant: If the countertop meets the backsplash or walls, there might be a bead of caulk or silicone sealant. Use a utility knife to carefully cut through this sealant.
- Loosen and Lift: Gently try to lift the countertop. If it’s still stuck, use a putty knife or a thin pry bar to work your way along the edges, carefully prying it away from the cabinets. Work slowly and evenly to avoid cracking the laminate.
- Break into Sections (If Necessary): For larger laminate countertops, you might need to break them down into smaller, more manageable pieces. Use a reciprocating saw with a wood blade to cut through the particleboard core. Start from an inconspicuous corner.
- Under-Mount Sink Removal: If you have an under-mount sink, this is a critical step. After disconnecting the plumbing, you’ll need to locate the clips or screws that hold the sink to the underside of the countertop. Remove these. Then, carefully break the sealant around the sink’s edge using a utility knife. The sink might need a gentle tap from below to loosen it. Be prepared for water.
Key Considerations for Laminate
- Particleboard Core: The particleboard core can absorb water and swell, making it heavier and potentially more brittle.
- Adhesives: Sometimes, adhesive is used in addition to fasteners. Gentle prying and patience are your best tools here.
Granite Countertop Removal
Granite countertops are beautiful but heavy and brittle. Their removal requires strength, careful handling, and often, more than one person. This is a job where professional help might be considered if you’re not experienced with heavy materials.
The Process
- Disengage Sink and Faucet: As with other types, first disconnect plumbing and any electrical connections for disposals. Remove the sink, faucet, and any other fixtures.
- Find Adhesive: Granite countertops are typically attached to the cabinets with a bead of construction adhesive or silicone.
- Cut Sealant: Use a utility knife or a thin, flexible scraper to cut through the sealant around the edges where the granite meets the backsplash, walls, or cabinets.
- Score Along Edges (Optional but Recommended): For a clean break and to prevent chipping the granite from unintended spots, you can use an angle grinder with a diamond blade to score a shallow line along the edges where it meets the backsplash or walls. Wear a respirator for silica dust.
- Loosen from Below: The most common attachment method is adhesive applied to the top edges of the cabinets. You’ll need to get underneath the countertop to break this bond.
- Pry Carefully:
- Two-Person Job: It’s highly recommended to have at least one helper.
- Prying Points: Use a pry bar between the granite and the cabinet, applying upward pressure. Work your way along the length of the countertop.
- Gentle Tapping: A rubber mallet can be used to gently tap the underside of the countertop at the cabinet edges to help break the adhesive bond. Avoid hitting the granite directly with a hammer.
- Reciprocating Saw (for Adhesion): If the adhesive is very strong, a reciprocating saw with a long, flexible blade can sometimes be used to cut through the adhesive from below, sliding the blade between the granite and the cabinet. Be extremely careful not to cut into cabinets or damage the granite.
- Lift and Remove: Once loosened, carefully lift the granite sections. They are very heavy, so ensure you have enough people and a clear path. Support the slab as you lift to prevent it from bowing or breaking.
Key Considerations for Granite
- Weight: Granite is incredibly heavy. A standard slab can weigh hundreds of pounds. Always have help.
- Brittleness: Despite its hardness, granite can be brittle and chip or break if handled improperly or subjected to uneven pressure.
- Support: Ensure cabinets are sturdy and can support the weight. You may need to add temporary bracing.
Butcher Block Countertop Removal
Butcher block countertops are durable and can be heavy depending on the wood species and thickness. They are typically attached with screws from the underside or sometimes glued.
The Process
- Disconnect Sink/Fixtures: Remove any attached sinks, faucets, or other fixtures.
- Locate Fasteners: The most common method is screws driven from the cabinet top into the underside of the butcher block. Check thoroughly under the cabinets.
- Remove Screws: Use a screwdriver or drill to remove all screws. Be careful not to strip the screw heads.
- Cut Sealant: If the butcher block meets a backsplash or wall, cut any caulk or adhesive with a utility knife.
- Adhesive Check: Some butcher block countertops might be glued down. If you don’t find screws, or if it feels very firmly attached, assume there’s adhesive.
- Prying and Lifting:
- Gentle Prying: Use a pry bar or putty knife between the butcher block and the cabinets to gently loosen it.
- Support: As you pry, support the butcher block to prevent it from sagging or breaking.
- Mallet Tapping: A rubber mallet can help break adhesive bonds.
- Sawing for Sections: If the butcher block is large, you may need to cut it into smaller sections for easier removal. Use a circular saw or reciprocating saw with a fine-tooth wood blade. Cut from the top side for a cleaner cut on the visible surface, but be mindful of any screws you might have missed.
Key Considerations for Butcher Block
- Wood Grain: Be aware of the wood grain direction when prying.
- Weight: While lighter than granite, thicker butcher block can still be quite heavy.
Tile Countertop Removal
Tile countertops are often set in thin-set mortar or adhesive over a plywood or cement board underlayment, which is then attached to the cabinets. This can be a messy and noisy job.
The Process
- Remove Grout: This is the first step to getting to the tiles. Use a grout saw or a utility knife to scrape out the grout between the tiles. A powered grout removal tool can speed this up significantly but requires care not to damage the tiles or underlying surface too much if you plan to reuse them.
- Remove Tiles:
- Pry Up: Once the grout is removed, try to get a putty knife or thin pry bar under the edge of a tile. Tap it gently with a hammer to loosen it.
- Hammer and Chisel: For stubborn tiles, place a cold chisel at the edge of a tile and strike it with a hammer. Work carefully to avoid shattering the tile or damaging the underlayment excessively.
- Scraping/Grinding: For very well-adhered tiles, especially if they are glued directly to a surface without grout, you might need to scrape or even grind off the adhesive.
- Remove Underlayment: Once all tiles and grout are removed, you’ll be left with the underlayment (usually plywood or cement board).
- Check Fasteners: Look for screws or nails holding the underlayment to the cabinet structure. Remove them.
- Pry and Lift: Use a pry bar to lift the underlayment. It may come up in large sheets or in pieces.
- Scrape Adhesive/Thin-set: Once the underlayment is off, you’ll likely have residual thin-set mortar or adhesive on the cabinet tops. Use a scraper, putty knife, or even a floor scraper to remove as much of this as possible.
Key Considerations for Tile
- Dust and Debris: Tile removal, especially with grout, creates a lot of dust. Wear your dust mask or respirator.
- Underlying Surface: Be mindful of the underlayment. If it’s plywood, you want to remove it cleanly to avoid damaging the cabinet structure. Cement board is more durable but harder to cut.
- Broken Pieces: Tiles will break during removal. Work carefully and be prepared for sharp edges.
Removing the Sink: A Crucial Step
Whether it’s an under-mount or drop-in sink, its removal is often tied to countertop removal. We’ve touched on this, but here’s a more detailed look.
Under-Mount Sink Removal
These are sinks mounted beneath the countertop.
- Water and Drain Disconnect: Ensure water is off. Place a bucket under the pipes and disconnect the P-trap and drain assembly.
- Loosen Clips: Underneath the countertop, look for metal clips holding the sink to the underside of the countertop. These are usually secured by screws. Remove all these clips.
- Break Sealant: The sink rim is typically sealed to the underside of the countertop with silicone or caulk. Use a utility knife to carefully cut through this entire seal.
- Gentle Prying: You might need to gently pry the sink downwards. A thin putty knife or scraper inserted between the sink and countertop edge can help break the last bits of sealant.
- Lower and Remove: Once freed, carefully lower the sink. It might still have some water in it. Have towels ready.
Drop-In Sink Removal
These sinks sit in a cutout in the countertop.
- Water and Drain Disconnect: Same as above – turn off water, place bucket, disconnect plumbing.
- Cut Sealant: Run a utility knife around the seam where the sink edge meets the countertop to break any caulk or adhesive.
- Loosen Fasteners: Look underneath the countertop for mounting clips that screw into the sink rim. Remove these.
- Lift Sink: Once clips and sealant are gone, lift the sink straight up and out of the cutout.
Advanced Tips and Troubleshooting
Even with preparation, you might encounter challenges. Here are some tips to help.
Dealing with Stubborn Adhesive
Construction adhesive can be incredibly strong.
- Heat: Sometimes, applying gentle heat with a hairdryer or heat gun (use caution not to scorch wood or melt plastic) can soften adhesive, making it easier to pry.
- Solvents: For some adhesives, specific solvents might help. Always test in an inconspicuous area first and ensure good ventilation.
- Reciprocating Saw: This is often the most effective tool for cutting through thick adhesive from below, but it requires precision.
Protecting Your Cabinets
The goal is to remove the countertop without damaging the cabinet structure.
- Use a Wood Block: When prying, place a small block of wood between the pry bar and the cabinet edge to distribute the force and prevent gouging.
- Shim Strategically: If a section is stuck, try inserting thin shims to hold it slightly elevated while you work on another area.
Breaking Down Large Sections
If a countertop section is too heavy or unwieldy, you’ll need to cut it.
- Measure First: Before cutting, measure the dimensions of your cabinets to ensure the pieces will fit through doorways.
- Support While Cutting: Ensure the countertop is well-supported on both sides of your cut line to prevent it from falling or breaking unexpectedly.
- Dust Control: Always use dust control measures, especially when cutting materials like granite or particleboard.
Cleaning Up After Removal
A clean workspace is crucial for the next stage of your renovation.
Debris Removal
- Bag It: Place all removed countertop sections, broken pieces, and debris into heavy-duty trash bags.
- Disposal: Check local regulations for countertop disposal. Large items might require a special pickup or a trip to the landfill or recycling center.
- Vacuum Thoroughly: Use a shop vacuum to clean up dust, small debris, and any stray particles from the cabinets and surrounding area.
Cleaning Cabinet Tops
- Scrape Remaining Adhesives: Use a putty knife, scraper, or even a razor blade (carefully!) to remove any leftover adhesive, thin-set, or caulk from the cabinet tops.
- Wipe Down: Clean the cabinet tops with a damp cloth and a mild cleaner to remove any residue and prepare them for the new countertop.
Frequently Asked Questions (FAQ)
How do I dispose of old countertops?
Disposal methods vary by location. You might be able to place them with your regular trash if they are cut into manageable pieces and bagged. For larger or heavier materials like granite, you may need to arrange for a special bulk pickup or take them to your local landfill or recycling center. Some recycling centers accept stone materials.
Do I need a professional for countertop removal?
While DIY countertop removal is possible, it’s not always necessary. If you’re removing heavy materials like granite or quartz, have minimal DIY experience, or are concerned about damaging your cabinets, hiring professionals is a wise investment. They have the right tools, experience, and manpower to do the job safely and efficiently.
How long does it take to remove kitchen countertops?
The time it takes can vary greatly depending on the material, how it was installed, and your experience.
* Laminate: 1-3 hours
* Butcher Block: 2-4 hours
* Tile: 3-6 hours (can be longer with difficult grout)
* Granite: 2-5 hours (often requires multiple people)
These are estimates and can be influenced by the complexity of sink/fixture removal and any unexpected adhesive issues.
What’s the most difficult type of countertop to remove?
Generally, granite and other natural stone countertops are the most difficult due to their extreme weight and brittleness. Tile countertops can also be challenging due to the labor-intensive grout removal and the potential for underlying adhesion issues.
Can I reuse my old countertop?
This depends entirely on the condition of the countertop. Laminate and butcher block can sometimes be salvaged if they are in good condition and removed carefully. Granite and tile are more prone to breaking during removal, making reuse less common unless professionally cut and handled.
Conclusion
Removing a kitchen countertop is a significant undertaking that’s well within the capabilities of many DIYers. By meticulously preparing, gathering the right tools, taking necessary safety precautions, and employing the correct techniques for your specific countertop material, you can successfully tackle this stage of your kitchen renovation. Whether you’re embarking on a full kitchen renovation countertop project or just swapping out an old sink, mastering DIY countertop removal is a rewarding skill that can save you time and money. Remember to prioritize safety, work with a helper for heavy materials, and take your time for the best results.