
Thinking about updating your kitchen? You can definitely refinish kitchen cabinet doors yourself! This guide will walk you through everything you need to know for a successful cabinet door restoration.
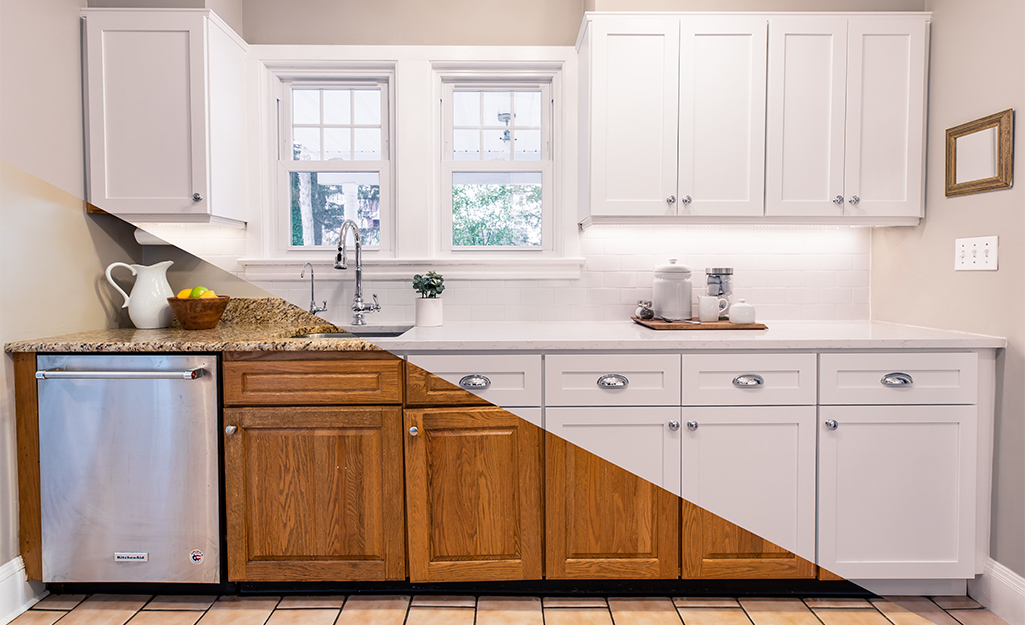
Image Source: contentgrid.homedepot-static.com
Why Refinish Your Kitchen Cabinet Doors?
Over time, kitchen cabinets can get worn out. The finish might chip, the color can fade, or you might just be ready for a new look. Refinishing your cabinet doors is a fantastic way to give your kitchen a fresh, updated feel without the high cost of a full renovation. It’s a rewarding DIY project that can dramatically change the appearance of your kitchen. Whether you’re looking for kitchen cabinet updates, a complete cabinet door restoration, or simply want to try painting kitchen cabinet doors or staining cabinet doors, this guide is for you.
Project Overview: Your DIY Cabinet Door Makeover
Refinishing cabinet doors involves several key steps. You’ll need to remove the doors, clean them, prepare the surface, apply your chosen finish (paint or stain), and then reassemble everything. It might seem like a lot, but by breaking it down, it’s a manageable project.
What You’ll Need: Essential Supplies
Before you start, gather all your materials. Having everything ready makes the process much smoother.
- Safety Gear:
- Safety glasses
- Gloves (chemical-resistant for stripping)
- Dust mask or respirator (especially when sanding or stripping)
- Good ventilation (open windows, fans)
- Cleaning & Prep:
- Screwdriver (for removing doors and hardware)
- Degreaser (like TSP substitute or Krud Kutter)
- Clean rags or sponges
- Mild soap and water
- Sanding sponges or sandpaper (various grits: 100, 150, 220)
- Tack cloths
- Wood filler (if needed for repairs)
- Finishing Supplies (Choose one path):
- For Painting:
- Primer (oil-based or water-based, depending on your paint)
- Cabinet-grade paint (latex, acrylic, or enamel)
- High-quality brushes (angled sash brush)
- Foam rollers (for smooth surfaces)
- Paint trays
- Drop cloths
- For Staining:
- Wood conditioner (especially for pine or other blotch-prone woods)
- Wood stain (oil-based or water-based)
- Clean rags or foam brushes for application
- Polyurethane or other clear topcoat (satin, semi-gloss, or gloss)
- Fine-grit sandpaper (220-320 grit) for between coats
- For Painting:
- Optional:
- Paint sprayer (for a professional finish)
- Kitchen cabinet hardware replacement (new knobs or pulls)
Step 1: Removing Cabinet Doors and Hardware
This is the first practical step in kitchen cabinet door refinishing.
- Label Everything: Before you take anything off, label each door and its corresponding cabinet frame with a number or letter. You can use painter’s tape and a marker. This is crucial for putting everything back correctly.
- Remove Doors: Open each cabinet door. You’ll usually see screws holding the hinges to the cabinet frame. Unscrew them carefully.
- Support Doors: Have someone help you, or use a block of wood to support the door as you remove the last screws. This prevents the door from falling.
- Remove Hardware: Once the doors are off, remove the hinges and any existing knobs or pulls. Place all the hardware in a baggie and label it to match the door it came from. This is also a good time to consider kitchen cabinet hardware replacement if your current hardware is outdated or damaged.
Tip for Hinge Removal:
Sometimes hinges can be tricky. If the hinge is attached to the door itself, you might need to unscrew that first. If the doors are inset, the hinges will be on the inside of the cabinet frame.
Step 2: Cleaning the Cabinet Doors
Thorough cleaning is vital for good adhesion of any new finish. Don’t skip this!
- Degrease: Kitchen cabinets are often coated with grease and grime. Use a degreaser solution on a damp cloth or sponge. Wipe down the entire surface of each door, front and back.
- Rinse: Wipe down the doors again with a clean cloth dampened with plain water to remove any degreaser residue.
- Dry: Allow the doors to air dry completely. You can also wipe them down with a dry cloth.
What to Use for Cleaning:
- TSP Substitute: A safe and effective degreaser.
- Mild Dish Soap and Water: For lighter grime.
- Specialized Cabinet Cleaners: Available at hardware stores.
Step 3: Stripping Old Finish (If Necessary)
If your cabinets have a thick, peeling, or very dark finish, you might need to strip them. This is one of the most labor-intensive parts of cabinet door restoration.
When to Strip:
- Peeling or flaking paint/varnish.
- Deep scratches or damage that won’t sand out.
- You’re changing from a dark stain to a light paint or vice versa.
How to Strip:
- Choose a Stripper: Use a chemical stripper designed for wood finishes. Gel strippers are generally easier to control and less messy. Follow the manufacturer’s instructions carefully.
- Apply Stripper: Apply a thick, even coat of the stripper with an old brush. Work in sections.
- Wait: Let the stripper do its work. It will start to bubble and lift the old finish. This usually takes 15-30 minutes, but check the product directions.
- Scrape: Use a plastic scraper or putty knife to gently scrape away the softened finish. Work in the direction of the wood grain.
- Clean: Use mineral spirits or a stripper wash (again, follow product instructions) on a rag to remove any remaining stripper residue.
- Neutralize: Some strippers require a neutralizing step. Make sure to follow through.
- Repeat if Needed: For stubborn finishes, you might need a second application.
Safety Note: Stripping chemicals can be harsh. Always wear gloves, eye protection, and a respirator in a well-ventilated area.
Step 4: Cabinet Door Prep – Sanding and Repair
Proper cabinet door prep is critical for a smooth, professional-looking finish.
- Sanding (After Stripping): If you stripped the doors, you’ll likely need to sand them smooth. Start with a medium-grit sandpaper (around 100-150 grit) to remove any remaining finish or imperfections.
- Sanding (If Not Stripping): If you’re painting or staining over an existing finish, you need to rough up the surface so the new finish adheres well. Use 150-grit sandpaper or a sanding sponge. Sand the entire surface of each door, paying attention to corners and edges.
- Repair Imperfections:
- Dents and Scratches: Lightly sand over them. For deeper gouges, use wood filler. Apply the filler with a putty knife, pressing it into the damaged area. Let it dry completely according to the product instructions.
- Re-sand: Once the wood filler is dry, sand the repaired areas smooth with 220-grit sandpaper. Make sure the repaired area is flush with the rest of the door.
- Final Sanding: After all repairs are done, give the entire door a final sanding with 220-grit sandpaper. This creates a uniformly smooth surface.
- Clean Dust: This is crucial. Use a vacuum with a brush attachment to remove most of the dust. Then, wipe down the doors thoroughly with tack cloths. Tack cloths are sticky and pick up fine dust particles that vacuums miss.
Sanding Grits Explained:
- Low Grit (e.g., 80-100): For heavy stripping or removing old finishes.
- Medium Grit (e.g., 150): For general sanding, smoothing out rough spots.
- Fine Grit (e.g., 220): For creating a smooth surface before priming or finishing.
- Very Fine Grit (e.g., 320+): For sanding between coats of finish.
Step 5: Applying Primer (If Painting)
If you’re painting kitchen cabinet doors, primer is your best friend.
- Choose Your Primer:
- Oil-based primer: Excellent for blocking stains and providing a very durable base, especially for wood with knots. Requires mineral spirits for cleanup.
- Water-based (latex/acrylic) primer: Easier cleanup with water, dries faster, and has lower VOCs (Volatile Organic Compounds). Good for most applications.
- Apply Thin Coats: Apply a thin, even coat of primer. Use a high-quality brush for edges and detailed areas, and a foam roller for flat surfaces. If using a paint sprayer, follow the manufacturer’s recommendations for primer.
- Smooth Application: Avoid drips and runs. If you get a drip, feather it out with your brush before it dries.
- Dry and Sand: Let the primer dry completely. Check the product’s drying times. Once dry, lightly sand the primer coat with 220-grit sandpaper or a fine-grit sanding sponge. This smooths out any imperfections and helps the paint adhere better.
- Clean Dust: Again, wipe down with a tack cloth to remove all sanding dust.
- Second Coat (Optional): For a truly flawless finish, especially if covering a dark color or if the wood is prone to tannin bleed-through (like cherry or red oak), a second coat of primer might be beneficial. Repeat the sanding and cleaning steps.
Step 6: Painting Kitchen Cabinet Doors
Now for the fun part of painting kitchen cabinet doors!
- Choose Your Paint: Use a high-quality cabinet-grade paint. Options include:
- Latex/Acrylic Enamels: Durable, flexible, and easy to clean. Come in various sheens (satin, semi-gloss, gloss). Satin is a popular choice for cabinets.
- Oil-based Enamels: Very durable and hard, but can yellow over time and are harder to clean up.
- Cabinet Coatings (e.g., Sherwin-Williams Emerald Urethane Trim Enamel): These are specifically formulated for cabinets and offer excellent durability and a smooth finish.
- Apply Thin Coats: Apply thin, even coats of paint. Overloading the brush or roller will lead to drips and an uneven finish. Work from the inside details outward.
- Brushes vs. Rollers:
- Brushes: Best for doors with panels and detailed edges. Use an angled sash brush for precision.
- Foam Rollers: Ideal for flat surfaces of doors and drawer fronts. They provide a smooth, brush-stroke-free finish.
- Paint Sprayer (For a Pro Finish): If you want the most professional, factory-like finish, a paint sprayer is the way to go. This requires practice and proper setup, including masking off everything you don’t want painted.
- Allow Drying Time: Let each coat of paint dry completely according to the manufacturer’s instructions. Rushing this step can cause adhesion problems.
- Sand Between Coats: After each coat of paint (except the final one), lightly sand with 220-grit sandpaper or a fine sanding sponge. This knocks down any dust nibs or minor imperfections.
- Clean Dust: Use a tack cloth to remove all dust after sanding.
- Multiple Coats: Most cabinet doors will require at least two or three coats of paint for full coverage and durability.
Painting Techniques for Smoothness:
- Maintain a Wet Edge: When painting, overlap your strokes slightly to ensure a continuous flow and avoid lap marks.
- Avoid Overworking the Paint: Apply the paint and let it level itself as much as possible. Excessive brushing can create texture.
Step 7: Staining Cabinet Doors
If you prefer the natural beauty of wood, staining cabinet doors is a great option.
- Wood Conditioner (Important!): For woods like pine, maple, or cherry, which can absorb stain unevenly, apply a pre-stain wood conditioner. This evens out the porosity of the wood, preventing blotchiness. Follow the product’s drying instructions.
- Test Your Stain: Always test your stain color on a scrap piece of wood from your cabinet doors or in an inconspicuous area on the back of a door. Stains can look very different on different wood types.
- Apply Stain:
- With Rags: Apply the stain generously with a clean, lint-free rag. Work in the direction of the wood grain.
- With Foam Brushes: Foam brushes can also be used for stain application, especially for getting into crevices.
- Let it Penetrate: Allow the stain to soak into the wood for the time recommended by the manufacturer (usually 5-15 minutes).
- Wipe Off Excess: Use a clean, lint-free rag to wipe off the excess stain. Wipe with the grain. The longer you leave the stain on, the darker the color will be.
- Dry Completely: Let the doors dry thoroughly. This can take 24-48 hours for oil-based stains.
Stain Colors and Tones:
- Natural: Enhances the wood’s natural color.
- Light Stains (e.g., honey, golden oak): Brighten the wood.
- Medium Stains (e.g., walnut, provincial): Add warmth and depth.
- Dark Stains (e.g., espresso, ebony): Create a dramatic, modern look.
Step 8: Applying a Topcoat (For Stained or Painted Doors)
A topcoat protects your finish and adds durability.
- Choose Your Topcoat:
- Polyurethane: Very durable, available in oil-based (amber tint, very strong) and water-based (clearer, faster drying).
- Polycrylic: Water-based, clear, and easy to use. Good for painted cabinets.
- Varnish or Lacquer: Other options, often applied with a sprayer for a fine finish.
- Apply Thin Coats: Apply thin, even coats of your chosen topcoat. Use a high-quality synthetic brush for water-based finishes or a natural bristle brush for oil-based finishes.
- Sand Between Coats: After each coat of topcoat dries (check product instructions), lightly sand with very fine-grit sandpaper (220-320 grit) or a fine sanding sponge. This smooths the surface and helps subsequent coats adhere better.
- Clean Dust: Always use a tack cloth to remove all dust after sanding.
- Multiple Coats: Apply at least 2-3 coats of topcoat for maximum protection against wear and tear, especially in a kitchen environment.
Topcoat Sheens:
- Matte: No shine.
- Satin: A low sheen.
- Semi-Gloss: A moderate sheen, often preferred for kitchens due to its durability and washability.
- Gloss: A high shine, reflects light and can show imperfections more.
Step 9: Reassembling Your Kitchen Cabinets
The final step in your DIY cabinet door makeover!
- Allow Full Curing: Ensure the topcoat is fully cured (this can take several days to weeks, depending on the product) before reattaching the doors. They might feel dry to the touch but still be soft.
- Reattach Hardware: If you’re keeping your old hardware, reattach the hinges, knobs, and pulls to the doors. If you opted for kitchen cabinet hardware replacement, now is the time to install the new ones.
- Hang the Doors: With help, carefully reattach the cabinet doors to the frames using the original hinge screws.
- Adjust Hinges: Most cabinet hinges have adjustment screws that allow you to fine-tune the door alignment. Adjust as needed so all doors hang straight and close properly.
Frequently Asked Questions (FAQ)
- Q: Can I refinish my laminate or thermofoil cabinet doors?
- A: Refinishing laminate or thermofoil cabinets is possible, but it’s more challenging than wood. You’ll need a specialized primer designed for these surfaces, followed by high-quality paint. Sanding may damage the laminate, so proceed with caution.
- Q: How long does it take to refinish cabinet doors?
- A: The time varies depending on the number of doors, the chosen finish, and drying times. A typical kitchen might take anywhere from 3-7 days, spread out over a week or two due to drying and curing.
- Q: What is the best finish for kitchen cabinets?
- A: For durability and washability, a semi-gloss or satin finish in a high-quality enamel paint or a durable topcoat like polyurethane is generally recommended for kitchen cabinets.
- Q: Can I paint over stained cabinets?
- A: Yes, you can paint over stained cabinets, but proper preparation is key. You must clean, degrease, sand thoroughly to create a surface for the primer to adhere to, and then use a good quality primer before painting.
- Q: Do I need to remove my cabinet doors to refinish them?
- A: While it’s possible to paint cabinets in place, removing the doors is highly recommended for a much better, more even finish, especially for painting kitchen cabinet doors. It allows you to access all areas and avoid drips on your countertops or floors.
Refinishing your kitchen cabinet doors is a rewarding project that can completely transform your kitchen’s appearance. With careful planning and execution, you can achieve professional-looking results and enjoy your updated kitchen for years to come. Happy DIYing!