
Can you paint kitchen floor tiles? Yes, you absolutely can paint kitchen floor tiles to give your kitchen a fresh, new look without the hassle and expense of a full renovation. This DIY floor tile paint project can transform your space with stunning results. This guide will walk you through everything you need to know about painting kitchen tiles, whether they are ceramic, vinyl, or another type. Get ready for a fantastic floor tile makeover!
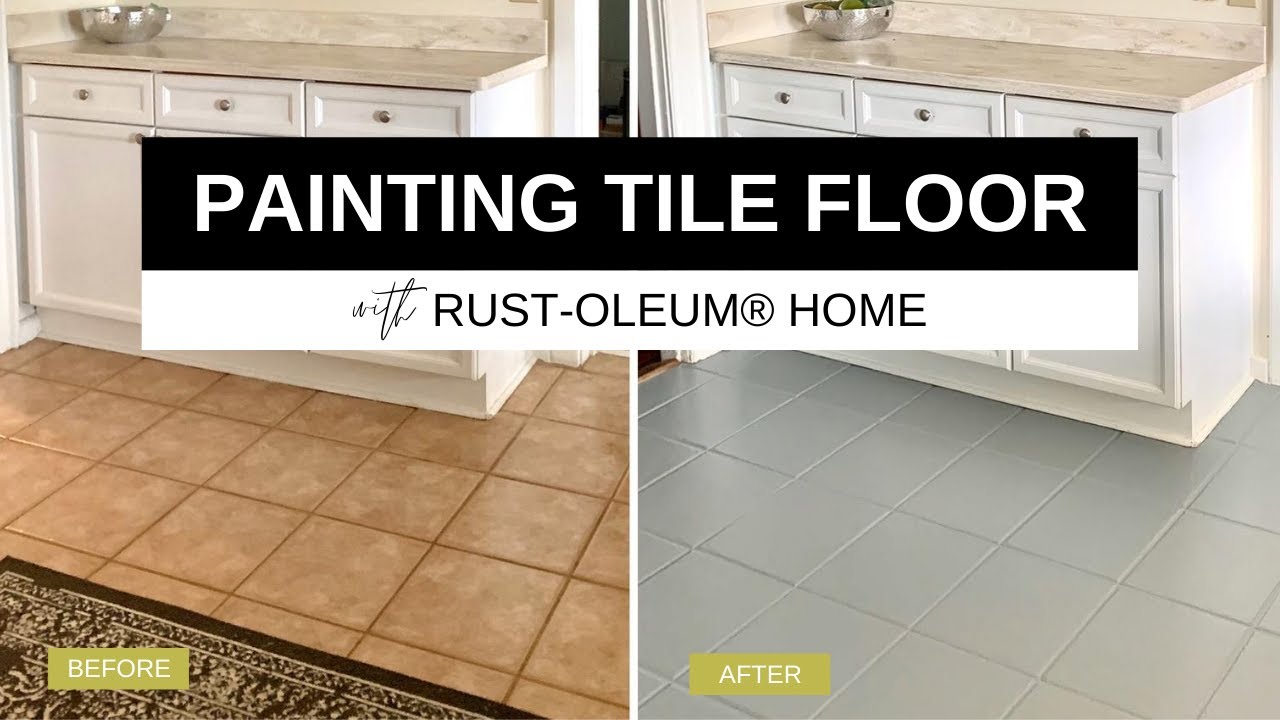
Image Source: i.ytimg.com
Why Paint Your Kitchen Floor Tiles?
Updating your kitchen can seem like a big undertaking. Often, the floor is a major focal point, and worn-out or outdated tiles can make the whole room feel tired. Instead of a costly and time-consuming replacement, a clever coat of kitchen floor tile paint can work wonders.
- Cost-Effective: Replacing kitchen flooring can cost hundreds, even thousands, of dollars. Painting is a fraction of that price.
- Time-Saving: A full tile replacement can take days or even weeks. Painting can often be completed in a weekend or two.
- Customization: You can choose any color or pattern you desire, creating a truly unique look for your kitchen.
- Revitalizes Old Spaces: It’s a perfect solution for rental properties or if you’re not ready for a permanent change.
- Versatility: This technique works on many types of floor tiles, including ceramic and vinyl.
Is Kitchen Floor Tile Paint Durable?
When done correctly with the right products, kitchen floor tile paint can be very durable. The key is using specialized floor paints designed to withstand high traffic, moisture, and cleaning. Look for paints labeled as “floor coating,” “epoxy paint,” or “tile and floor paint.” These are formulated to adhere well and resist wear and tear. Proper preparation and sealing are crucial for long-lasting results.
What Type of Paint Can I Use for Kitchen Floor Tiles?
Choosing the right paint is vital for success. Not all paints are created equal, especially when it comes to flooring.
- Epoxy Floor Paints: These are often a two-part system (resin and hardener) that creates a very tough, durable finish. They offer excellent resistance to chemicals, abrasion, and moisture, making them ideal for kitchens.
- Acrylic Floor Paints: High-quality acrylic floor paints can also be a good option, especially for DIYers. They are generally easier to work with than epoxies and come in many colors. Look for those specifically designed for concrete or tile floors.
- Specialty Tile Paints: Some manufacturers offer paints specifically formulated for ceramic or vinyl tiles. These can be a simpler, single-part solution.
Important Note: Never use regular wall paint or latex paint for your kitchen floor. It will not withstand foot traffic or cleaning and will peel or chip quickly.
Preparing Your Kitchen Floor for Painting
This is perhaps the most critical step for a successful and long-lasting paint job. Skipping or rushing preparation is the most common reason for paint failure.
Step 1: Clear the Kitchen
- Remove all furniture, appliances, rugs, and anything else from the floor.
- Take the time to give your kitchen a good clean while it’s empty.
Step 2: Deep Clean the Tiles
The goal here is to remove all dirt, grease, soap scum, wax, and any other residues.
- Sweep and Vacuum: Start by removing loose debris.
- Degrease: Use a strong degreaser or a solution of TSP (trisodium phosphate) or a TSP substitute. Follow the manufacturer’s instructions carefully. Wear gloves and eye protection.
- Scrub: Use a stiff brush or a floor scrubber to scrub the tiles and grout lines thoroughly.
- Rinse Well: This is crucial. Rinse the floor multiple times with clean water to remove all traces of the cleaning solution. A wet vacuum can be very helpful for this.
- Allow to Dry Completely: The floor must be bone dry before proceeding. This can take 24-48 hours, depending on humidity. You can speed this up with fans.
Step 3: Repair Imperfections
- Inspect Tiles: Check for any cracked, chipped, or loose tiles.
- Repair or Replace: Loose tiles should be re-adhered. Cracked or chipped tiles need to be filled with a suitable tile or grout filler. Allow these repairs to dry and cure completely according to the product instructions.
- Fill Grout: If your grout is damaged or has large pores, you might want to consider filling it with a grout filler or a thin layer of flexible grout caulk. Ensure it’s smooth and flush with the tile.
Step 4: Etch or Prime (Depending on Tile Type)
This step ensures the paint adheres properly.
- For Ceramic or Porcelain Tiles: These are non-porous, so they benefit from etching or priming.
- Etching: You can use an etching solution (often acid-based) for a micro-rough surface. Follow the product’s instructions precisely and ensure good ventilation. Rinse thoroughly afterward.
- Primer: A good quality bonding primer designed for tile or glossy surfaces is usually the easiest and most effective route. Look for primers that specifically state they are for tile or non-porous surfaces. Apply a thin, even coat and let it dry completely as per the manufacturer’s recommendations.
- For Vinyl Tiles:
- Cleaning is Key: Thorough cleaning is paramount for vinyl. Ensure all wax or polish is removed.
- Sanding (Optional but Recommended): Lightly scuff the surface with fine-grit sandpaper (around 120-180 grit). This creates a “tooth” for the primer to grip. Clean away all dust thoroughly after sanding.
- Primer: Use a primer specifically recommended for vinyl or plastic surfaces. This will prevent the paint from reacting with the vinyl and causing issues.
Step 5: Tape Off Edges
- Use painter’s tape to protect baseboards, cabinets, and any other adjacent surfaces you don’t want to paint. Ensure the tape is pressed down firmly to prevent paint bleed.
Painting Kitchen Tiles: Step-by-Step
Now for the fun part – transforming your floor!
Step 1: Apply the First Coat of Paint
- Choose Your Tool: Use a high-quality roller with a short nap (like 1/4 inch or 3/8 inch) for smooth surfaces. For textured tiles or to get into grout lines, a dense foam roller or a good quality brush might be better.
- Start in a Corner: Begin in a corner furthest from your exit point.
- Work in Sections: Apply the paint in thin, even coats. Avoid applying too much paint, as this can lead to drips and an uneven finish.
- Maintain a Wet Edge: Overlap your strokes slightly to ensure a seamless finish and avoid lap marks.
- Paint Grout Lines: Ensure your roller or brush gets into the grout lines to cover them completely.
- Allow to Dry: Let the first coat dry completely according to the paint manufacturer’s instructions. This is crucial for adhesion between coats. Drying times can vary significantly.
Step 2: Apply Additional Coats (If Needed)
- Most floor painting projects require at least two coats for full coverage and durability.
- Check the paint can for recommended drying times between coats.
- Apply subsequent coats in the same manner as the first, ensuring thin, even layers.
Step 3: Apply a Topcoat or Sealer (Highly Recommended)
This is where the durability comes in. A good topcoat will protect your painted tiles from scuffs, scratches, and cleaning chemicals.
- Types of Topcoats:
- Clear Acrylic Sealer: A water-based acrylic sealer provides good protection and is easy to clean up.
- Polyurethane Sealers: These offer excellent durability and resistance to abrasion and chemicals. Water-based polyurethanes are generally easier to work with and have lower VOCs. Oil-based can be more durable but have stronger fumes and yellowing over time.
- Epoxy Topcoats: If you used an epoxy paint system, you’ll likely use a compatible epoxy topcoat for maximum protection.
- Application: Apply the topcoat using a clean roller or brush, following the manufacturer’s instructions for application and drying times. Apply thin, even coats. Two coats of topcoat are often recommended for best results.
Drying and Curing Times
This is where patience is a virtue.
- Drying Time: This refers to when the surface feels dry to the touch and you can recoat. This can be a few hours.
- Curing Time: This is when the paint or topcoat reaches its maximum hardness and durability. This can take several days to a week or even longer.
- Foot Traffic: You can usually walk on the floor carefully after 24-72 hours, depending on the product.
- Heavy Furniture: Wait at least 7 days, preferably 14 days, before placing heavy furniture back on the floor. Use felt pads under furniture legs.
- Full Use and Cleaning: Wait at least 7-14 days before cleaning the floor with harsh cleaners or exposing it to significant moisture.
Tips for Stunning Results
- Test in an Inconspicuous Area: Always test your paint and topcoat in a small, hidden spot (like inside a pantry or under a cabinet) to ensure you like the color and that it adheres well.
- Use High-Quality Tools: Cheap rollers and brushes will leave streaks and an uneven finish. Invest in good quality tools.
- Ventilation is Key: Open windows and use fans, especially when using primers, epoxy paints, or strong cleaners.
- Work in Good Lighting: This helps you see any missed spots or drips.
- Don’t Rush: Proper preparation and allowing adequate drying time between coats are essential for a professional-looking and durable finish.
- Consider a Pattern: Once you have your base coat down, you can get creative! Use stencils for patterns, or use painter’s tape to create geometric designs.
- Maintain Your Painted Floor: Clean spills immediately. Use mild, pH-neutral cleaners. Avoid abrasive scrubbers or harsh chemicals that can damage the topcoat.
Painting Vinyl Kitchen Tiles: Special Considerations
Painting vinyl kitchen tiles is achievable, but it requires specific attention to the material.
- Surface Preparation is Paramount: Vinyl can be slippery and may have a factory coating that needs to be removed or scuffed for paint adhesion.
- Primer for Vinyl: A good bonding primer specifically formulated for vinyl or plastic is essential. This prevents issues like the paint lifting or the vinyl softening.
- Paint Type: While some floor paints can work, ensure they are compatible with vinyl. Some heavy-duty epoxy coatings might be too harsh for older vinyl.
- Flexibility: Vinyl can expand and contract with temperature changes. A slightly more flexible topcoat might be beneficial.
Painting Ceramic Kitchen Tiles: Special Considerations
Ceramic and porcelain tiles are generally more porous than vinyl, but their non-porous surface still requires proper preparation.
- Cleaning: A very thorough degreasing is needed to remove any sealers or residues that might be on the tile.
- Etching or Priming: As mentioned, etching or a bonding primer is almost always necessary for ceramic and porcelain tiles to ensure the paint adheres well and doesn’t peel.
- Grout: Ensure grout lines are clean and, if necessary, treated with a grout sealer before painting the tiles, or filled and smoothed if they are very porous or damaged.
Common Mistakes to Avoid
| Mistake | Consequence | How to Prevent |
|---|---|---|
| Insufficient Cleaning | Paint won’t adhere, peels or chips quickly. | Thoroughly degrease and rinse. Use TSP or a strong cleaner. |
| Skipping Primer/Etching | Poor adhesion, paint lifts. | Always prime or etch non-porous surfaces like ceramic or vinyl. |
| Applying Paint Too Thickly | Drips, runs, uneven finish, long drying times. | Apply thin, even coats. Use a good roller and don’t overload it. |
| Not Waiting Between Coats | Paint can peel or become gummy. | Follow manufacturer’s recommended drying times for recoating. |
| Using the Wrong Paint | Paint won’t last, peels, or damages the surface. | Use specialized floor paint, epoxy, or tile paint. Avoid regular wall paint. |
| Not Using a Topcoat | Painted surface is prone to scuffs and scratches. | Apply a durable clear topcoat for protection. |
| Rushing the Curing Process | Damage to the new paint job from early use. | Allow the full curing time before placing furniture or heavy traffic. |
| Improper Grout Treatment | Grout can stain through the paint or look uneven. | Clean grout thoroughly, repair if needed, and consider a grout sealer or filler. |
Frequently Asked Questions (FAQ)
Q1: Can I paint over existing tile grout?
A1: Yes, you can paint grout. However, it’s essential to clean it thoroughly. If the grout is very porous or damaged, consider filling it with a grout filler or using a specialized grout paint product before painting the tiles themselves. This ensures a more uniform look.
Q2: How long will painted kitchen floor tiles last?
A2: With proper preparation, the right products, and good maintenance, painted floor tiles can last anywhere from 3 to 7 years, sometimes even longer. Durability depends on the quality of materials used, the amount of foot traffic, and how well the floor is cared for.
Q3: Can I use a stencil to add a pattern to my painted kitchen floor?
A3: Absolutely! Once your base coats of paint and topcoat have cured sufficiently (check the paint manufacturer’s guidelines), you can use stencils to add intricate designs or simple patterns. Use a stencil brush or a small foam roller for application, and ensure you carefully lift the stencil to avoid smudging.
Q4: What is the best way to clean painted kitchen floor tiles?
A4: For best results, use a soft mop or cloth and a mild, pH-neutral cleaner. Avoid abrasive scrubbers, steel wool, or harsh chemicals like bleach or ammonia, as these can break down the paint or topcoat over time. Wipe up spills immediately.
Q5: My painted floor is starting to chip. What did I do wrong?
A5: Most often, chipping is due to inadequate preparation. This can include not cleaning the floor thoroughly enough to remove grease or wax, not priming a non-porous surface, or not using a durable topcoat. Rushing the drying or curing times can also contribute.
Q6: Can I paint over vinyl sheet flooring?
A6: While this guide focuses on vinyl tiles, many of the same principles apply to vinyl sheet flooring. Thorough cleaning, scuffing, and using the correct primer for vinyl are crucial. Ensure the vinyl is in good condition and not lifting or damaged.
Q7: Is this a good solution for a high-traffic kitchen?
A7: Yes, if you use durable floor tile paint (like epoxy systems) and a robust topcoat, it can be a very good solution for high-traffic kitchens. The key is selecting products designed for durability and following all preparation and application steps meticulously.
Embarking on a kitchen floor tile makeover can seem daunting, but with the right approach, you can achieve stunning, professional-looking results. This DIY floor tile paint project offers a fantastic way to refresh your kitchen’s aesthetic without breaking the bank. Remember, preparation is paramount, and choosing the right products will ensure your painted kitchen tiles are not only beautiful but also durable for years to come. Happy painting!