
Image Source: i.ytimg.com
How To Cover Kitchen Cabinets: Stunning Updates & DIY Solutions
Can you cover kitchen cabinets? Yes, absolutely! Covering kitchen cabinets is a fantastic way to give your kitchen a fresh look without a complete renovation. Whether you’re looking for a budget-friendly DIY solution or exploring more permanent updates, there are many ways to transform your cabinets and elevate your kitchen’s style. This guide delves into various methods, from quick fixes to more involved projects, to help you achieve a stunning kitchen cabinet makeover.
Breathing New Life into Old Cabinets: Popular Covering Methods
When you want to update kitchen cabinets, the options are plentiful. You can completely replace kitchen cabinet doors, opt for cabinet refacing options, or explore creative covering techniques. Let’s explore some of the most popular and effective ways to cover your kitchen cabinets.
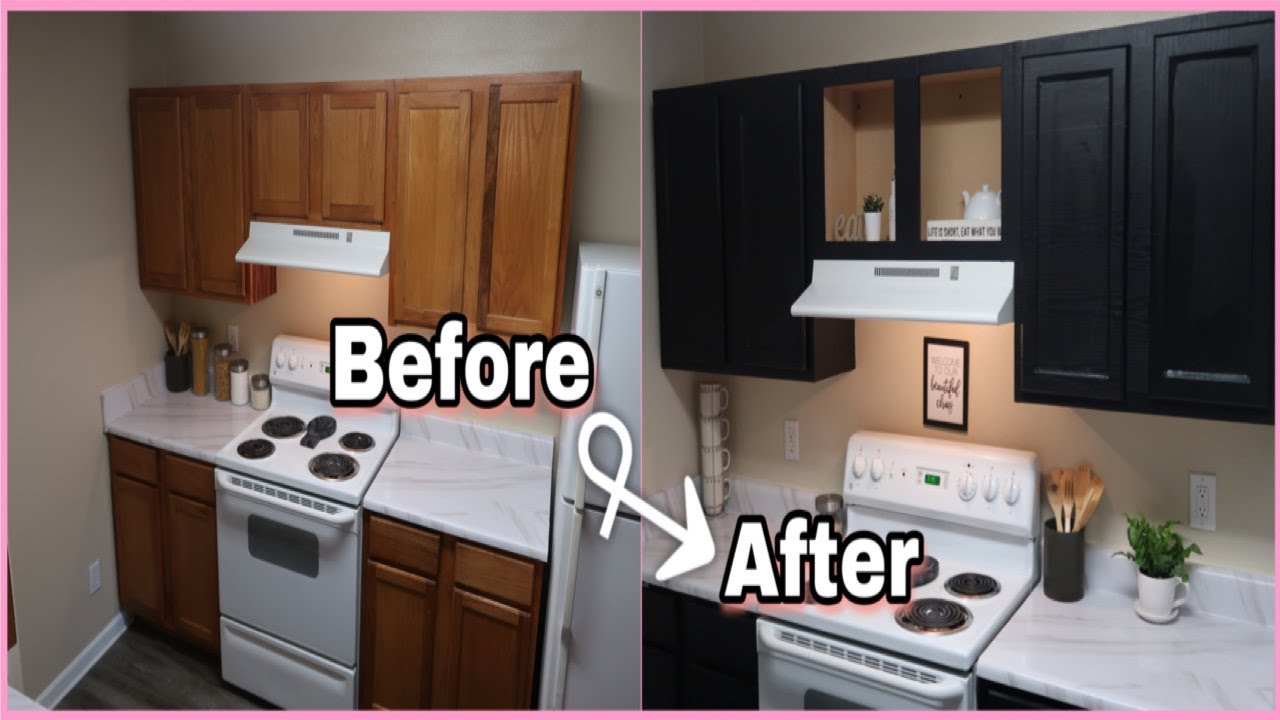
1. Paint Kitchen Cabinets: The Classic Transformation
Painting is arguably the most popular method for a kitchen cabinet makeover. It offers a wide range of color possibilities and can dramatically change the feel of your kitchen.
Preparing for Paint: The Crucial First Step
Proper preparation is key to a durable and beautiful painted finish. Skipping this step can lead to peeling, chipping, and an uneven look.
- Clean Thoroughly: Remove all cabinet doors and drawers. Wash them with a degreaser to remove grease, grime, and any residue. A solution of warm water and dish soap usually does the trick. For stubborn buildup, a TSP (trisodium phosphate) substitute can be effective.
- Repair Imperfections: Fill any holes or dents with wood filler. Once dry, sand the area smooth.
- Sand Surfaces: Lightly sand all cabinet surfaces. This creates a slightly rough texture that paint can adhere to. Use medium-grit sandpaper (around 120-150 grit) for the initial sanding and then follow with a finer grit (around 220 grit) for a smoother finish. Sanding dust should be wiped away thoroughly with a tack cloth.
- Prime Your Cabinets: Apply a good quality primer. This is essential for ensuring even coverage, blocking stains, and helping the paint adhere properly. Opt for a stain-blocking primer, especially if your cabinets have a dark wood grain or you’re painting over a dark color.
Choosing the Right Paint: Durability and Finish
The type of paint you choose significantly impacts the longevity and appearance of your painted cabinets.
- Types of Paint:
- Latex/Acrylic Paint: Water-based, easy to clean up, and available in a vast array of colors and finishes. Look for high-quality enamel formulas designed for cabinets.
- Oil-Based Paint: More durable and provides a harder finish but is trickier to clean up and has strong fumes. It’s less common for DIY cabinet painting today due to advancements in water-based options.
- Finishes:
- Satin: Offers a subtle sheen and is relatively easy to clean. A popular choice for cabinets.
- Semi-Gloss: Provides a bit more shine and is very durable and easy to wipe down, making it ideal for high-traffic areas like kitchens.
- Gloss: The most reflective finish, offering a very sleek and modern look. It highlights imperfections, so meticulous prep work is vital.
Painting Techniques: Brush, Roller, or Spray?
- Brushing: Suitable for smaller projects or detailed work. Use a high-quality synthetic brush for latex paints.
- Rolling: A foam roller can provide a smoother finish than a brush for larger, flat surfaces. Apply paint in thin, even coats.
-
Kitchen Cabinet Spray Paint: For the most professional and smoothest finish, consider using a paint sprayer. This method requires practice and can be done with aerosol cans or electric sprayers.
- Aerosol Cabinet Paint: Convenient for small projects or touch-ups. Ensure even strokes and maintain a consistent distance from the surface.
- Electric Paint Sprayer: Offers more control and a factory-like finish, but requires more setup and practice.
Application Tips for a Flawless Finish
- Thin Coats are Key: Apply multiple thin coats rather than one thick coat. This prevents drips and ensures a more even and durable finish.
- Allow Drying Time: Let each coat dry completely according to the manufacturer’s instructions before applying the next.
- Sand Between Coats: Lightly sand between coats with fine-grit sandpaper (220-320 grit) to smooth out any imperfections and improve adhesion. Wipe away dust with a tack cloth.
- Use a Topcoat/Sealer: For added durability, especially in a busy kitchen, consider a clear topcoat or sealer after the final paint layer.
2. Contact Paper Cabinets: The Speedy Style Swap
Contact paper, also known as peel and stick vinyl, is a fantastic DIY cabinet covering solution for those seeking a quick and affordable update. It’s perfect for renters or anyone who likes to change their décor frequently.
What to Look for in Contact Paper
- Durability: Choose thicker, more robust vinyl that can withstand kitchen wear and tear.
- Adhesive Quality: A good quality adhesive will stick well but also allow for repositioning during application if needed.
- Water Resistance: Essential for a kitchen environment.
- Design Variety: Available in countless patterns, colors, and textures, from wood grains to faux marble and solid colors.
The Application Process: Step-by-Step
- Clean and Dry: Ensure cabinets are clean, dry, and smooth.
- Measure and Cut: Measure the cabinet surface accurately and cut the contact paper slightly larger than needed, allowing for trimming.
- Peel and Stick: Slowly peel back the backing paper, starting from one edge. Carefully align the contact paper and press it down.
- Smooth Out Air Bubbles: Use a smoothing tool (like a credit card or a dedicated squeegee) to push out any air bubbles as you go. Work from the center outwards.
- Trim Excess: Use a sharp craft knife or utility knife to trim any excess contact paper around the edges.
Tips for a Seamless Look
- Overlap Strategically: For large surfaces, a slight overlap can help prevent gaps, but ensure it’s smooth.
- Heat for Adhesion: Gently heating the contact paper with a hairdryer can help it conform to edges and curves for a better seal.
- Test in an Inconspicuous Area: If you’re unsure about the adhesion or how it looks, try a small piece on the inside of a cabinet door first.
3. Peel and Stick Cabinet Liners: Easy Protection and Style
Similar to contact paper, peel and stick cabinet liners offer a convenient way to cover and protect your cabinet interiors or the exterior surfaces.
Where to Use Peel and Stick Liners
- Cabinet Interiors: Line shelves and drawers for a pop of color or pattern and to protect them from spills and scratches.
- Cabinet Exteriors: Can be applied to the front of cabinet doors and drawer fronts for a new look.
Application and Maintenance
The application is very similar to contact paper. Ensure surfaces are clean and dry. Peel, stick, and smooth. Maintenance is usually as simple as wiping with a damp cloth.
4. Laminate Kitchen Cabinets: A Modern and Durable Option
Laminate is a synthetic material that can mimic the look of wood, stone, or solid colors. Applying laminate to existing cabinets can give them a sleek, modern, and durable finish.
Pros of Laminate for Cabinets
- Durability: Highly resistant to scratches, stains, and moisture.
- Cost-Effective: Often less expensive than solid wood or other premium materials.
- Easy Maintenance: Simple to clean and requires little upkeep.
- Variety of Styles: Available in a vast range of colors, patterns, and textures.
Applying Laminate: A Detailed Approach
Applying laminate can be a bit more involved than contact paper, often requiring contact cement and careful application to avoid bubbles and wrinkles.
- Surface Preparation: Clean, sand, and ensure the cabinet surfaces are perfectly smooth.
- Adhesive Application: Apply a suitable adhesive (like contact cement) to both the cabinet surface and the back of the laminate sheet. Allow the adhesive to become tacky according to the manufacturer’s instructions.
- Careful Placement: Lay the laminate down slowly, starting from one edge, and press it firmly into place. Use a rolling tool to ensure good adhesion and to eliminate air bubbles.
- Trimming: Use a sharp utility knife to trim excess laminate around the edges.
Important Considerations
- Edging: Exposed edges of laminate can be prone to chipping if not properly sealed or if using a less durable type. Consider edge banding for a cleaner finish.
- Repair: Damaged laminate can be difficult to repair seamlessly, often requiring replacement of the section.
5. Cabinet Refacing Options: A Significant Upgrade
Cabinet refacing involves replacing the existing cabinet doors and drawer fronts, and then covering the cabinet boxes with a matching veneer or laminate. This offers a more substantial transformation and a durable, high-quality finish.
What Refacing Entails
- New Doors and Drawer Fronts: You can order custom-sized doors and drawer fronts in various materials (wood, MDF, thermofoil, laminate) and styles.
- Veneering or Laminating Boxes: The exposed cabinet frames (boxes) are then covered with a thin layer of wood veneer or laminate to match the new doors.
- New Hardware: This is the perfect opportunity to update hinges and knobs/pulls.
Benefits of Cabinet Refacing
- Modernize Look: Dramatically changes the appearance of your kitchen.
- Increased Durability: New doors and finishes are often more resistant to wear and tear.
- Cost-Effective Compared to Replacement: Generally less expensive than a full cabinet replacement.
- Less Disruptive: Less demolition and mess than a complete gut job.
6. Replace Kitchen Cabinet Doors: A Focused Renovation
Sometimes, the cabinet boxes are in good condition, but the doors are outdated or damaged. Replacing kitchen cabinet doors is a targeted way to update your kitchen.
Options for New Doors
- Stock Doors: Available in standard sizes from home improvement stores, offering a budget-friendly choice.
- Semi-Custom Doors: You can often order doors in specific sizes and styles, with a wider range of materials and finishes.
- Custom Doors: For unique styles or precise fits, custom-made doors are an excellent, albeit more expensive, option.
Materials for Replacement Doors
- Solid Wood: Offers natural beauty and durability, available in various species like maple, oak, cherry, and birch.
- MDF (Medium-Density Fiberboard): A stable and smooth material, often used for painted cabinets. It’s less prone to warping than solid wood.
- Thermofoil: A vinyl film fused to an MDF core, offering a seamless, durable, and often glossy finish.
- Laminate: Similar to thermofoil but can offer more varied textures and patterns.
The Installation Process
- Measure Carefully: Accurate measurements are crucial for ordering the correct size doors and drawer fronts.
- Remove Old Doors: Unscrew and carefully remove the old doors and drawer fronts.
- Attach New Hardware: Install hinges and drawer slides onto the new doors and drawer fronts.
- Mount New Doors: Attach the new doors to the cabinet boxes. Adjust hinges as needed for proper alignment.
Choosing the Right Method for Your Project
Selecting the best way to cover your kitchen cabinets depends on several factors: your budget, desired aesthetic, skill level, and how much time you have.
Budget Considerations
| Method | Estimated Cost Range (DIY) | Estimated Cost Range (Professional) |
|---|---|---|
| Paint Kitchen Cabinets | $100 – $300 | $1,000 – $3,000+ |
| Contact Paper Cabinets | $50 – $200 | Not typically professionally done |
| Peel and Stick Liners | $30 – $150 | Not typically professionally done |
| Laminate Kitchen Cabinets | $200 – $600 | $1,500 – $5,000+ |
| Cabinet Refacing Options | $500 – $2,000+ | $3,000 – $10,000+ |
| Replace Kitchen Cabinet Doors | $300 – $1,500+ | $2,000 – $7,000+ |
Note: These are approximate costs and can vary widely based on the size of your kitchen, quality of materials, and location.
Skill Level and Time Commitment
- Beginner-Friendly: Contact paper, peel and stick liners.
- Intermediate DIYer: Painting kitchen cabinets.
- Advanced DIYer/Professional: Laminate application, cabinet refacing, replacing cabinet doors.
Enhancing Your Cabinet Update: Hardware and Details
Don’t forget the finishing touches! Updating your hardware can make a significant difference in the overall look of your cabinets.
- Knobs and Pulls: Available in countless styles, materials (metal, ceramic, wood, glass), and finishes (brushed nickel, matte black, brass, chrome).
- Hinges: Consider updating to soft-close hinges for a luxurious feel and to prevent slamming.
Frequently Asked Questions About Covering Kitchen Cabinets
Q1: What is the easiest way to cover kitchen cabinets?
The easiest way to cover kitchen cabinets is by using peel-and-stick contact paper or vinyl liners. They require minimal tools and are forgiving for beginners.
Q2: Can I cover my laminate kitchen cabinets with something else?
Yes, you can cover laminate kitchen cabinets. Painting is a popular option, but proper preparation is crucial for adhesion. You could also apply a new layer of laminate or vinyl wrap.
Q3: How long does contact paper on kitchen cabinets last?
High-quality contact paper, applied correctly in a kitchen environment, can last anywhere from 2 to 10 years. Durability depends on the thickness of the material, the adhesive quality, and how well it’s maintained.
Q4: What is the most durable way to update kitchen cabinets?
The most durable ways to update kitchen cabinets are usually professional cabinet refacing or replacing kitchen cabinet doors with high-quality materials like solid wood or professionally finished MDF, followed by a durable paint job or laminate.
Q5: Do I need to remove cabinet doors to paint them?
While you can paint cabinet doors while they are still on the cabinets, removing them will allow for a much smoother and more professional finish. It prevents drips on the frames and makes it easier to access all surfaces.
Q6: Can I use regular house paint to paint kitchen cabinets?
It’s not recommended to use regular interior latex paint. You should use a high-quality enamel paint specifically designed for cabinets or trim, or a specialized cabinet paint. These paints offer better durability, adhesion, and resistance to moisture and wear.
Q7: Is cabinet refacing worth the cost?
Cabinet refacing can be worth the cost if you are happy with your current kitchen layout but want to update the look and improve the durability of your cabinets. It’s significantly cheaper than a full cabinet replacement and offers a high-quality, lasting finish.
Q8: How do I clean cabinets covered in contact paper?
Clean cabinets covered in contact paper with a damp cloth and mild soap. Avoid abrasive cleaners or excessive scrubbing, as this can damage the material or adhesive.
By exploring these diverse methods, you can confidently tackle your kitchen cabinet makeover and achieve the stunning, updated look you desire. Whether you choose the simplicity of contact paper or the lasting transformation of painting or refacing, your kitchen will thank you for it!