
Your Guide: How to Build an Outdoor Kitchen With Steel Studs
Can you build an outdoor kitchen with steel studs? Yes, you absolutely can build an outdoor kitchen with steel studs. Steel stud framing is an excellent and increasingly popular choice for outdoor kitchen construction, offering a durable, weather-resistant, and versatile alternative to traditional wood framing. This guide will walk you through the process, highlighting the benefits and key considerations for building your dream steel stud framing outdoor kitchen.
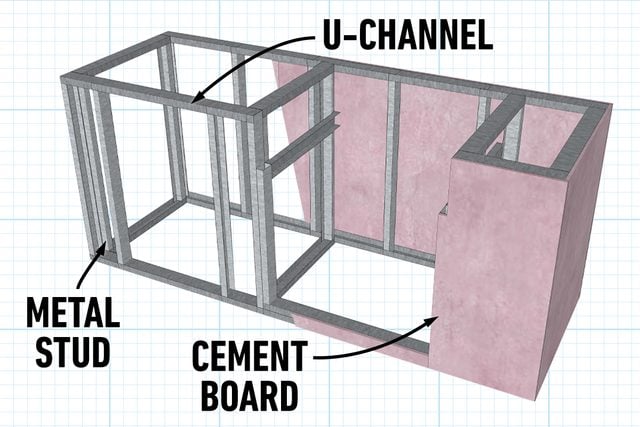
Image Source: www.familyhandyman.com
Why Choose Steel Studs for Your Outdoor Kitchen?
When planning your DIY outdoor kitchen steel project, the choice of framing materials is crucial. While wood has been a long-standing option, steel studs offer several distinct advantages for exterior applications, especially when creating a robust metal stud outdoor kitchen construction.
Durability and Longevity
Steel is inherently resistant to many of the elements that plague traditional wood. It won’t rot, warp, or be susceptible to insect infestation like termites or carpenter ants. This means your outdoor kitchen framing materials will stand the test of time and weather.
Weather Resistance
One of the most significant benefits of building an outdoor kitchen with metal is its superior weather resistance. Steel doesn’t absorb moisture, which eliminates the risk of mold, mildew, and wood rot. This makes it an ideal choice for regions with high humidity or frequent rainfall. The steel studs for weather resistant kitchen will not degrade like wood when exposed to the elements.
Strength and Stability
Steel studs provide a strong and stable framework for your steel frame outdoor cooking area. They offer excellent load-bearing capacity, which is important for supporting countertops, appliances, and finishes. This structural integrity ensures your residential outdoor kitchen steel will remain sound for years to come.
Fire Resistance
Unlike wood, steel is non-combustible. This adds an extra layer of safety to your exterior steel stud kitchen, particularly around grilling and cooking areas where open flames are involved.
Design Flexibility
Steel studs allow for intricate and innovative outdoor kitchen design with steel. The lightweight nature of steel framing makes it easier to maneuver and cut, enabling greater design freedom. You can create custom shapes and configurations that might be more challenging or labor-intensive with wood.
Cost-Effectiveness
While the initial cost of steel studs might sometimes be comparable to or slightly higher than wood, the long-term benefits often make them more cost-effective. Reduced maintenance, resistance to pests and rot, and a longer lifespan contribute to overall savings.
Planning Your Steel Stud Outdoor Kitchen
A well-planned project is a successful project. Before you start cutting steel, it’s essential to have a clear vision and a detailed plan for your steel stud framing outdoor kitchen.
Design and Layout
Consider the functionality and aesthetics of your outdoor kitchen design with steel. Think about:
- Appliance Placement: Where will your grill, refrigerator, sink, and any other appliances go? Ensure adequate space and access for utilities.
- Countertop Space: How much prep and serving space do you need?
- Seating Areas: Do you want an integrated bar or seating?
- Traffic Flow: How will people move around the kitchen and its adjacent areas?
- Storage: Will you need cabinets or shelves?
Sketch out your design, including dimensions, to visualize the final product. This is where the flexibility of building an outdoor kitchen with metal really shines, allowing for creative layouts.
Local Building Codes and Permits
This is a critical step for any construction project. Always check with your local building department for regulations regarding outdoor kitchens, structures, and electrical/plumbing installations. You may need permits, and inspections will likely be required throughout the construction process. This ensures your residential outdoor kitchen steel meets safety standards.
Material Selection
Beyond steel studs, you’ll need to select other materials:
- Steel Studs: Choose appropriate gauge studs (typically 20-gauge or 18-gauge for framing).
- Screws: Use corrosion-resistant screws (e.g., galvanized or coated) for assembling the steel frame.
- Sheathing: Cement board or exterior-grade plywood are common choices for sheathing the steel frame. Cement board is particularly well-suited for wet environments.
- Vapor Barrier/House Wrap: While steel doesn’t rot, a vapor barrier can help manage moisture and prevent condensation within the walls, especially in humid climates.
- Insulation (Optional): Depending on your climate and design, you might consider insulation.
- Finishing Materials: Stucco, stone veneer, tile, or other exterior-grade finishes will be applied over the sheathing.
- Countertops: Choose durable outdoor-rated materials like granite, concrete, or porcelain.
- Appliances: Select appliances specifically designed for outdoor use.
Budgeting
Create a detailed budget that includes all materials, tools, potential appliance costs, and any professional services you might need (e.g., electrician, plumber).
Tools and Materials You’ll Need
Gathering the right tools and materials before you begin is essential for efficient and safe construction of your DIY outdoor kitchen steel.
Essential Tools
- Tape Measure: For accurate measurements.
- Level: To ensure everything is plumb and level.
- Stud Finder (for steel): A magnetic stud finder works for locating pre-drilled holes or thinner gauge studs.
- Metal Shears or Aviation Snips: For cutting steel studs and tracks.
- Cordless Drill/Driver: With appropriate bits for driving screws.
- Circular Saw or Reciprocating Saw: For cutting sheathing materials (use appropriate blades for metal or cement board).
- Safety Glasses: Always wear safety glasses when working with metal and power tools.
- Work Gloves: Protect your hands from sharp edges.
- Hearing Protection: When using power saws.
- Utility Knife: For cutting various materials.
- Caulking Gun: For applying sealants.
- Hammer: For minor adjustments or tapping.
- Marker or Pencil: For marking cuts and measurements.
Key Materials
- Steel Studs: Various lengths and gauges.
- Steel Tracks (Sole Plates and Head Plates): To anchor the studs to the foundation and ceiling.
- Self-Tapping Screws: Specifically designed for metal framing (e.g., #8 x 1/2 inch for connecting studs to tracks).
- Corner Crimpers or Screws: For joining studs at corners.
- Sheathing Panels: Cement board or exterior-grade plywood.
- Fasteners for Sheathing: Corrosion-resistant screws or nails suitable for your chosen sheathing.
- Vapor Barrier/House Wrap (optional but recommended):
- Sealants and Adhesives: Exterior-grade caulk and adhesives.
Step-by-Step Guide to Building Your Steel Frame Outdoor Kitchen
Follow these steps to construct the robust framework for your steel frame outdoor cooking area.
Step 1: Prepare the Foundation and Layout
- Foundation: Ensure your foundation is level and stable. This could be a concrete slab, pavers, or a deck.
- Layout: Mark the perimeter of your outdoor kitchen on the foundation using chalk lines or spray paint. This will guide the placement of your bottom tracks (sole plates).
Step 2: Install the Bottom Tracks (Sole Plates)
- Placement: Position the steel tracks along the marked layout lines.
- Anchoring: Secure the tracks to the foundation using appropriate anchors. For concrete, use concrete screws (like Tapcons). For wood decks, use exterior-grade screws long enough to penetrate the joists.
- Squaring: Ensure the tracks form perfect right angles at the corners. Measure diagonally; the measurements should be equal if the frame is square.
Step 3: Cut and Install the Vertical Studs
- Measuring and Cutting: Measure the desired height for your walls. Steel studs are typically cut to a standard ceiling height, but for an outdoor kitchen, you might have varying heights for countertops, backsplashes, or bar areas. Use metal shears or aviation snips to cut the studs to length. Remember to account for the thickness of the top and bottom tracks when measuring.
- Placement: Position the studs vertically within the bottom tracks. The standard spacing for studs is usually 16 inches or 24 inches on center, but you can adjust this based on the weight and type of finishes you plan to use. For an exterior steel stud kitchen, consider closer spacing if using heavy materials like stone veneer.
- Securing: Attach the studs to the bottom tracks using self-tapping metal screws. Drive screws through the sides of the studs into the flanges of the tracks.
Step 4: Install the Top Tracks (Head Plates)
- Measuring and Cutting: Cut the top tracks to the required lengths for the tops of your walls.
- Placement: Place the top tracks onto the ends of the vertical studs.
- Securing: Screw the top tracks to the studs using self-tapping metal screws.
Step 5: Frame Openings for Appliances and Doors
- Layout: Mark the locations for appliance cutouts (grill, sink, etc.) and any doorways or windows on your stud layout.
- Headers and Sills: Frame these openings with horizontal studs (headers) above and below, and shorter vertical studs (cripples) to support them. Use double studs for headers and sills for added strength, especially for heavier appliances or large openings. This is a crucial step for the structural integrity of your outdoor kitchen framing materials.
- Reinforcement: Consider additional bracing around openings to ensure they remain square and strong.
Step 6: Install Horizontal Blocking and Bracing
- Purpose: Horizontal blocking (short pieces of stud placed horizontally between vertical studs) adds rigidity and provides attachment points for sheathing and finishes.
- Placement: Install blocking at regular intervals, particularly where you plan to attach heavy items like countertops, shelving, or cabinet bases. This is vital for supporting the weight on your steel frame outdoor cooking area.
- Bracing: Diagonal bracing can be added to corners or long wall sections to prevent racking and improve overall stability.
Step 7: Sheathing the Steel Frame
- Material Choice: Cement board is highly recommended for steel studs for weather resistant kitchen applications due to its superior moisture resistance. Exterior-grade plywood is another option, but it must be properly sealed.
- Installation:
- Start at a corner and attach the sheathing panels to the steel studs using corrosion-resistant screws.
- Ensure the panels are flush and butt tightly against each other.
- Stagger the seams of the sheathing panels for added strength.
- For cement board, use screws specifically designed for cement board installation.
- Cutouts: Cut out openings for appliances and doors as needed, using an appropriate saw.
Step 8: Applying a Vapor Barrier (Optional but Recommended)
- Purpose: Wrap the entire exterior of the framed structure with a weather-resistant barrier (house wrap).
- Installation: Overlap the seams by at least 6 inches and tape them with specialized house wrap tape. This helps prevent water from penetrating the framing while allowing moisture vapor to escape.
Step 9: Installing Finishes
This is where your residential outdoor kitchen steel begins to take its final form.
- Stucco: Apply stucco directly over cement board sheathing.
- Stone Veneer: Install stone veneer using appropriate adhesive and mortar over cement board.
- Tile: Install outdoor-rated tile, ensuring proper substrate preparation and adhesive.
- Other Finishes: You can also use wood paneling (properly treated for outdoor use), metal siding, or other weather-resistant materials.
Step 10: Installing Countertops and Appliances
- Countertop Support: Ensure the steel frame and sheathing provide adequate support for your chosen countertops. You may need to add extra blocking or reinforcement.
- Appliance Installation: Install your outdoor appliances according to manufacturer instructions, ensuring proper ventilation and utility connections.
Step 11: Electrical and Plumbing
- Professional Installation: It is highly recommended to hire licensed electricians and plumbers for these critical aspects of your exterior steel stud kitchen.
- Wiring: Run electrical wiring within the wall cavities, ensuring it is properly secured and protected. Outdoor-rated electrical boxes and fixtures are essential.
- Plumbing: Install any necessary plumbing for sinks or other water features, again using outdoor-rated materials and ensuring proper drainage and freeze protection if applicable.
Step 12: Final Touches and Sealing
- Caulking: Seal all joints, seams, and around openings with high-quality exterior-grade caulk to prevent water intrusion.
- Finishing Details: Add any trim, lighting, or decorative elements.
Advantages of Steel Stud Framing for Outdoor Kitchens in Summary
| Advantage | Description | Impact on Outdoor Kitchens |
|---|---|---|
| Durability | Resistant to rot, decay, warping, and insect damage. | Longer lifespan, less maintenance, maintains structural integrity in harsh outdoor conditions. |
| Weather Resistance | Does not absorb moisture, unaffected by humidity or rain. | Prevents mold, mildew, and structural degradation, ideal for coastal or humid climates. |
| Strength & Stability | High strength-to-weight ratio, excellent load-bearing capacity. | Provides a solid base for heavy countertops and appliances, resists wind loads. |
| Fire Resistance | Non-combustible material. | Enhances safety around grills and open flames. |
| Design Flexibility | Lightweight, easy to cut and shape, allows for complex designs. | Enables creative layouts, custom features, and precise finishing. |
| Pest Resistance | Insects cannot infest or damage steel. | Eliminates the risk of structural damage from termites or carpenter ants. |
| Cost-Effectiveness | Long-term savings due to reduced maintenance and increased lifespan. | Lower overall ownership costs compared to materials that degrade more quickly. |
| Consistency | Manufactured to precise standards, ensuring uniformity in size and shape. | Easier to achieve plumb and level walls, consistent results in construction. |
Important Considerations for Your Steel Stud Outdoor Kitchen
Building an outdoor kitchen with steel studs involves some unique considerations compared to traditional wood framing.
Thermal Bridging
Steel is a conductor of heat and cold. This means that the steel studs can transfer temperature from the exterior to the interior of the wall cavity. While less critical for an unconditioned outdoor kitchen, it can be a factor in extreme climates. Proper sheathing, finishes, and potentially insulation can mitigate this.
Corrosion
Although galvanized steel studs are coated to resist rust, prolonged exposure to moisture, salt air (in coastal areas), or certain chemicals can eventually lead to corrosion. Using corrosion-resistant fasteners and ensuring proper sealing and drainage are crucial.
Cutting and Handling
Steel studs have sharp edges. Always wear gloves and safety glasses when cutting and handling them. Metal shears or aviation snips are the best tools for clean cuts.
Fasteners
Using the correct type and length of self-tapping screws designed for metal framing is essential. For exterior applications, ensure these fasteners are also corrosion-resistant.
Plumbing and Electrical Runs
Plan your plumbing and electrical runs carefully within the steel stud cavities. You may need to drill holes through studs or tracks to pass wires and pipes, ensuring you don’t compromise structural integrity.
Frequently Asked Questions (FAQ)
Q1: Is steel stud framing truly weather-resistant for an outdoor kitchen?
A1: Yes, steel stud framing is highly weather-resistant. Unlike wood, steel does not rot, warp, or get damaged by insects, making it an excellent choice for outdoor environments. The primary concern is corrosion, which can be mitigated by using galvanized steel and proper sealing.
Q2: What kind of sheathing is best for an outdoor kitchen framed with steel studs?
A2: Cement board is the preferred sheathing material for outdoor kitchens framed with steel studs. It is exceptionally durable, moisture-resistant, and provides an excellent substrate for various exterior finishes like stucco, tile, or stone veneer.
Q3: Can I install heavy countertops on a steel stud frame?
A3: Absolutely. Steel studs provide excellent structural support. For very heavy countertops or appliances, ensure you use appropriate gauge studs and add horizontal blocking within the frame at the points of support to distribute the load effectively.
Q4: Do I need a vapor barrier when building an outdoor kitchen with steel studs?
A4: While steel itself doesn’t absorb moisture, a vapor barrier or house wrap is still a good idea. It helps prevent water penetration into the wall cavity from rain and can manage condensation that might occur due to temperature differences.
Q5: How do I finish the exterior of a steel stud outdoor kitchen?
A5: Steel stud frames can be finished with a wide variety of exterior materials, including stucco, stone veneer, tile, brick, or exterior-grade wood siding. The key is to attach these finishes securely to the steel frame, usually over a suitable sheathing material like cement board.
Q6: What are the main differences between building with steel studs versus wood studs for an outdoor kitchen?
A6: Steel studs offer superior resistance to rot, insects, and fire. They are also lighter and can be easier to cut for intricate designs. Wood studs, while more traditional, are susceptible to moisture damage and require more maintenance in an outdoor setting.
Q7: Is it difficult to cut steel studs for an outdoor kitchen project?
A7: Cutting steel studs is generally straightforward with the right tools, such as metal shears or aviation snips. For thicker gauge studs or more complex cuts, a reciprocating saw with a metal-cutting blade or a portable band saw can be used. Always prioritize safety when cutting metal.
Building an outdoor kitchen with steel studs is a rewarding project that results in a durable, long-lasting, and attractive cooking and entertaining space. By following these guidelines and paying attention to detail, you can create a fantastic steel stud framing outdoor kitchen that you’ll enjoy for years to come.