
Can you attach crown moulding to kitchen cabinets? Yes, you absolutely can! Adding crown moulding to your kitchen cabinets is a fantastic way to elevate the look of your kitchen, giving it a more finished and custom appearance. This DIY project can seem daunting, but with the right tools and techniques, attaching decorative molding to cabinets becomes surprisingly manageable. This guide will walk you through everything you need to know about crown molding installation kitchen cabinets, from selecting the right molding to the final touches. We’ll cover cabinet trim installation step-by-step, focusing on DIY kitchen cabinet molding techniques that anyone can follow.
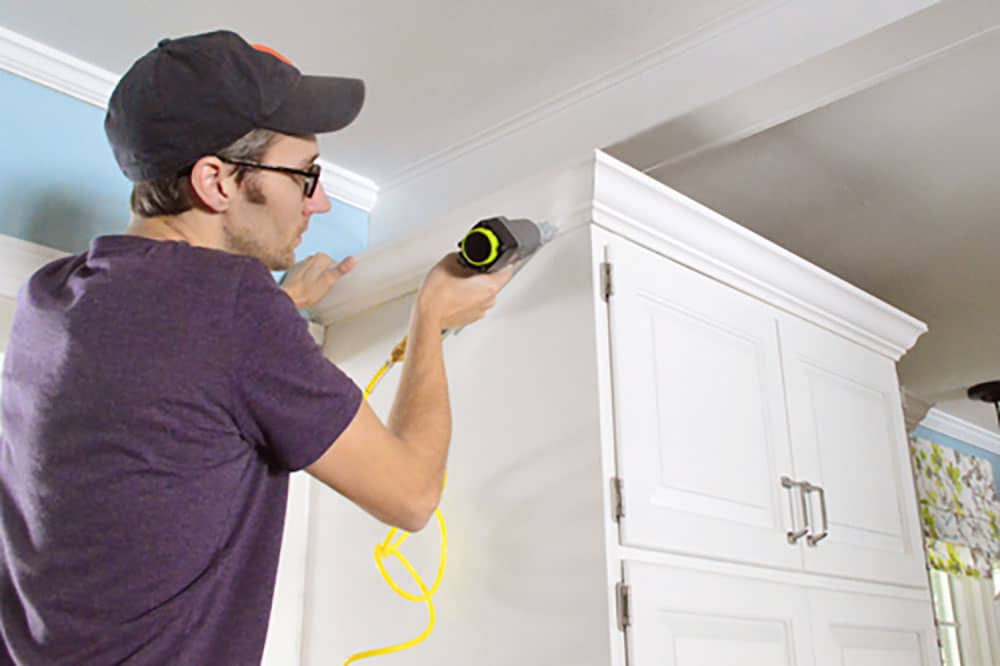
Image Source: www.younghouselove.com
Why Add Crown Moulding to Your Kitchen Cabinets?
Adding crown moulding is more than just a decorative choice; it’s a way to enhance your kitchen’s style and perceived value.
- Elevates Aesthetics: It creates a polished, high-end look, masking the often-plain gap between cabinets and the ceiling.
- Adds Customization: It makes your cabinets look custom-built, giving your kitchen a unique personality.
- Hides Imperfections: It can cover uneven ceiling lines or gaps that are common in older homes.
- Increases Home Value: A well-executed cabinet upgrade like this can be a selling point for your home.
This project falls under kitchen cabinet finishing, adding that final, crucial detail that makes a big difference.
Choosing the Right Crown Moulding for Your Kitchen Cabinets
The first step in applying crown molding kitchen is selecting the perfect molding. Several factors come into play:
Material Options
- Wood: The most traditional choice.
- Pine: Affordable and easy to paint or stain, but can be softer and prone to dents.
- Poplar: A good balance of cost and workability, takes paint well.
- Oak, Maple, Cherry: Hardwoods are more durable and offer beautiful grain patterns for staining, but are more expensive and harder to work with.
- MDF (Medium-Density Fiberboard): Cost-effective and smooth, ideal for painting. It can swell if exposed to moisture, so it’s best for dry kitchen environments.
- Polyurethane/Plastic: Lightweight, moisture-resistant, and often comes pre-primed. It’s great for mimicking intricate wood designs and is very durable.
Style and Profile
Cabinet crown moulding comes in various profiles, from simple, clean lines to ornate, detailed designs. Consider your kitchen’s overall style:
- Simple Crown: A classic choice that works with most kitchen styles.
- Cove Moulding: Features a concave curve, offering a softer look.
- Dentil Moulding: Includes small, tooth-like projections for a more formal appearance.
- Build-Up Moulding: Often a combination of smaller mouldings layered together to create a custom, substantial look.
Tip: If you have existing trim in your kitchen, try to match its style for a cohesive look.
Size Considerations
The size of the moulding should be proportional to your cabinets and ceiling height.
- Ceiling Height: Taller ceilings can accommodate wider, more substantial mouldings. Lower ceilings might look better with narrower profiles.
- Cabinet Size: Larger cabinets can handle bolder mouldings, while smaller cabinets might be overwhelmed by very wide styles.
- General Rule: A common starting point is a 3-5 inch wide moulding for standard 8-foot ceilings.
Tools and Materials You’ll Need
Gathering all your supplies before you start securing cabinet crown will make the process much smoother.
Essential Tools
- Miter Saw: Crucial for making precise angled cuts, especially for mitered corner cabinet molding. A compound miter saw is ideal as it can also tilt for bevel cuts.
- Measuring Tape: For accurate measurements.
- Pencil: For marking.
- Stud Finder: To locate ceiling joists or wall studs for secure mounting.
- Level: To ensure your moulding is straight.
- Safety Glasses: Always protect your eyes!
- Gloves: For handling materials and protecting hands.
- Caulk Gun: For applying caulk.
- Hammer or Brad Nailer: For fastening the moulding. A brad nailer makes the job much faster and cleaner.
- Wood Glue: For reinforcing joints.
- Clamps: To hold pieces together while glue dries.
- Putty Knife: For applying wood filler and caulk.
- Sanding Block or Electric Sander: For smoothing edges.
- Drop Cloths: To protect your countertops and floor.
Materials
- Crown Moulding: Enough to cover all cabinet runs, plus about 10-15% extra for mistakes and cuts.
- Brad Nails: Appropriate length for your moulding (usually 1 1/2″ to 2″).
- Wood Filler or Spackle: To fill nail holes and gaps.
- Caulk: Paintable caulk to fill any gaps between the moulding and cabinets/ceiling.
- Paint or Stain: To match or complement your cabinets.
- Primer: If painting wood or MDF.
Prepping Your Kitchen Cabinets for Moulding
Proper preparation is key to a professional finish. This stage is vital for successful cabinet moulding techniques.
Cleaning
- Ensure the top edges of your cabinets and the wall/ceiling area where the moulding will attach are clean and free of dust, grease, or cobwebs.
Planning and Layout
- Measure Carefully: Measure the length of each cabinet run where you’ll be installing the moulding.
- Account for Corners: Decide how you’ll handle corners. Most cabinet crown moulding uses mitered corners, meaning the pieces are cut at an angle so they meet neatly.
- Visualize the Fit: Place a piece of moulding against your cabinets and ceiling to get a feel for how it will look and fit.
Step-by-Step Guide to Attaching Crown Moulding
Now, let’s get to the core of how to attach crown moulding to kitchen cabinets easily.
Step 1: Cutting Your Moulding Pieces
This is where precision matters. You’ll be making angled cuts.
- Inside Corners: For an inside corner (like where two walls meet), you’ll cut a 45-degree angle. Place the moulding upside down in your miter saw, as if it were installed on the cabinet. The longest point of the cut will face the inside corner.
- Outside Corners: For an outside corner (less common on cabinets, but possible if cabinets wrap around a corner), you’ll also cut a 45-degree angle, but the cuts will face away from each other.
- Joining Long Runs: When you need to join two pieces of moulding along a long run, you’ll use a scarf joint. This is a long, angled cut (usually 22.5 degrees) on the end of each piece. When overlapped and glued, these cuts create a nearly invisible seam and distribute stress better than a butt joint.
Miter Saw Settings for Cabinet Crown Moulding (Common Technique)
| Type of Corner/Joint | Moulding Orientation in Saw | Miter Angle | Bevel Angle (if applicable) | Notes |
|---|---|---|---|---|
| Inside Corner | Upside down, against fence | 45 degrees | Varies by profile | Long point extends outwards. |
| Outside Corner | Upside down, against fence | 45 degrees | Varies by profile | Long point extends inwards. |
| Scarf Joint | Upside down, against fence | 22.5 degrees | Varies by profile | Overlap and glue for long runs. |
Important Note: The exact angles and saw settings can depend on your specific moulding profile and how it’s designed to sit. Always test-cut a scrap piece to ensure a perfect fit. Many DIYers find it helpful to watch videos demonstrating how to cut crown moulding in an upside-down position.
Step 2: Dry Fitting
Before you start nailing, dry fit your cut pieces to ensure they fit snugly and the corners meet cleanly. This is your chance to make any necessary adjustments.
Step 3: Attaching the Moulding to Cabinets
This is the primary action of securing cabinet crown.
- Locate Support: If you’re attaching to the top of cabinets, the cabinet structure itself provides support. If your moulding extends to the wall, use a stud finder to locate wall studs or ceiling joists. Mark these locations lightly with a pencil.
- Apply Wood Glue: Apply a thin bead of wood glue to the back of the moulding where it will meet the cabinet top. For scarf joints, apply glue to both angled surfaces.
- Position and Nail:
- For cabinet tops: Place the moulding firmly against the cabinet top.
- For wall/ceiling connections: Align the moulding with the wall or ceiling edge.
- Use a Brad Nailer: Fire nails through the moulding into the cabinet frame or wall studs/joists. Aim the nails at an angle (toe-nailing) to get good holding power. Common nailing points are into the cabinet frame, the top edge of the cabinet doors, or into the ceiling joists above.
- Nail Spacing: Space nails about 12-16 inches apart.
- Manual Nailing: If using a hammer, hold the moulding firmly in place and carefully tap nails through. Be careful not to dent the wood.
Cabinet Moulding Techniques for a Secure Fit:
- Glue and Nail: Always use both glue and nails for the strongest bond.
- Nail Placement: Drive nails into solid wood. If you can’t hit a stud, use the cabinet’s solid framing members.
- Holding Power: When attaching to cabinets, try to angle nails into the cabinet frame. Sometimes, a small block can be glued and nailed to the top of the cabinet to provide a better nailing surface for the moulding.
Step 4: Filling Nail Holes and Gaps
Once all the moulding is in place, it’s time for finishing.
- Fill Nail Holes: Use a putty knife to fill all nail holes with wood filler or spackle. Press it in firmly and then wipe away any excess. Let it dry according to the product instructions.
- Sand Smooth: Once the filler is dry, lightly sand the filled areas until they are smooth and flush with the moulding surface.
- Caulk Seams: Apply a thin bead of paintable caulk along any gaps between the moulding and the cabinets, or between the moulding and the ceiling/wall. Smooth the caulk line with your finger or a damp cloth for a clean finish. This step is crucial for a professional look.
Step 5: Painting or Staining
The final step in DIY kitchen cabinet molding is applying the finish.
- Prime (if necessary): If you’re painting wood or MDF, apply a coat of primer.
- Paint or Stain: Apply your chosen paint or stain according to the manufacturer’s instructions. You may need multiple coats for full coverage.
- Touch-Up: After the paint/stain dries, touch up any areas that may have been missed or smudged.
Tips for a Professional Finish
- Start with Quality Moulding: Cheaper, lower-quality moulding can be warped or inconsistent, making installation difficult.
- Test Cuts are Key: Always make test cuts on scrap pieces to ensure your miter saw is calibrated correctly and your angles are precise.
- Work with a Partner: Having an extra set of hands can be invaluable, especially when holding longer pieces of moulding in place.
- Don’t Rush: Take your time with each step, especially the cutting. Patience will pay off with a much better result.
- Clean as You Go: Wipe away excess glue and wood filler as you work. This will make the final finishing steps much easier.
- Use the Right Adhesive: For particularly tricky joints or if you’re not using a nailer, consider using construction adhesive along with nails.
Common Challenges and How to Solve Them
- Uneven Ceilings/Walls: You might find that the gap between your moulding and the ceiling isn’t consistent. Use caulk generously to fill these variations for a seamless look. Sometimes, you may need to shim behind the moulding if there’s a significant gap.
- Moulding Sagging: This usually happens when nails aren’t driven into solid support or there aren’t enough nails. If you notice sagging, add more nails, possibly at a steeper angle. Ensure you’re using enough glue.
- Mitered Corners Not Meeting Perfectly: Small gaps at the corners can often be filled with wood filler. For larger gaps, you may need to re-cut the miters. A coping saw can be used to “cope” inside corners for a more seamless fit if mitering isn’t perfect, though this is a more advanced technique. For mitered corner cabinet molding, precision is paramount.
Frequently Asked Questions (FAQ)
Q1: Do I need a special saw to cut crown moulding?
A1: A compound miter saw is highly recommended. It allows for both angled (miter) and tilted (bevel) cuts, which are essential for achieving the correct angles for crown moulding, especially when installing crown trim for cabinets. While a standard miter saw can work for some simpler cuts, a compound miter saw makes the process much easier and more precise.
Q2: How do I attach crown moulding if there are no studs or joists directly above the cabinets?
A2: If you can’t reach studs or joists directly, you’ll rely on the solid construction of the cabinets themselves. Ensure you are nailing into the cabinet frame and the top of the cabinet box. Using wood glue in conjunction with nails is critical here for holding power. For extra security on longer runs, you might consider adding small wood blocks glued and screwed to the top of the cabinet to provide a more solid nailing surface for the moulding.
Q3: What is the best way to join two pieces of crown moulding on a long cabinet run?
A3: The best method is a scarf joint. This involves cutting both ends of the moulding at a long, shallow angle (typically 22.5 degrees). When the pieces are brought together, they overlap, and the angled cut creates a much stronger and less visible seam than a simple butt joint. Always use wood glue on these scarf joint surfaces before nailing. This is a key cabinet moulding techniques.
Q4: Can I attach crown moulding to cabinets that are not flush with the ceiling?
A4: Yes, you can. This is a very common scenario, and the crown moulding actually helps to disguise the uneven gap. Your main goal is to ensure the moulding is securely fastened to the cabinet boxes. The slight variations in the gap between the moulding and the ceiling can then be skillfully hidden with a bead of paintable caulk. Proper caulking is a critical part of the kitchen cabinet finishing process.
Q5: How much extra crown moulding should I buy?
A5: It’s always wise to buy extra. A good rule of thumb is to purchase 10-15% more than your calculated measurements. This accounts for miscuts, mistakes, and ensures you have enough material for precise angled cuts and potential replacements if a piece gets damaged during installation.
Conclusion
Adding crown moulding to your kitchen cabinets is a rewarding project that can dramatically enhance the look and feel of your kitchen. By following these detailed steps and cabinet trim installation techniques, you can achieve a professional-looking finish even with DIY kitchen cabinet molding. From selecting the right crown trim for cabinets to mastering mitered corner cabinet molding and perfecting the final caulking and painting, each step contributes to a beautifully transformed kitchen. So, gather your tools, follow this guide, and enjoy your beautifully finished cabinets!