
Image Source: howtonestforless.com
How To Apply Backsplash In Kitchen: Easy Step-by-Step DIY Guide
Wondering if you can install a kitchen backsplash yourself? Absolutely! With the right tools and a little patience, anyone can tackle a kitchen backsplash installation. This guide will walk you through everything from choosing your material to the final touches, making your tile backsplash DIY project a success.
Choosing Your Kitchen Backsplash
The first exciting step in your DIY backsplash journey is selecting the perfect material. Your kitchen backsplash is more than just a protective barrier; it’s a significant design element that can tie your whole kitchen together.
Popular Backsplash Materials
There are many options, each with its own pros and cons:
- Ceramic Tiles: A very popular and budget-friendly choice. They come in endless colors, patterns, and sizes. Ceramic is durable and easy to clean, though less dense than porcelain.
- Porcelain Tiles: Similar to ceramic but fired at higher temperatures, making them denser, harder, and more resistant to moisture and stains. They can mimic natural stone very well.
- Natural Stone (Marble, Granite, Travertine, Slate): These offer a luxurious, natural beauty. Each piece is unique. However, they are generally more expensive, require sealing to prevent stains, and can be prone to chipping if not handled carefully.
- Glass Tiles: Offer a sleek, modern look and can reflect light beautifully, making spaces feel brighter. They can be more challenging to cut and install, and grout lines can be more visible.
- Metal Tiles (Stainless Steel, Copper): Provide a contemporary, industrial, or even farmhouse aesthetic. They are durable and easy to clean but can show smudges and scratches.
- Peel-and-Stick Backsplashes: A quick and easy option for a temporary or budget-friendly upgrade. They come in various styles, mimicking subway tile, mosaic, or even brick. They are simple to apply but may not offer the same longevity or durability as traditional tile.
Considering Backsplash Patterns
The way you lay your tiles, your chosen backsplash patterns, can dramatically alter the look and feel of your kitchen.
- Subway Tile: A classic for a reason. Laying these rectangular tiles in a brick or stacked pattern offers timeless appeal.
- Herringbone: Creates a dynamic, eye-catching diagonal pattern. It requires more cuts and can be more time-consuming but delivers a stunning result.
- Basketweave: Two or more tiles are arranged to mimic the look of a woven basket. It adds texture and visual interest.
- Hexagon: Offers a geometric, modern, or vintage feel depending on the tile size and color.
- Mosaic: Small tiles often arranged on a mesh backing. This allows for intricate patterns and designs, from intricate floral motifs to simple color blends.
When making your choice, consider your budget, your desired aesthetic, and how much time and effort you’re willing to put into the installation.
Preparing Your Backsplash Surface
Proper preparation is crucial for a successful kitchen backsplash installation. A clean, smooth, and sound surface ensures the adhesive sticks well and your tiles look their best.
Essential Tools Needed
Gathering your backsplash tools needed before you start will save you time and frustration:
- Safety Gear: Safety glasses, gloves, and a dust mask are essential.
- Measuring Tape and Pencil: For accurate measurements and marking.
- Level: To ensure your tiles are straight.
- Notched Trowel: Specifically sized for your tile to spread adhesive evenly.
- Tile Nippers or Wet Saw: For cutting tiles to fit around outlets and edges. A wet saw is recommended for intricate cuts or harder materials like porcelain or natural stone.
- Spacers: To maintain consistent grout lines.
- Sponge and Bucket: For cleaning up excess adhesive and grout.
- Grout Float: For applying grout.
- Utility Knife: For removing old caulk or trimming excess material.
- Caulk Gun and Kitchen Caulk: For sealing edges.
- Adhesive (Thin-set Mortar or Tile Adhesive): The right backsplash adhesive types are critical.
Cleaning and Repairing the Wall
- Remove Obstacles: Take down any outlet covers, switch plates, shelves, or hooks.
- Clean Thoroughly: Wash the wall with a mild detergent and water to remove grease, grime, and dust. A degreaser might be necessary in the kitchen area. Rinse well and let it dry completely.
- Inspect for Damage: Check for any holes, cracks, or loose drywall paper. Fill any holes or cracks with spackling compound and sand smooth once dry.
- Sand Smooth: Lightly sand any glossy surfaces to give the adhesive something to grip. Wipe away dust with a damp cloth.
- Check for Flatness: Use a long level to ensure the wall is flat. Minor imperfections can often be compensated for with the adhesive, but significant bowing or unevenness might require patching or skim coating.
- Priming (Optional but Recommended): For porous surfaces like new drywall or areas that may have been patched, applying a primer designed for tile surfaces can improve adhesion and prevent the wall from absorbing moisture from the adhesive.
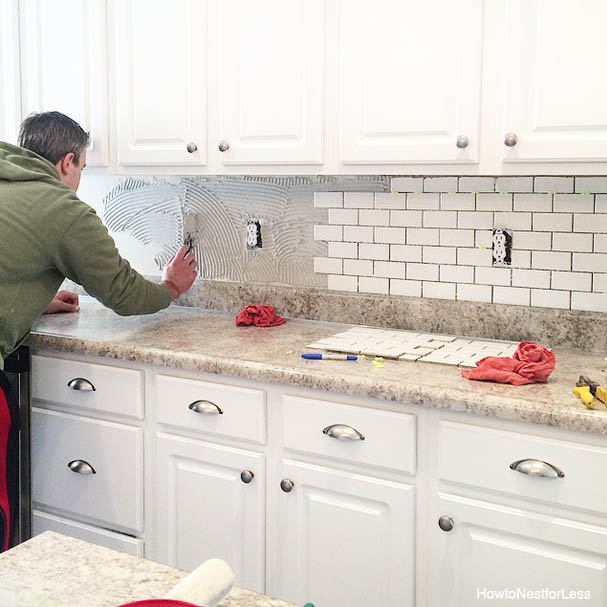
Applying the Backsplash Adhesive
Choosing the right backsplash adhesive types is critical for a long-lasting installation. For most ceramic and porcelain tiles, a good quality premixed tile adhesive or thin-set mortar will work well. For heavier tiles like natural stone or glass, thin-set mortar is usually recommended.
Understanding Adhesive Types
- Premixed Tile Adhesive (Mastic): Comes in a bucket, ready to use. It’s easy to work with and good for most wall applications with non-porous tiles. It’s generally less water-resistant than thin-set, so avoid it in areas prone to heavy moisture.
- Thin-set Mortar: A powdered product that you mix with water according to the manufacturer’s instructions. It creates a stronger, more water-resistant bond, making it ideal for heavier tiles, porcelain, natural stone, and areas with potential moisture.
Spreading the Adhesive
- Mix Thin-set (if using): Follow the package directions carefully. Mix to a peanut-butter-like consistency. Let it “slake” (rest) for a few minutes as directed, then remix.
- Apply in Small Sections: Work in manageable sections, about 2-3 square feet at a time. Adhesive can start to dry out before you finish tiling.
- Use the Notched Trowel: Hold the trowel at a 45-degree angle to the wall. Spread the adhesive evenly, creating uniform ridges. The size of the notches on the trowel depends on the size of your tiles – check the tile manufacturer’s recommendations. Larger tiles generally need larger notches.
- Comb the Adhesive: The ridges create air channels that allow for better tile adhesion and ensure full coverage.
Laying the Tiles: Your Tile Backsplash DIY Project
This is where your kitchen backsplash starts to take shape! Patience and precision are key here.
Planning Your Layout
Before you even touch adhesive, do a dry run.
- Find the Center: Locate the center point of the backsplash area, usually above the stove or a prominent feature.
- Lay Out a Row: Lay out a row of tiles without adhesive, starting from the center and working outwards. Use spacers between the tiles. This helps you visualize the final pattern and identify any awkward cuts needed at the ends.
- Check for Gaps: Ensure the layout looks balanced. You might need to adjust your starting point to avoid tiny slivers of tile at the edges. It’s often better to have slightly larger cuts on both ends than a tiny piece on one.
- Mark Guidelines: Lightly draw a horizontal and vertical guideline on the wall using your level and pencil. This will help you keep your first row straight.
Installing the First Tile
- Position the First Tile: Place your first tile firmly onto the adhesive, aligning it with your guidelines.
- Press and Wiggle: Gently press the tile into the adhesive and wiggle it slightly. This helps ensure good contact and removes air pockets.
- Use Spacers: Insert tile spacers into the corners of the tile to maintain consistent grout lines.
Continuing the Installation
- Work Outwards: Continue laying tiles in your chosen pattern, working outwards from your starting point.
- Maintain Consistent Pressure: Apply firm, consistent pressure to each tile to embed it into the adhesive.
- Check for Straightness: Periodically use your level to ensure your rows and columns are straight. Adjust as needed before the adhesive sets.
- Clean Up Excess Adhesive: Wipe away any adhesive that squeezes out between tiles or onto the tile faces with a damp sponge immediately. Dried adhesive is much harder to remove.
Cutting Backsplash Tile
Cutting backsplash tile is often necessary to fit around outlets, windows, doors, and at the edges of your backsplash area.
Methods for Cutting
- Tile Nippers: Good for small, simple cuts or shaping edges. They work by scoring and then nipping away small pieces of tile.
- Rotary Cutter (Wheeled Glass/Tile Cutter): Similar to a glass cutter, this scores the tile surface. You then snap the tile along the score line. It’s useful for straight cuts.
- Wet Saw: The most versatile option, especially for harder materials like porcelain and stone, or for complex shapes and straight cuts. It uses a diamond blade and water to cool the blade and reduce dust, providing cleaner cuts.
Cutting Techniques
- Measure Twice, Cut Once: Accurately measure the area you need to cut.
- Mark Your Cut Line: Use a pencil to mark the tile. For wet saws, you’ll usually score the top surface.
- Use a Template (for outlets): For outlets, you can create a cardboard template of the opening and transfer the shape to your tile.
- Safety First: Always wear safety glasses when cutting tile. If using a wet saw, follow its operating instructions carefully.
- Smooth Edges: After cutting, you may need to lightly sand any sharp edges with a rubbing stone or fine-grit sandpaper.
How to Grout Backsplash
Grouting fills the gaps between tiles, unifying the surface and protecting the edges. Learning how to grout backsplash is a key skill.
Choosing Your Grout
- Sanded Grout: Contains sand and is used for grout lines 1/8 inch or wider. The sand provides strength and prevents shrinkage.
- Unsanded Grout: Contains no sand and is used for grout lines smaller than 1/8 inch, and for delicate tiles like glass or metal that could be scratched by sand.
- Epoxy Grout: A more durable and stain-resistant option, but it is more expensive and trickier to work with.
Grouting Steps
- Prepare the Grout: Mix the grout according to the manufacturer’s instructions to a smooth, paste-like consistency. Let it slake if the instructions require it.
- Apply the Grout: Using a grout float, scoop a generous amount of grout onto the tiles. Hold the float at a 45-degree angle and spread the grout across the tiles, forcing it into the gaps between them. Work in diagonal motions to ensure all joints are filled.
- Remove Excess Grout: Hold the float at a steeper angle (almost 90 degrees) and scrape off as much excess grout as possible from the tile surface.
- First Cleaning (Hazing): Wait about 15-30 minutes (depending on drying time) for the grout to set slightly. Use a damp (not wet) sponge to gently wipe away the excess grout from the tile faces. Rinse the sponge frequently in clean water. Work diagonally across the tiles to avoid pulling grout out of the joints.
- Second Cleaning (Buffing): After a few hours, a slight haze may appear on the tiles. Buff this haze off with a clean, dry cloth or a microfiber towel.
Backsplash Finishing Techniques
The finishing touches are what make your DIY backsplash look professional and polished.
Caulking the Edges
- Remove Spacers: Once the grout is dry (check grout manufacturer’s instructions, usually 24-72 hours), remove all tile spacers.
- Clean the Edges: Ensure the edges of your backsplash and the countertop/cabinets are clean and dry.
- Apply Caulk: Use a good quality silicone or latex kitchen and bath caulk in a color that matches your grout or tile. Cut the tip of the caulk tube at a 45-degree angle and apply a thin, consistent bead along the top edge where the backsplash meets the cabinets, and the bottom edge where it meets the countertop.
- Smooth the Caulk: Wet your finger or a caulk smoothing tool and gently run it over the caulk line to create a smooth, concave finish. Wipe away any excess caulk immediately.
Sealing Natural Stone (If Applicable)
If you chose natural stone tiles, sealing is essential to protect them from stains.
- Wait for Grout to Cure: Ensure the grout is fully cured according to the manufacturer’s instructions.
- Apply Sealer: Use a high-quality penetrating sealer designed for natural stone. Apply it according to the product’s directions, usually with a clean cloth or brush.
- Wipe Off Excess: Allow the sealer to penetrate for the recommended time, then wipe off any excess from the tile surface before it dries.
- Reapply as Needed: Natural stone may need to be resealed periodically (every 1-2 years) depending on traffic and cleaning habits.
Maintaining Your New Backsplash
Once your beautiful new backsplash is installed, proper maintenance will keep it looking great for years.
- Regular Cleaning: Wipe down your backsplash regularly with a mild, non-abrasive cleaner and a soft cloth. Avoid harsh chemicals or abrasive scrubbers that can damage grout or tile finishes.
- Grout Care: For stubborn stains on grout, use a grout cleaner specifically designed for the type of grout you have. You may want to reseal the grout periodically, especially in high-traffic or wet areas.
- Check for Damage: Periodically inspect your backsplash for any loose tiles or cracked grout and address any issues promptly to prevent them from worsening.
Frequently Asked Questions (FAQ)
Q1: How long does it take to install a kitchen backsplash?
A1: For a standard backsplash area, a DIY installation typically takes between 1 to 2 days. This includes preparation, tiling, grouting, and finishing. The drying time between steps is crucial, so plan accordingly.
Q2: Can I tile over existing wallpaper?
A2: It’s generally not recommended to tile over wallpaper. The adhesive may not bond properly to the wallpaper, and moisture from the adhesive could cause the wallpaper to peel or bubble, compromising the backsplash. It’s best to remove the wallpaper and prepare the wall surface properly.
Q3: What’s the best way to clean grout haze?
A3: The best way to clean grout haze is with a clean, damp sponge during the initial cleanup. For stubborn haze that appears after drying, a specialized grout haze remover or a mixture of white vinegar and water (used sparingly and rinsed thoroughly) can be effective on most tile types. Always test in an inconspicuous area first.
Q4: Can I use any type of tile adhesive for my backsplash?
A4: No, it’s important to choose the right backsplash adhesive types for your specific tile and location. Premixed adhesives (mastic) are suitable for lighter, non-porous tiles in dry areas. Thin-set mortar is recommended for heavier tiles, porcelain, natural stone, and areas exposed to moisture.
Q5: How do I deal with outlets when tiling?
A5: You’ll need to cut your tiles to fit around outlets. For straight cuts, a wet saw or tile nippers can work. For more complex shapes or a cleaner finish, an outlet box extender might be needed to bring the outlet cover flush with the new tile surface. Always turn off the power to the outlet at the breaker before working near electrical components.
By following these steps, you can confidently tackle your kitchen backsplash project and enjoy a beautiful, updated kitchen space. Happy tiling!