
What is the best way to lay out kitchen cabinets? The best way to lay out kitchen cabinets is by focusing on the work triangle, creating efficient zones for cooking, cleaning, and storage, and ensuring ample counter space and accessibility. This guide will walk you through every step of the kitchen cabinet planning process, from initial ideas to the final kitchen cabinet installation.
Your kitchen is the heart of your home, and the cabinets are its backbone. Getting the kitchen cabinet layout right is crucial for both functionality and aesthetics. Whether you’re embarking on a full renovation or a simple refresh, a well-planned kitchen cabinet design layout will transform your cooking experience. Let’s dive into how to achieve your dream kitchen by mastering the art of kitchen cabinet arrangement.
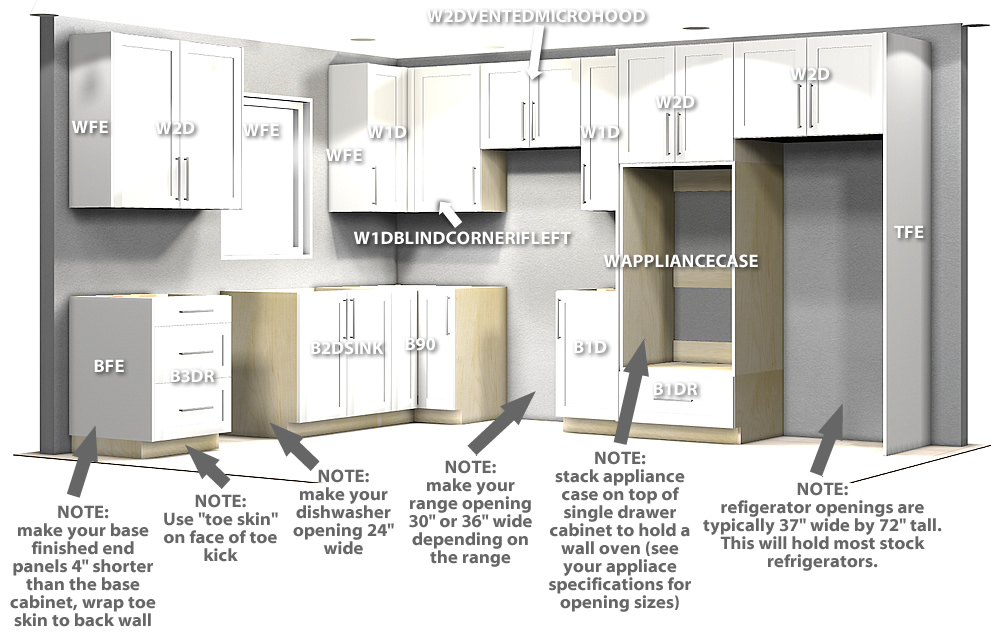
Image Source: www.barkercabinets.com
Fathoming the Foundation: The Kitchen Work Triangle
Before you even think about kitchen cabinet styles or kitchen cabinet types, you need to grasp the concept of the kitchen work triangle. This fundamental principle guides the placement of your three main work zones: the sink, the refrigerator, and the stove.
- The Sink: Your primary cleaning and prep area.
- The Refrigerator: Your food storage hub.
- The Stove: Your cooking center.
The idea is to create an efficient pathway between these three points, minimizing unnecessary steps and maximizing workflow. The ideal distance between each point of the triangle is generally between 4 and 9 feet. The total perimeter of the triangle should ideally be between 13 and 26 feet.
Optimizing Your Work Triangle
- Clear Pathways: Ensure there are no obstructions between the sink, refrigerator, and stove. Doors, islands, or other furniture shouldn’t block this crucial flow.
- Avoid Triangle Obstruction: Never place the stove or refrigerator directly in a corner where they could limit access to the sink.
- Island Considerations: If you have an island, ensure it doesn’t break the work triangle. If an island is part of your layout, it should ideally have a clear path of at least 36 inches on all sides.
Decoding Kitchen Zones: Beyond the Triangle
While the work triangle is essential, modern kitchens benefit from a more nuanced approach by incorporating distinct work zones. This concept expands on the triangle to create specialized areas for different tasks.
Prep Zone
This is where most of your food preparation happens. It should be located near the sink and refrigerator, offering ample counter space.
- Ideal Placement: Between the sink and the stove.
- Key Features: Generous counter space, easy access to frequently used utensils, knives, cutting boards, and trash/recycling bins. Consider placing a trash pull-out in your base cabinets here.
Cooking Zone
This zone is centered around your stove and oven.
- Ideal Placement: Adjacent to the prep zone.
- Key Features: Easy access to pots, pans, cooking utensils, spices, and oils. Ventilation is crucial here. You might consider specialized kitchen cabinet types like pull-out spice racks near the stove or deep drawers for pots and pans.
Cleaning Zone
This zone encompasses your sink, dishwasher, and waste disposal.
- Ideal Placement: Typically between the refrigerator and the prep zone.
- Key Features: Proximity to the sink and dishwasher. Consider dedicated storage for cleaning supplies under the sink.
Storage Zone
This zone is for pantry items, dishes, glassware, and small appliances.
- Ideal Placement: Can be spread out, but a central pantry or a bank of tall cabinets is beneficial.
- Key Features: Accessible storage for dry goods, dishes, and everyday items. Consider kitchen cabinet spacing that allows for easy access to these items.
Key Considerations for Kitchen Cabinet Placement
Once you have your zones defined, you can begin to think about the specific kitchen cabinet placement. This involves considering several factors:
1. Workflow and Accessibility
- Open Doors: Ensure that appliance doors (refrigerator, oven, dishwasher) and cabinet doors can open fully without hitting each other or bumping into walls or other cabinets.
- Traffic Flow: Plan for clear walkways. The main traffic paths in your kitchen should be at least 36 inches wide, preferably 42-48 inches if possible.
- Corner Cabinets: These can be tricky. Lazy Susans, pull-out shelves, or specialized corner drawers can maximize usability and prevent wasted space.
2. Counter Space
- Landing Zones: Every major appliance needs a “landing zone” – a clear counter space of at least 15 inches on one side (preferably both) to place items before and after use.
- Prep Space: Aim for at least 36 inches of continuous counter space for efficient food preparation.
3. Appliance Integration
- Refrigerator: Ensure enough space for the refrigerator door to open fully. Consider built-in or counter-depth refrigerators for a more seamless look.
- Oven/Range: Allow sufficient space around the cooktop and oven. If you have a wall oven, ensure it’s at a comfortable height.
- Dishwasher: Position it next to the sink for easy loading and unloading.
4. Lighting and Aesthetics
- Natural Light: Position your sink near a window if possible to take advantage of natural light.
- Task Lighting: Plan for under-cabinet lighting to illuminate your work surfaces.
- Visual Balance: Consider the overall kitchen cabinet design layout for a pleasing visual balance. Mix and match different kitchen cabinet types and heights for a more dynamic look.
Popular Kitchen Layouts and Their Cabinet Considerations
Different kitchen shapes and sizes lend themselves to different layouts. Here are some of the most common and how kitchen cabinet arrangement plays a role:
a) The Galley Kitchen
- Description: Two parallel walls of cabinets and appliances.
- Pros: Extremely efficient for smaller spaces, great for the work triangle.
- Cons: Can feel cramped, limited counter space.
- Cabinet Layout Ideas: Maximize vertical space with tall cabinets. Utilize narrow base cabinets for specialized storage. Keep upper cabinets uniform for a cleaner look.
b) The L-Shaped Kitchen
- Description: Cabinets and appliances arranged along two adjacent walls.
- Pros: Offers good workflow and plenty of counter space, works well in open-plan living.
- Cons: Corner cabinets can be challenging to utilize effectively.
- Cabinet Layout Ideas: Focus on diagonal corner cabinets or pull-out solutions. This layout is excellent for incorporating an island.
c) The U-Shaped Kitchen
- Description: Cabinets and appliances along three walls.
- Pros: Offers abundant storage and counter space, very efficient work triangle.
- Cons: Can feel closed off if not designed carefully, potential for awkward corners.
- Cabinet Layout Ideas: Maximize every inch with specialized corner solutions. Consider a peninsula that can double as a breakfast bar.
d) The Island Kitchen
- Description: Combines one of the above layouts with a central island.
- Pros: Adds significant workspace, storage, and can serve as a social hub.
- Cons: Requires ample floor space to avoid feeling cluttered.
- Cabinet Layout Ideas: The island can house the sink, cooktop, or simply provide extra prep and storage. Ensure adequate kitchen cabinet spacing around the island for comfortable movement.
e) The Peninsula Kitchen
- Description: Similar to a U-shaped kitchen but with one side open and featuring a peninsula that extends from the cabinets.
- Pros: Offers some of the benefits of an island without requiring as much space, good for defining kitchen areas.
- Cons: Can obstruct flow if not positioned correctly.
- Cabinet Layout Ideas: The peninsula can be used for seating, additional counter space, or housing appliances.
Deciphering Kitchen Cabinet Measurements: The Devil is in the Details
Accurate kitchen cabinet measurements are non-negotiable for a successful layout. Measure everything twice!
Standard Cabinet Dimensions (for planning purposes):
| Cabinet Type | Standard Widths | Standard Depths | Standard Heights |
|---|---|---|---|
| Base Cabinets | 12″ to 48″ (in 3″ increments) | 24″ (standard) | 34.5″ (to countertop) |
| Wall Cabinets | 12″ to 48″ | 12″ to 24″ | 30″, 36″, 42″ |
| Tall Cabinets (Pantry/Oven) | 18″ to 36″ | 24″ | 84″, 90″, 96″ |
Crucial Measurement Points:
- Wall Lengths: Measure the total length of each wall where cabinets will be installed.
- Window and Door Locations: Note their exact position and dimensions. This impacts wall cabinet height and placement.
- Ceiling Height: Essential for determining wall cabinet heights and whether to stack cabinets or go to the ceiling.
- Plumbing and Electrical Outlets: Mark their exact locations. These cannot be moved easily and will dictate appliance placement.
- Appliance Dimensions: Have the exact height, width, and depth of all your chosen appliances. Don’t forget the space needed for doors to open.
- Obstructions: Account for radiators, vents, bulkheads, or any other architectural features.
Selecting Your Kitchen Cabinet Types and Styles
The functional layout is set, now it’s time to consider the visual elements – your kitchen cabinet types and kitchen cabinet styles. These choices significantly impact the overall feel and look of your dream kitchen.
Kitchen Cabinet Types:
- Base Cabinets: The foundation of your kitchen, providing counter space and storage below.
- Wall Cabinets: Mounted on the wall, offering storage above the counter.
- Tall Cabinets: Often referred to as pantry cabinets or oven cabinets, these extend from floor to ceiling or near-ceiling height.
- Specialty Cabinets: Corner cabinets, sink bases, oven cabinets, etc.
Popular Kitchen Cabinet Styles:
- Shaker: Characterized by a flat center panel and square edges. Timeless and versatile, fitting in with many design aesthetics.
- Slab (or Flat Panel): A simple, sleek door with no ornamentation. Ideal for modern and minimalist kitchens.
- Raised Panel: Features a center panel that is recessed, with a raised decorative frame around it. Offers a more traditional and ornate look.
- Inset: The cabinet door and drawer fronts are set into the cabinet frame, creating a flush, high-end appearance.
- Beadboard: Features a series of vertical grooves, adding a touch of cottage or farmhouse charm.
- Glass Front Cabinets: Upper cabinets with glass panels allow you to display china or decorative items, adding visual interest.
Cabinet Construction:
- Framed Cabinets: Have a face frame attached to the front of the cabinet box. Doors and drawers are typically attached to this frame.
- Frameless Cabinets (European Style): Do not have a face frame. Doors attach directly to the cabinet box, offering wider drawer and door openings and a sleeker look.
The Art of Kitchen Cabinet Spacing
Proper kitchen cabinet spacing is vital for both usability and aesthetics. It refers to the gaps between cabinets, appliances, and walls, as well as the clearance around doors and drawers.
Key Spacing Considerations:
- Door and Drawer Clearance: Allow at least 2 inches of clearance for doors and drawers to open fully without obstruction. For appliances like refrigerators and dishwashers, you’ll need more space depending on the door swing.
- Walkways: As mentioned, main walkways should be at least 36 inches wide.
- Appliance Landing Zones: A minimum of 15 inches of counter space next to the refrigerator, oven, and dishwasher.
- Corner Cabinet Spacing: If using a corner sink base, ensure there’s enough clearance for plumbing access.
- Above-Appliance Spacing: For ovens and microwaves, follow manufacturer recommendations for necessary clearance to prevent overheating.
Kitchen Cabinet Installation: The Final Piece of the Puzzle
Even the best kitchen cabinet planning and kitchen cabinet design layout can be undermined by poor kitchen cabinet installation. This is often a job best left to professionals, but knowing the basics is helpful.
Key Installation Steps:
- Layout Marking: Precise lines are drawn on the walls to indicate the exact placement of each cabinet, ensuring they are level and plumb.
- Cabinet Securing: Cabinets are attached to the wall studs using sturdy screws.
- Leveling and Shimming: Cabinets must be perfectly level and plumb. Shims are used to fill any gaps between the cabinet and the wall.
- Joining Cabinets: Adjacent cabinets are screwed together to create a solid, unified bank of cabinetry.
- Installing Doors and Drawers: These are attached and adjusted for proper alignment and smooth operation.
- Installing Hardware: Handles and knobs are attached.
- Countertop Installation: This usually follows cabinet installation.
Tip: If you’re a DIY enthusiast, consider renting a laser level for perfectly straight lines and invest in good quality cabinet installation hardware.
Planning Your Dream Kitchen: A Step-by-Step Approach
Let’s consolidate everything into a practical planning guide for your dream kitchen.
Step 1: Define Your Needs and Lifestyle
- How many people use the kitchen?
- What kind of cooking do you do? (Baking, quick meals, entertaining)
- What are your storage needs? (Pantry items, dishes, small appliances)
- Do you need a space for dining or socializing in the kitchen?
Step 2: Measure Your Space Meticulously
- Record all wall lengths, window and door placements, ceiling heights, and any obstructions.
- Draw a detailed floor plan, including electrical outlets and plumbing.
Step 3: Sketch Out Your Layout Ideas
- Start with the work triangle (sink, fridge, stove).
- Consider work zones (prep, cooking, cleaning, storage).
- Explore different kitchen layouts (L-shape, U-shape, galley, island) to see what fits your space and needs best.
- Draw rough sketches of cabinet placement within these layouts.
Step 4: Select Your Cabinet Types and Styles
- Browse different kitchen cabinet styles (Shaker, slab, etc.) and kitchen cabinet types (base, wall, tall).
- Consider materials and finishes.
- Think about interior cabinet accessories like pull-out shelves, drawer organizers, and spice racks.
Step 5: Plan for Appliances
- Choose your appliances early, as their dimensions will dictate cabinet sizes and kitchen cabinet spacing.
- Ensure adequate “landing zones” and door clearance.
Step 6: Detail Your Cabinet Layout
- Use graph paper or design software to create a precise kitchen cabinet design layout.
- Specify the exact dimensions and types of each cabinet.
- Pay close attention to kitchen cabinet spacing for workflow and accessibility.
- Don’t forget corner solutions and specialized storage.
Step 7: Consider Lighting and Electrical
- Plan for task lighting (under-cabinet), ambient lighting, and accent lighting.
- Ensure enough electrical outlets are available where needed for appliances and gadgets.
Step 8: Get Professional Quotes and Advice
- Share your detailed plans with cabinet suppliers and installers.
- Get multiple quotes and compare them.
- Consult with a kitchen designer if needed for expert advice on layout and aesthetics.
Step 9: Finalize and Order
- Double-check all kitchen cabinet measurements and your final layout plan.
- Place your order for cabinets and hardware.
Step 10: Schedule Installation
- Arrange for professional kitchen cabinet installation or prepare for a DIY project.
Frequently Asked Questions (FAQ)
How much space do I need between kitchen cabinets and an island?
You need at least 36 inches of clearance between cabinets and an island for comfortable movement. For a more spacious feel and easier traffic flow, aim for 42-48 inches.
Can I put a stove or sink in a corner?
Yes, you can. However, corner sinks often require specialized corner sink base cabinets and can sometimes be less accessible. Corner stoves might be placed in L-shaped layouts but require careful planning to ensure adequate ventilation and workspace.
What is the best kitchen layout for small kitchens?
Galley kitchens and L-shaped kitchens are often the most efficient for small spaces. They help create a defined work triangle and maximize usable cabinet and counter space.
How do I maximize storage in my kitchen cabinets?
Utilize vertical space by stacking cabinets to the ceiling. Incorporate pull-out shelves, drawer organizers, lazy Susans in corner cabinets, and specialized inserts for pots, pans, and spices.
Should my upper cabinets match my base cabinets?
Not necessarily. You can create visual interest by using different finishes or styles for upper and base cabinets, especially in larger kitchens or those with islands. For example, lighter uppers can make the space feel more open.
By following these detailed steps and paying close attention to kitchen cabinet planning, kitchen cabinet arrangement, and kitchen cabinet spacing, you’ll be well on your way to creating your dream kitchen that is as beautiful as it is functional.