
Image Source: shop.moen.com
How To Repair Kitchen Faucet Moen: Step-by-Step Guide
Can you fix a leaky Moen kitchen faucet yourself? Yes, in many cases, you absolutely can! Most common Moen faucet issues, like drips or low water pressure, are manageable with basic tools and a bit of patience. This comprehensive guide will walk you through the process of Moen faucet repair, helping you to fix a leaky Moen faucet or tackle other common problems. We’ll cover everything from identifying the issue to performing the repair, ensuring your Moen kitchen faucet works like new.
Gathering Your Supplies for Moen Faucet Repair
Before you begin any DIY Moen faucet repair, it’s essential to have the right tools and materials ready. Having everything on hand will make the process smoother and prevent frustrating interruptions.
Essential Tools for Moen Faucet Fixes:
- Adjustable Wrench: For loosening and tightening various nuts and fittings.
- Phillips Head Screwdriver: Usually needed for removing handle screws.
- Flathead Screwdriver: May be required for prying or accessing certain components.
- Pliers (Slip-Joint or Channel-Lock): Useful for gripping and turning stubborn parts.
- Allen Wrench Set: Many Moen faucet handles use hex screws.
- Rag or Towel: To catch drips and protect the sink finish.
- Bucket: To place under the faucet to collect any residual water.
- Penetrating Oil (like WD-40): Helpful for loosening corroded or stuck parts.
- Plumber’s Grease or Silicone Grease: For lubricating O-rings and cartridges.
Important Moen Kitchen Faucet Parts You Might Need:
The specific Moen faucet parts you’ll require depend on the problem. However, some common replacements include:
- Moen Faucet Cartridge: This is the heart of the faucet, controlling water flow and temperature. A worn-out cartridge is a very common cause of leaks.
- O-rings and Seals: Small rubber rings that prevent leaks around different parts of the faucet.
- Aerator: The small screen at the tip of the spout that can get clogged with mineral deposits, affecting water flow.
- Handle Screws: Sometimes these can strip or break.
- Escutcheon or Trim Pieces: Decorative covers that might need replacement if damaged.
Tip: It’s always a good idea to identify your specific Moen faucet model before purchasing parts. You can often find the model number under the sink or on the faucet body itself. Moen’s website also has a fantastic Faucet Parts finder tool.
Diagnosing Common Moen Faucet Problems
Troubleshooting Moen faucet issues often starts with observing the symptoms. Knowing what to look for can save you time and unnecessary parts replacement.
Common Moen Faucet Issues:
- Moen Faucet Drip: This is the most frequent complaint. It usually indicates a problem with the cartridge or worn-out seals.
- Low Water Pressure: Can be caused by a clogged aerator, debris in the water lines, or a failing cartridge.
- Leaky Spout Base: Often due to worn O-rings at the base of the spout.
- Loose or Wobbly Handle: May need tightening of an internal screw or replacement of a worn component.
- Difficulty Turning Handle: This often points to a worn-out or stiff cartridge.
- Water Leaking from Base of Handle: Typically signifies a faulty O-ring or a cracked cartridge.
Step-by-Step Guide to Fixing a Leaky Moen Faucet
This section focuses on the most common DIY Moen faucet repair: fixing a leaky Moen faucet, specifically addressing a drip from the spout.
Step 1: Turn Off the Water Supply
This is the most critical first step in any plumbing repair.
- Look under your sink for two shut-off valves, one for hot water and one for cold.
- Turn both valves clockwise until they are snug. Do not overtighten.
- Turn on the faucet to drain any remaining water in the lines and to confirm the water is indeed off.
Step 2: Remove the Faucet Handle
The method for removing the handle varies by Moen faucet model.
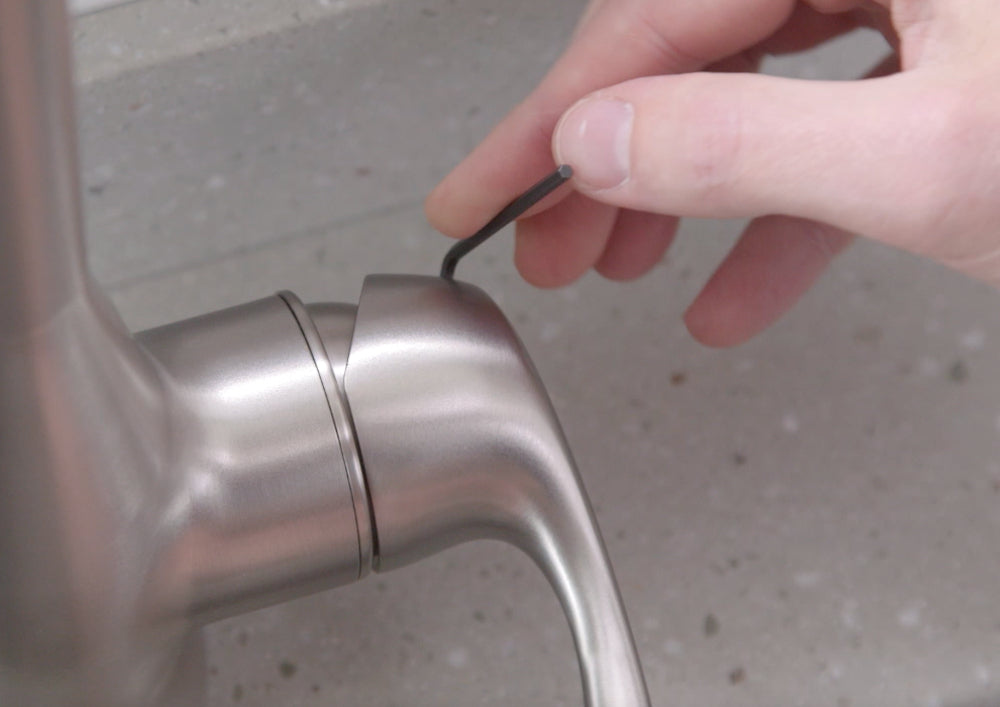
- Locate the Set Screw: Most Moen handles have a decorative cap or button on the front or side. Carefully pry off this cap using a small flathead screwdriver or an Allen wrench to reveal a set screw.
- Remove the Set Screw: Use the appropriate screwdriver or Allen wrench to loosen and remove the set screw. You don’t need to remove it completely, just loosen it enough to slide the handle off.
- Lift Off the Handle: Gently pull the handle straight up and off the faucet body. If it’s stuck, a gentle wiggle or a bit of penetrating oil might help. Avoid excessive force.
Step 3: Remove the Escutcheon and Packing Nut
Once the handle is off, you’ll see a decorative cover called an escutcheon.
- Unscrew the Escutcheon: Some escutcheons simply unscrew by hand. Others might have a retaining nut that needs to be loosened with a wrench.
- Locate the Packing Nut: Beneath the escutcheon, you’ll find a large, usually brass, nut. This is the packing nut.
- Loosen the Packing Nut: Use an adjustable wrench to carefully loosen the packing nut by turning it counter-clockwise.
Step 4: Remove and Replace the Moen Faucet Cartridge
This is where the magic happens for fixing a Moen faucet drip.
- Remove the Cartridge Retainer Clip: Most Moen cartridges are held in place by a small metal clip. You’ll see a small slot on the side of the faucet body where the cartridge sits. Use pliers or a flathead screwdriver to pull this clip straight out.
- Pull Out the Old Cartridge: With the clip removed, you can now pull out the old Moen faucet cartridge. It might be stuck. You can try to grip the stem with pliers and gently twist and pull. If it’s very stubborn, you might need a Moen cartridge puller tool, which is specifically designed for this purpose. You can usually rent these or purchase them at a hardware store.
- Install the New Moen Faucet Cartridge: Take your new Moen faucet cartridge (ensure it’s the correct replacement part for your model). It will have specific notches or orientation guides. Align the new cartridge with the opening in the faucet body, ensuring it sits correctly.
- Insert the Cartridge Retainer Clip: Slide the retainer clip back into its slot to secure the new cartridge.
Step 5: Reassemble the Faucet
Now, reverse the steps to put everything back together.
- Replace the Packing Nut: Screw the packing nut back onto the faucet body, tightening it with your wrench.
- Replace the Escutcheon: Screw the escutcheon back into place.
- Reattach the Handle: Slide the handle back onto the cartridge stem and tighten the set screw. Replace the decorative cap.
Step 6: Turn the Water Back On and Test
- Slowly turn the hot and cold water shut-off valves back on by turning them counter-clockwise.
- Check for any leaks around the handle, spout base, or connections.
- Turn on the faucet and test the hot and cold water flow, as well as the temperature control.
Addressing Other Moen Faucet Issues
Beyond a simple drip, other problems can arise. Here’s how to troubleshoot them.
Troubleshooting Moen Faucet Low Water Pressure
If you’re experiencing poor water flow, the issue might not be the cartridge.
Clogged Aerator:
This is a frequent culprit for reduced pressure.
- Locate the Aerator: It’s the small screen at the very end of the spout.
- Unscrew the Aerator: Most aerators unscrew by hand or with pliers. Be gentle to avoid damaging the spout threads.
- Clean the Aerator: Rinse it under running water. If it’s still clogged, soak it in a solution of equal parts white vinegar and water for a few hours to dissolve mineral buildup. You can use a small brush to scrub away any remaining debris.
- Reassemble: Screw the clean aerator back onto the spout.
Debris in Water Lines:
Sometimes, sediment can get lodged in the faucet’s internal components.
- Disconnect Supply Lines: Turn off the water supply and disconnect the flexible supply lines from the shut-off valves. Place a bucket underneath to catch any residual water.
- Flush the Lines: Briefly turn the water supply back on (with the lines disconnected) to flush out any debris. Direct the flow into the bucket.
- Inspect and Reconnect: Check the aerator and the faucet cartridge for any obvious blockages. Reconnect the supply lines securely.
Fixing a Leaky Spout Base (Moen Faucet Handle Replacement Not Required)
If water drips from where the spout meets the faucet body, it’s usually the O-rings.
- Remove the Spout: For many Moen faucets, you’ll need to remove the handle and then unscrew or lift off a decorative cap or collar at the base of the spout. This might reveal a mounting nut that secures the spout. Loosen this nut.
- Lift Out the Spout: Carefully pull the spout straight up and away from the faucet body.
- Replace O-Rings: You’ll see one or more rubber O-rings around the base of the spout or within the faucet body where the spout sits. Remove the old O-rings and replace them with new ones of the same size. Lubricate the new O-rings with plumber’s grease before installation.
- Reassemble: Re-seat the spout, tighten any mounting nuts, and replace the decorative cap and handle.
Replacing a Moen Faucet Handle
If your handle is cracked, loose beyond tightening, or you simply want to update the look, a Moen faucet handle replacement is straightforward.
- Follow Steps 1 and 2 from the leaky faucet guide: Turn off the water and remove the existing handle.
- Identify the Correct Replacement Handle: Ensure you have the correct handle for your specific Moen faucet model.
- Attach the New Handle: Slide the new handle onto the cartridge stem, ensuring it’s properly aligned.
- Secure the Handle: Insert and tighten the set screw. Replace the decorative cap.
Moen Faucet Maintenance for Longevity
Regular Moen faucet maintenance can prevent many common problems and extend the life of your fixture.
Regular Cleaning:
- Wipe down the faucet regularly with a soft, damp cloth to prevent water spots and mineral buildup.
- For tougher grime, use a mild soap and water solution. Avoid abrasive cleaners or scouring pads that can scratch the finish.
Checking for Leaks:
- Periodically inspect your faucet for any signs of dripping or leaks, especially around the handle, spout base, and under the sink.
Replacing Worn Parts:
- If you notice a slight drip that doesn’t go away, or if the handle feels stiff, consider replacing the Moen faucet cartridge proactively, even if it’s not completely failing yet. This is a key part of preventative Moen faucet maintenance.
When to Call a Professional
While many Moen faucet repair tasks are manageable for the DIYer, there are times when calling a plumber is the best course of action.
- Persistent Leaks: If you’ve replaced the cartridge and O-rings and the leak persists, there might be a more significant issue with the faucet body or the water supply lines.
- Corroded or Damaged Faucet Body: If the faucet itself is heavily corroded or damaged, it might be more cost-effective to replace the entire faucet rather than attempt repairs.
- Uncertainty or Lack of Confidence: If you’re not comfortable with any of the steps or feel you lack the necessary tools, it’s always better to seek professional help to avoid causing further damage.
- Complex Plumbing Issues: If the problem extends beyond the faucet itself, such as issues with your water pressure or pipes, a professional plumber is needed.
Moen Faucet Installation: A Quick Overview
While this guide focuses on repair, understanding the basics of Moen faucet installation can be helpful. A proper installation is the first step to a well-functioning faucet.
Key Steps in Moen Faucet Installation:
- Turn Off Water: Always start by shutting off the main water supply to your home.
- Remove Old Faucet: Disconnect water supply lines, mounting nuts, and any drain components.
- Prepare the Sink: Clean the sink surface where the new faucet will be installed.
- Install New Faucet: Follow the manufacturer’s instructions precisely. This typically involves mounting the faucet body, connecting supply lines, and securing mounting hardware.
- Connect Supply Lines: Ensure connections are snug but not overtightened.
- Turn On Water and Test: Slowly restore water supply and check thoroughly for leaks.
Frequently Asked Questions (FAQ)
Here are some common questions related to Moen faucet repair.
What is the most common reason for a Moen faucet to leak?
The most common reason for a Moen faucet to leak from the spout is a worn-out or damaged Moen faucet cartridge. Over time, the seals within the cartridge can degrade, allowing water to seep through.
Can I buy Moen kitchen faucet parts at any hardware store?
Yes, most major hardware stores and home improvement centers carry a wide range of Moen kitchen faucet parts. It’s always best to bring the old part with you or have your faucet model number handy to ensure you get the correct replacement.
How often should I perform Moen faucet maintenance?
Basic cleaning should be done regularly. Inspecting for leaks and checking the ease of handle operation should be done every few months. Proactively replacing the Moen faucet cartridge every 5-7 years can prevent future leaks.
What is the difference between a cartridge and a valve in a Moen faucet?
In most modern Moen faucets, the “cartridge” is the primary component that controls water flow and temperature. Older styles might have used a “valve,” which often referred to the entire valve body or stem assembly. For most DIY repairs, you’ll be dealing with replacing the cartridge.
How do I know if I need a new Moen faucet cartridge or just new O-rings?
If the leak is specifically from the spout, a new cartridge is usually the solution. If the leak is from the base of the spout where it meets the sink or faucet body, worn O-rings are the more likely cause. If the handle is difficult to move or the leak seems to come from around the handle itself, it could be the cartridge or internal seals related to it.
Is Moen faucet installation difficult for a beginner?
Moen faucet installation can be managed by a beginner with basic DIY skills and by carefully following the instructions. However, if you are uncomfortable with plumbing or encounter unexpected issues, calling a professional is recommended.
How do I reset my Moen faucet?
“Resetting” a Moen faucet typically refers to ensuring the cartridge is properly seated and the retaining clip is in place. If you’re experiencing issues after a repair or installation, it might involve disassembling and reassembling the cartridge and handle assembly to ensure everything is aligned correctly. This is a key aspect of troubleshooting Moen faucet issues.
My Moen faucet handle is loose, what’s the fix?
A loose Moen faucet handle is often due to a loose set screw. Locate the set screw (usually under a decorative cap on the handle) and tighten it with the appropriate tool (Allen wrench or screwdriver). If tightening the screw doesn’t help, the internal spline or cartridge might be worn, requiring a Moen faucet handle replacement or cartridge replacement.
By following these detailed steps and tips, you should be well-equipped to tackle many common Moen faucet repair needs. Remember to work carefully, have the right parts, and don’t hesitate to seek professional help if you’re unsure.