
Can you change a single handle kitchen faucet yourself? Yes, with basic tools and a little patience, you can absolutely change a single handle kitchen faucet yourself, saving money and gaining a valuable DIY skill. This guide will walk you through the entire process, from gathering supplies to enjoying your new, sparkling faucet. We’ll cover everything you need to know to make this a successful project, whether you’re tackling a minor leaky faucet fix or giving your kitchen a fresh look.
Replacing a kitchen faucet might seem daunting, but it’s a manageable DIY project. This guide breaks down how to replace kitchen faucet units, including how to perform a single handle faucet repair by identifying and replacing a faulty faucet cartridge replacement, and the essential plumbing basics you need to know. We’ll ensure you have all the information to gather the right kitchen sink faucet parts.
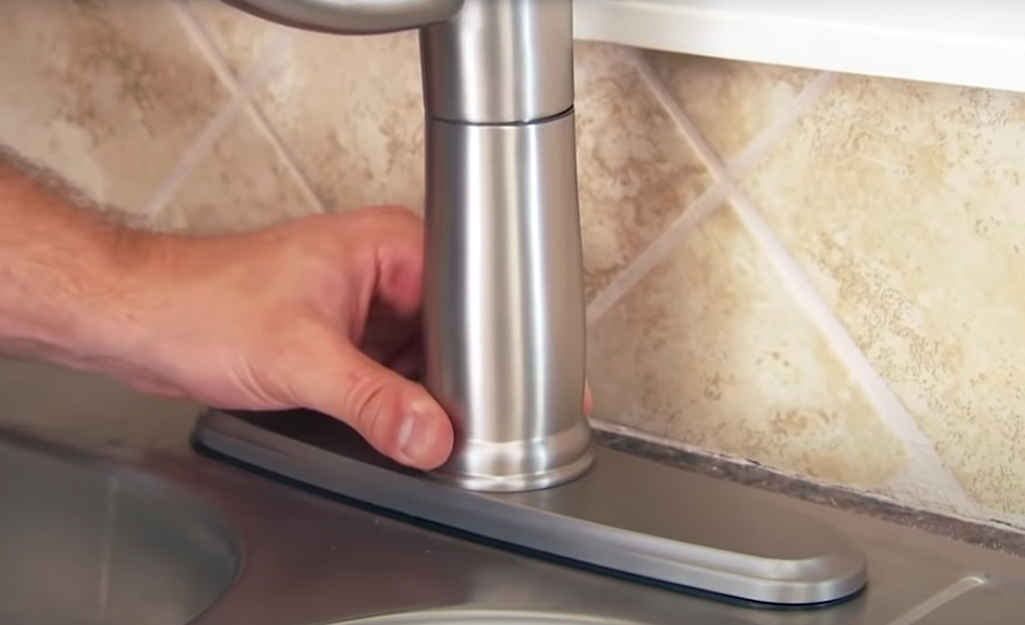
Image Source: contentgrid.homedepot-static.com
Tools and Materials You’ll Need
Before you begin, gather all your tools and materials. Having everything ready will make the process smooth and efficient.
- New Faucet: Choose a faucet that fits your sink’s hole configuration.
- Adjustable Wrench: Essential for loosening and tightening nuts and fittings.
- Basin Wrench: A specialized tool for reaching nuts in tight spaces under the sink.
- Phillips Head Screwdriver: For removing any decorative caps or handle screws.
- Flat Head Screwdriver: Can be useful for prying or loosening certain parts.
- Plumber’s Putty or Silicone Caulk: To create a watertight seal between the faucet base and the sink.
- Teflon Tape (Pipe Thread Tape): For sealing threaded connections.
- Bucket: To catch any residual water.
- Rags or Old Towels: For wiping up spills and keeping the area dry.
- Safety Glasses: Protect your eyes from debris.
- Work Light or Flashlight: To see clearly under the sink.
- Penetrating Oil (Optional): For loosening stubborn nuts.
- Pliers (Optional): Useful for gripping and turning.
- New Supply Lines (Recommended): It’s a good idea to replace old supply lines when replacing the faucet.
Step-by-Step Guide to Replacing Your Faucet
Let’s get started! Follow these steps carefully to ensure a successful faucet replacement.
Step 1: Shut Off the Water Supply
This is the most crucial first step.
- Locate the hot and cold water shut-off valves beneath your kitchen sink. These are usually small, oval-shaped knobs attached to pipes coming from the wall.
- Turn the knobs clockwise until they are hand-tight. If you can’t find individual shut-off valves under the sink, you’ll need to shut off water supply to the entire house at the main water valve, usually located in your basement, garage, or near your water meter.
- Open the old faucet to drain any remaining water in the lines. Let it run until the water stops.
Step 2: Prepare the Work Area
- Clear out everything from under the sink to give yourself plenty of room to work.
- Place a bucket under the water supply lines and the faucet connections.
- Lay down old towels or rags to absorb any drips and protect your cabinet floor.
Step 3: Remove the Old Faucet Handle
Most single-handle faucets have a way to remove faucet handle.
- Look for a small decorative cap on the front or side of the handle.
- Gently pry off this cap using a flathead screwdriver.
- You’ll likely see a screw underneath. Use the appropriate screwdriver (usually Phillips head) to remove this screw.
- Once the screw is out, the handle should lift straight off. If it’s stuck, a gentle wiggle or a bit of penetrating oil might help. For some models, you might need to loosen a set screw on the underside of the handle with an Allen wrench.
Step 4: Disconnect Water Supply Lines
- Using your adjustable wrench, carefully loosen the nuts that connect the water supply lines to the shut-off valves. Have your bucket and rags ready for any residual water.
- Next, you’ll need to disconnect the supply lines from the faucet itself. These connections are usually under the sink.
- A basin wrench is incredibly helpful here, as it allows you to reach nuts that are in awkward positions. If you don’t have one, an adjustable wrench might still work, but it will be more challenging.
Step 5: Remove the Old Faucet Mounting Hardware
- Under the sink, you’ll see a large nut or nuts holding the faucet to the sink or countertop.
- Use your basin wrench or adjustable wrench to loosen and remove these nuts. They can sometimes be difficult to reach and may be corroded.
- Once the nuts are removed, the old faucet should be loose. From above the sink, you can now lift the old faucet out.
Step 6: Clean the Sink Surface
- Before installing the new faucet, clean the area where the old faucet was mounted.
- Scrape off any old plumber’s putty, caulk, or mineral deposits. A putty knife or plastic scraper works well.
- Ensure the surface is clean and dry for a good seal with the new faucet.
Step 7: Install the New Faucet
This is where your new faucet comes to life. The specific installation steps can vary slightly depending on the faucet model, so always refer to the manufacturer’s instructions. However, the general process is as follows:
- Prepare the New Faucet: Some faucets come with a gasket or seal that fits onto the base. Others require you to apply plumber’s putty or silicone caulk to the underside of the faucet base. Check your faucet’s manual. If using plumber’s putty, roll it into a snake and press it firmly around the underside of the faucet base.
- Position the New Faucet: Carefully insert the new faucet through the mounting holes in your sink or countertop.
- Secure from Below: From underneath the sink, slide any included washers or mounting plates onto the faucet shanks. Then, screw on the mounting nuts. Hand-tighten them first, ensuring the faucet is straight.
- Tighten Mounting Nuts: Use your basin wrench or adjustable wrench to tighten the mounting nuts securely. Be careful not to overtighten, which could damage the sink or faucet. Ensure the faucet is centered and stable before fully tightening.
Step 8: Connect the Water Supply Lines
- If you purchased new supply lines, connect them to the new faucet’s shanks first.
- Then, connect the other end of the supply lines to the corresponding hot and cold water shut-off valves.
- Hand-tighten the connections first, then use your adjustable wrench to tighten them about a quarter-turn further. Again, avoid overtightening.
- For threaded connections, wrapping Teflon tape clockwise around the threads before connecting can help create a better seal.
Step 9: Test for Leaks
- Slowly turn the water supply valves back on (counter-clockwise).
- Check all connections under the sink for any drips or leaks.
- Turn on the new faucet and let the water run for a minute.
- Inspect all connections again, including where the supply lines connect to the faucet and valves, and where the faucet mounts to the sink.
- If you see any leaks, try tightening the connection slightly. If the leak persists, you may need to shut off the water again, disconnect the line, reapply Teflon tape or plumber’s putty, and reconnect.
Step 10: Reinstall Handle and Aerator
- Once you’ve confirmed there are no leaks, reattach the faucet handle. Line it up, insert the screw, and tighten it. Then, pop the decorative cap back into place.
- Faucet aerator cleaning is a good practice for new faucets too. The aerator is the small screen at the tip of the spout. Unscrew it, rinse it, and screw it back on. This ensures a smooth water flow.
Troubleshooting Common Issues
Even with the best preparation, you might encounter a few hiccups. Here are some common problems and their solutions.
Leaky Connections
- Problem: Water drips from a supply line connection or where the faucet mounts to the sink.
- Solution: Ensure all nuts are tightened sufficiently. Check that Teflon tape or plumber’s putty was used correctly on threaded connections. If a connection still leaks, shut off the water, disassemble the connection, check the rubber washer or seal for damage, and reassemble with new sealing material if needed.
Faucet Handle is Loose
- Problem: The handle wiggles or feels loose after installation.
- Solution: This usually means the screw holding the handle is not tight enough, or the decorative cap is not properly seated. Re-tighten the handle screw.
Low Water Pressure
- Problem: The new faucet has weak water flow.
- Solution:
- Aerator: The most common culprit is a clogged aerator. Unscrew it and clean it thoroughly.
- Supply Lines: Ensure the shut-off valves are fully open. Sometimes, debris can get lodged in the supply lines or within the faucet itself during installation. You might need to disconnect a supply line and flush it.
- Faucet Cartridge: If your faucet has a cartridge (which is common for single-handle faucets), a faulty cartridge can restrict flow. This might mean you need to perform a faucet cartridge replacement or there’s an issue with the new faucet itself.
When to Consider a Faucet Cartridge Replacement
If your faucet has poor flow or leaks from the handle area, the issue might be with the cartridge inside the faucet. This is a common part for single handle faucet repair.
What is a Faucet Cartridge?
A faucet cartridge is essentially the “brain” of your faucet. It’s a valve that controls the flow and temperature of water. When you move the single handle, it moves internal parts within the cartridge to mix hot and cold water and regulate the volume. Over time, the seals inside a cartridge can wear out, leading to leaks or poor operation.
How to Replace a Faucet Cartridge
Replacing a cartridge is often a simpler repair than replacing the entire faucet.
- Shut off water supply: Just like with a full replacement, turn off the hot and cold water valves under the sink.
- Remove the handle: Follow the steps outlined earlier to remove the faucet handle.
- Expose the cartridge: You’ll typically see a retaining clip or nut holding the cartridge in place. Carefully remove this. Some cartridges might be held by a threaded collar.
- Remove the old cartridge: Use pliers or a cartridge puller tool (often specific to the faucet brand) to gently pull out the old cartridge.
- Install the new cartridge: Insert the new cartridge, ensuring it’s oriented correctly (there’s usually a specific way it needs to sit).
- Reassemble: Replace the retaining clip or nut, then reattach the faucet handle.
- Test: Turn the water back on and check for leaks or proper operation.
It’s essential to get the exact replacement cartridge for your faucet model. You can often find this information on the faucet itself or in the original manual. If you can’t identify it, take the old cartridge to a hardware store for matching.
Choosing the Right Faucet Parts
When selecting a new faucet, consider the following:
Sink Hole Configuration
- Single Hole: For sinks with one hole, a spout and handle are usually integrated into a single unit.
- Centerset (4-inch spread): This is common for older sinks where the handles and spout are spaced 4 inches apart. For a single-handle faucet, this usually means a base plate covers the extra holes.
- Widespread (8-inch spread or more): These have separate handles and a spout, offering more flexibility in placement.
Faucet Type and Style
- Pull-down or Pull-out: These offer convenience for cleaning and filling pots.
- Side Sprayer: A classic option where a separate sprayer unit is mounted next to the faucet.
- Pot Filler: Mounted on the wall above the stove, these are a specialty item.
- Finish: Chrome, brushed nickel, stainless steel, matte black, and bronze are popular choices. Consider how the finish will match your other kitchen fixtures and appliances.
Brand and Quality
Reputable brands often offer better warranties and easier access to replacement kitchen sink faucet parts.
Maintaining Your New Faucet
To keep your new faucet looking and functioning its best, follow these maintenance tips:
- Regular Cleaning: Wipe down your faucet regularly with a soft, damp cloth to prevent water spots and mineral buildup.
- Avoid Abrasive Cleaners: Harsh chemicals or scouring pads can scratch the finish. Stick to mild soap and water or specialized faucet cleaners.
- Check for Leaks: Periodically check under the sink for any signs of leaks.
- Aerator Cleaning: Unscrew and clean the aerator every few months to maintain good water flow.
Frequently Asked Questions (FAQ)
Q1: How long does it typically take to replace a kitchen faucet?
A: For an experienced DIYer, it can take 30-60 minutes. For a first-timer, allow 1-3 hours, especially if you encounter any stubborn parts or need to make extra trips for supplies.
Q2: What if my shut-off valves are old and won’t turn off completely?
A: If the shut-off valves are leaky or won’t close properly, you’ll need to replace them. This is a slightly more advanced plumbing task, and you might consider calling a plumber if you’re not comfortable. Otherwise, you’ll have to shut off water supply at the main valve for your house.
Q3: My new faucet has a different number of holes than my old one. What do I do?
A: If your sink has more holes than your new faucet requires, most single-handle faucets come with a deck plate or escutcheon that covers the unused holes. If it doesn’t, you can purchase one separately.
Q4: Is it necessary to replace the supply lines?
A: While not always strictly necessary, it is highly recommended. Old supply lines can become brittle and prone to leaks, especially after being disturbed. Replacing them with new ones is a good preventative measure.
Q5: What is the most common reason for a single-handle faucet to fail?
A: The most common reason is a worn-out faucet cartridge replacement. This internal component wears down over time due to the constant use and friction, leading to leaks or difficulty operating the handle.
By following this comprehensive guide, you can confidently tackle the project of changing your single-handle kitchen faucet. Enjoy your updated kitchen and the satisfaction of a job well done!