
Is your kitchen faucet head looking a bit dull and crusty? Do you find yourself struggling with weak water flow or uneven spray? The most common culprit is limescale buildup, and sometimes, rust. This guide will show you how to clean your kitchen sink faucet head easily, making it sparkle like new. Can I clean my kitchen faucet head with everyday items? Yes, you absolutely can! Most effective faucet cleaning methods use common household ingredients like vinegar and baking soda.
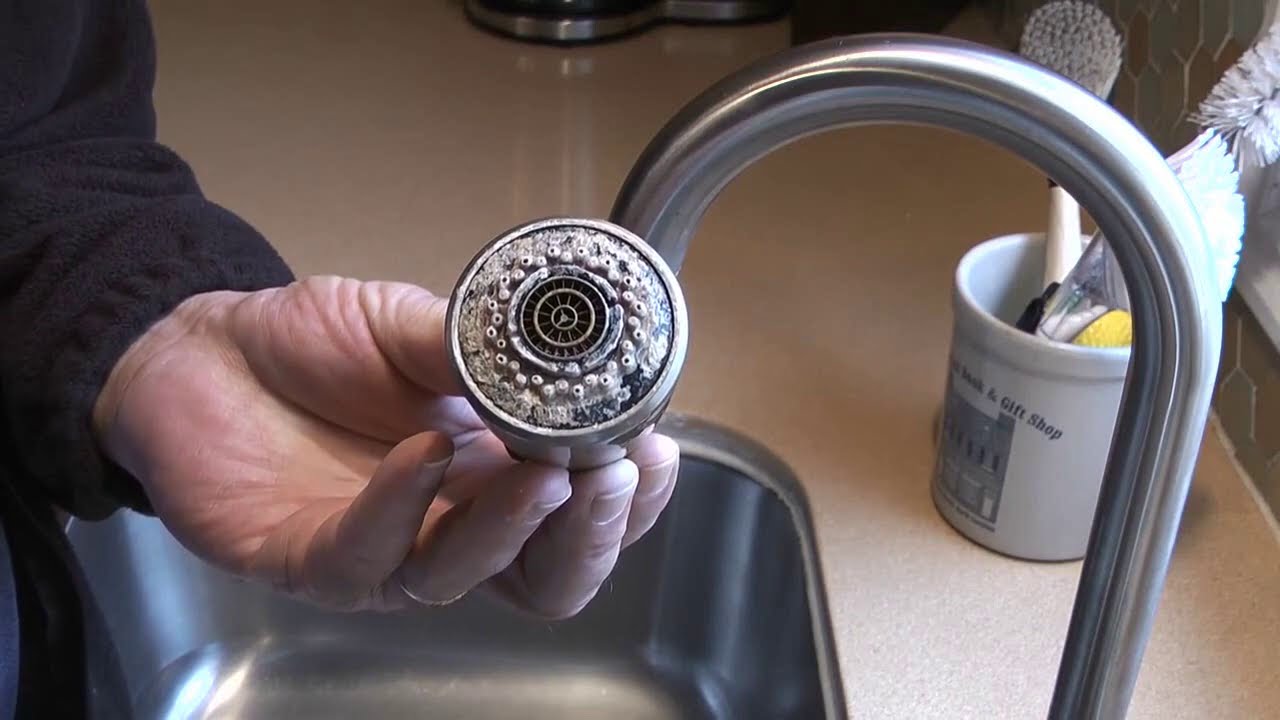
Image Source: i.ytimg.com
Why Your Faucet Head Needs a Good Clean
Over time, minerals in your tap water, especially calcium and magnesium, can deposit on your faucet. This is known as limescale. It’s a white, chalky substance that can clog the tiny holes in your faucet head, also called an aerator. This clog reduces water pressure and can make the spray pattern erratic. In some cases, especially with older faucets or those with metal components exposed to moisture, rust can also form, leading to unsightly stains and potential damage. Cleaning your faucet head regularly not only restores its appearance but also ensures optimal water flow and hygiene in your kitchen. This is crucial for everything from washing dishes to filling pots for cooking.
Deciphering the Problem: Limescale vs. Rust
Before diving into cleaning, it’s helpful to know what you’re dealing with.
- Limescale: This is a hard, white, or grayish deposit. It’s made up of calcium carbonate, which comes out of hard water. You’ll often see it around the holes of the faucet head and sometimes on the spout. It feels gritty and rough to the touch.
- Rust: This is a reddish-brown, flaky substance. It forms when iron in the water reacts with oxygen. Rust usually appears on metal parts of the faucet and can stain the sink.
Getting Started: Tools and Supplies You’ll Need
Gathering the right supplies makes the cleaning process smooth. Here’s what you’ll likely need:
- White Vinegar: The acidity in vinegar is excellent for breaking down limescale.
- Baking Soda: A gentle abrasive that helps scrub away grime and can neutralize odors.
- Old Toothbrush: Perfect for scrubbing stubborn spots.
- Soft Cloths or Microfiber Towels: For drying and polishing.
- Small Bowl or Plastic Bag: To soak the faucet head or aerator.
- Rubber Band or String: To secure the plastic bag if you can’t remove the aerator.
- Pliers (Optional): If you need to gently loosen a stuck aerator.
- Gloves: To protect your hands.
- A Small Pin or Paperclip: For clearing individual nozzle holes.
- Metal Polish (Optional): For restoring shine to chrome or brass.
The Step-by-Step Guide to a Sparkling Faucet Head
Let’s break down the process for how to clean kitchen sink faucet head.
Step 1: Removing the Faucet Aerator (The Key to Faucet Aerator Cleaning)
The aerator is the small part at the very tip of your faucet spout. It mixes air with water to create a smooth stream and prevent splashing. Limescale loves to build up here. How to remove faucet head components like the aerator is often simpler than people think.
- Identify the Aerator: Look at the very end of your faucet spout. The aerator is usually a small, cylindrical piece. Some are easily visible, while others are recessed inside the spout.
- Manual Removal (If Possible): Many aerators can be unscrewed by hand. Try gripping it firmly and turning it counter-clockwise.
- Using Pliers (Gently!): If it’s too tight, wrap a cloth around the aerator first to prevent scratching. Then, use pliers to grip it and turn counter-clockwise. Be gentle; you don’t want to damage the faucet.
- Check for a Hidden Aerator: Some faucets have aerators hidden inside the spout. You might need a special aerator wrench or to consult your faucet’s manual to see how to access it.
Pro Tip: If you can’t remove the aerator without risking damage, or if your faucet design makes it difficult, you can still clean the faucet head by soaking it directly in a bag.
Step 2: The Vinegar Soak for Kitchen Faucet Limescale Removal
Vinegar is your best friend for kitchen faucet limescale removal. Its acetic acid works wonders on mineral deposits.
- For Removable Aerators:
- Place the unscrewed aerator into a small bowl.
- Pour enough white vinegar over it to completely submerge it.
- Let it soak for at least 30 minutes. For tough buildup, you can soak it for several hours or even overnight.
- For Non-Removable Aerators:
- Fill a small plastic bag (like a Ziploc bag) with enough white vinegar to cover the faucet head.
- Carefully place the bag over the faucet spout, ensuring the aerator is fully submerged in the vinegar.
- Secure the bag tightly around the spout using a rubber band or string.
- Let it soak for at least 30 minutes to several hours, depending on the severity of the buildup.
Step 3: Scrubbing Away the Grime
After the soak, it’s time to get rid of the loosened deposits.
- For Aerators:
- Remove the aerator from the vinegar.
- Use an old toothbrush to scrub away any remaining limescale or debris from the aerator’s screen and threads. Rinse it thoroughly under running water.
- If you see any stubborn bits still stuck in the small holes, you can try to gently poke them out with a thin pin or paperclip. Be careful not to damage the mesh.
- For Faucets Soaked in Bags:
- Remove the plastic bag.
- Use the toothbrush to gently scrub the faucet head and aerator area.
- Rinse the faucet head thoroughly with clean water.
Step 4: Tackling Sink Faucet Rust Cleaning
Rust can be a bit more stubborn, but we have solutions.
- Vinegar and Baking Soda Paste:
- Make a paste by mixing baking soda with a small amount of water or vinegar.
- Apply this paste directly to any rust spots on the faucet.
- Let it sit for about 15-30 minutes.
- Gently scrub the rust away with the toothbrush.
- Rinse thoroughly.
- Lemon Juice: The citric acid in lemon juice can also help with rust. Apply lemon juice to the rust, let it sit, and then scrub.
- Commercial Rust Removers: For very stubborn rust, you might consider a specialized rust remover designed for plumbing fixtures. Always follow product instructions carefully and ensure good ventilation. This is an option if you’re asking about the best kitchen faucet cleaner for tough rust.
Remember, for sink faucet rust cleaning, it’s essential to be patient and avoid abrasive scrubbing that could damage the faucet finish.
Step 5: Reassembly and Testing
Once everything is clean and rinsed, it’s time to put it back together.
- Reattach the Aerator: Screw the aerator back into the faucet spout, turning clockwise. Hand-tighten it first, then give it a very gentle snug with pliers (with a cloth to protect the finish) if needed.
- Turn on the Water: Turn on the faucet and let the water run for a minute. Check the water flow and spray pattern. You should notice a much stronger, more even stream.
- Check for Leaks: Ensure the aerator is sealed tightly and there are no leaks around the spout.
Step 6: Polishing for a Dazzling Shine
To finish off, give your faucet a good polish.
- For Chrome Faucets: Use a soft microfiber cloth to buff the faucet. For extra shine, you can use a specialized chrome polish, following the product’s instructions.
- For Other Finishes: Check your faucet manufacturer’s recommendations. Some finishes might be sensitive to certain polishes. A soft, dry cloth is often the safest bet. This final touch is key for polishing kitchen faucet surfaces.
Cleaning a Clogged Faucet Without Removing the Aerator
What if you’re dealing with a cleaning clogged faucet scenario and can’t remove the aerator? Don’t worry, you can still achieve good results by soaking the faucet head directly.
- Prepare the Soak: Fill a plastic bag with white vinegar (or a mixture of vinegar and water).
- Submerge the Faucet Head: Carefully place the bag over the faucet spout so the aerator and the end of the spout are completely immersed in the vinegar.
- Secure the Bag: Use a rubber band or twist tie to hold the bag in place around the base of the spout.
- Soak Time: Let it soak for at least an hour. For significant clogs, leave it for several hours or overnight.
- Scrub and Rinse: After soaking, remove the bag. Use an old toothbrush to scrub any loosened deposits from the faucet head and around the nozzle openings. Rinse the faucet thoroughly with clean water.
- Flush the System: Turn on the water to its full pressure to flush out any remaining debris that might have been dislodged.
Disinfecting Your Kitchen Faucet
Beyond limescale and rust, your faucet can harbor germs. Disinfecting kitchen faucet surfaces is an important part of kitchen hygiene.
- Vinegar as a Disinfectant: White vinegar has mild disinfectant properties. After cleaning, you can wipe down the faucet with a cloth dampened in vinegar and let it air dry.
- Hydrogen Peroxide: For stronger disinfection, you can use a 3% hydrogen peroxide solution. Spray it onto the faucet head, let it sit for a few minutes, then wipe it clean with a damp cloth and rinse.
- Mild Soap and Water: For regular cleaning and to keep germs at bay, a wipe down with mild dish soap and water is often sufficient. Always rinse thoroughly after using any cleaning agent.
Alternatives to Vinegar for Faucet Cleaning
While vinegar is often the go-to, here are other effective options:
- Baking Soda Paste: As mentioned, a paste of baking soda and water can be a gentle abrasive for scrubbing away buildup. It’s particularly useful for cleaning clogged faucet holes if you can’t soak them.
- Lemon Juice: Its natural acidity can help dissolve mineral deposits and remove rust stains. You can rub a cut lemon directly onto affected areas or use bottled lemon juice.
- Commercial Faucet Cleaners: If you’re looking for the best kitchen faucet cleaner, there are many products specifically designed for bathroom and kitchen fixtures. These often contain mild acids or specialized cleaning agents. Always read and follow the product’s instructions and safety warnings. Some are specifically formulated for limescale or rust.
How to Maintain a Clean Faucet
Prevention is always better than cure. Here’s how to keep your faucet head sparkling:
- Wipe Down After Use: After each use, especially after washing dishes, quickly wipe down the faucet spout and head with a soft cloth. This prevents water spots and minor mineral deposits from building up.
- Regular Cleaning Schedule: Aim to clean your faucet head thoroughly at least once a month, or more often if you have very hard water.
- Address Issues Promptly: If you notice reduced water flow or visible buildup, tackle it right away before it becomes a major problem. This makes cleaning clogged faucet issues much easier.
When to Call a Professional
While most faucet cleaning can be a DIY job, there are times when it’s best to seek professional help:
- Severe Rust Damage: If rust has deeply corroded the metal or is causing leaks, a plumber might be needed to assess or replace parts.
- Stuck or Damaged Aerator: If you can’t remove the aerator without risking damage to the faucet, a plumber has the right tools and expertise.
- Complex Faucet Designs: Some modern faucets have intricate designs or special coatings that might require professional cleaning methods.
- Persistent Clogging: If even after thorough cleaning, your faucet remains clogged or has poor water flow, there might be a larger issue within the plumbing system.
Summary of Cleaning Methods
Here’s a quick comparison of common cleaning agents:
| Cleaning Agent | Best For | How to Use | Notes |
|---|---|---|---|
| White Vinegar | Limescale, general cleaning | Soak aerator/faucet head for 30 mins to overnight. Scrub with a toothbrush. Rinse. | Widely available, safe for most finishes, acidic. |
| Baking Soda Paste | Gentle scrubbing, mild stains, odor removal | Mix with water/vinegar to form a paste. Apply, let sit, scrub. Rinse. | Mild abrasive, good for polishing. |
| Lemon Juice | Limescale, rust, mild disinfection | Rub directly, let sit, scrub. Rinse. | Natural acid, pleasant scent. |
| Hydrogen Peroxide | Disinfection | Spray 3% solution, let sit for a few minutes, wipe and rinse. | Good for sanitizing, use in well-ventilated areas. |
| Commercial Cleaners | Tough limescale, rust, specific finishes | Follow product instructions carefully. Test in an inconspicuous area first. | Choose based on the specific problem and faucet material. |
Frequently Asked Questions (FAQ)
Q1: How often should I clean my kitchen faucet head?
A: It’s recommended to clean your faucet head thoroughly at least once a month. If you have hard water, you might need to do it more often, perhaps every two weeks, to prevent significant buildup.
Q2: Can I use bleach to clean my faucet?
A: It’s generally not recommended to use bleach on faucet heads. Bleach can be too harsh for some faucet finishes, potentially causing discoloration or damage. It’s also not ideal for removing mineral deposits like limescale. Vinegar is a much safer and more effective option for that.
Q3: My faucet aerator is stuck. What should I do?
A: If your aerator is difficult to remove, wrap a cloth around it to protect the finish and use pliers to gently turn it counter-clockwise. If it still won’t budge, or you fear damaging the faucet, it might be best to consult a plumber. Avoid excessive force.
Q4: What is the best way to remove hard water stains from my faucet?
A: White vinegar is excellent for removing hard water stains (limescale). Soak the aerator in vinegar or soak the faucet head itself in a bag filled with vinegar. Scrubbing with a paste of baking soda and vinegar can also be effective.
Q5: Can cleaning my faucet improve water pressure?
A: Yes, absolutely. Clogged aerators are a common cause of reduced water pressure. By removing the limescale and debris that are blocking the tiny holes, you restore the proper flow of water.
Q6: How do I clean a faucet with a brushed nickel finish?
A: For brushed nickel, it’s important to be gentle. Use mild cleaners like diluted white vinegar or a soap and water solution. Avoid abrasive cleaners or scouring pads that can scratch the finish. Always dry the faucet thoroughly after cleaning to prevent water spots.
By following these steps, you can easily remove limescale and rust, and effectively clean your kitchen sink faucet head, restoring its sparkle and functionality for a more pleasant kitchen experience.