
Yes, you can install a new kitchen sink faucet yourself with this easy-to-follow DIY guide. Replacing a kitchen faucet is a common DIY project that most homeowners can tackle with basic tools and a bit of patience. This guide will walk you through every step of replacing kitchen faucet, from shutting off the water to tightening faucet connections, making DIY sink faucet installation a breeze. We’ll cover everything you need to know about kitchen faucet replacement, including the essential under-sink plumbing and how to properly connect kitchen faucet components.
Installing a new kitchen sink tap can seem daunting, but it’s a very manageable task. A worn-out or outdated faucet can be a source of frustration, dripping water, or simply not working as it should. Thankfully, a kitchen faucet mounting job is within reach for most DIY enthusiasts. This guide will help you through plumbing for kitchen sink with clear instructions.
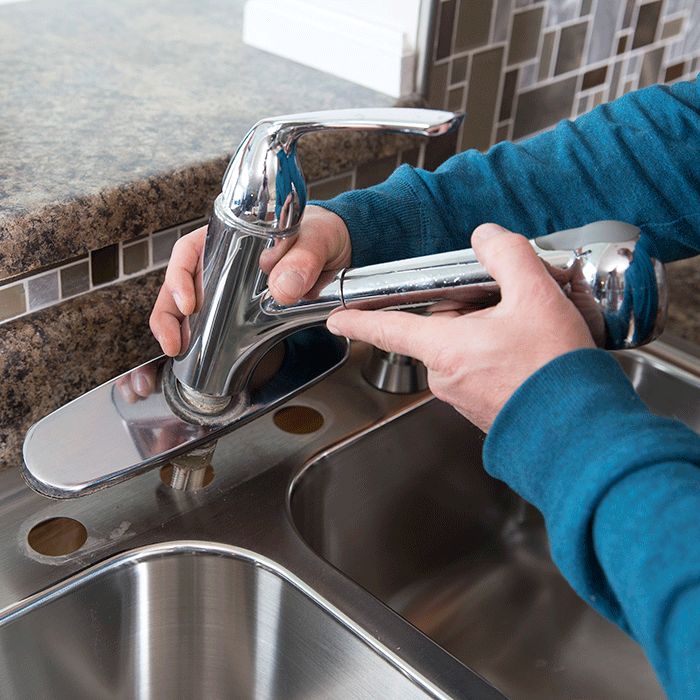
Image Source: mobileimages.lowes.com
What You’ll Need: Tools and Materials
Before you start, gather all the necessary tools and materials. Having everything ready will make the process much smoother.
Essential Tools:
- Adjustable Wrench: This is your primary tool for loosening and tightening nuts. Get one with a good grip.
- Basin Wrench: This specialized tool is designed to reach those awkward nuts located high up under the sink, making it invaluable for kitchen faucet mounting.
- Plumber’s Putty or Silicone Sealant: This creates a watertight seal between the faucet and the sink.
- Bucket: To catch any residual water from the pipes.
- Old Towels or Rags: For wiping up spills and keeping the work area dry.
- Safety Glasses: Protect your eyes from debris or dripping water.
- Work Gloves: For better grip and to protect your hands.
- Flashlight or Work Light: It’s dark under the sink!
- Screwdriver (Phillips and Flathead): You might need these for some older faucet models.
- Utility Knife or Putty Knife: To scrape away old sealant.
- Teflon Tape (Pipe Thread Tape): For sealing threaded connections.
New Faucet Components:
- New Kitchen Faucet: Make sure it’s compatible with your sink and has the correct number of holes.
- Supply Lines: Often come with the new faucet, but it’s good to have them ready. Make sure they are the correct length and have the right connectors.
Step-by-Step Guide to Installing Your New Faucet
Let’s break down the process into manageable steps.
Step 1: Shutting Off the Water Supply
This is the MOST IMPORTANT first step. You don’t want any surprises with water spraying everywhere!
- Locate Shut-Off Valves: Look under your kitchen sink. You should see two valves attached to the pipes coming out of the wall – one for hot water and one for cold water.
- Turn Off the Valves: Turn the handles of both valves clockwise until they are fully closed.
- Test: Turn on your old faucet to ensure the water is completely shut off. Let any remaining water drain out. If the water doesn’t stop, you might need to shut off the main water supply to your house. This is usually located in the basement, garage, or near your water meter.
Step 2: Removing the Old Faucet
Now that the water is off, you can start dismantling the old faucet.
- Clear the Area: Remove everything from under the sink to give yourself plenty of working room. Place a bucket and towels underneath to catch any drips.
- Disconnect Supply Lines: Use your adjustable wrench to unscrew the supply lines from the shut-off valves. Have your bucket ready for any trapped water.
- Loosen Mounting Nuts: This is where the basin wrench is a lifesaver. Reach up under the sink and locate the nuts that secure the old faucet to the sink or countertop. Use the basin wrench to loosen and remove these nuts. It can be tricky, so take your time.
- Remove the Old Faucet: Once the supply lines and mounting nuts are removed, the old faucet should lift out from the top of the sink. You might need to wiggle it a bit if there’s old sealant holding it in place. If it’s stubborn, use a utility knife to carefully cut around the base.
Step 3: Cleaning the Sink Surface
A clean surface is crucial for a good seal with your new faucet.
- Scrape Away Old Sealant: Use a putty knife or utility knife to gently scrape off any old plumber’s putty or silicone sealant from the sink or countertop where the old faucet was mounted. Be careful not to scratch your sink.
- Wipe Clean: Use a damp cloth to wipe away any dust or debris. Make sure the area is completely dry before installing the new faucet.
Step 4: Preparing the New Faucet for Installation
Most new faucets come with instructions, but here are the general steps for kitchen faucet mounting.
- Read Manufacturer Instructions: Always refer to the specific instructions that came with your new faucet, as designs can vary.
- Assemble Faucet Components: If your faucet comes in parts (e.g., the spout needs to be attached to the body), assemble them according to the instructions.
- Apply Sealant: Apply a bead of plumber’s putty or silicone sealant around the base of the new faucet where it will meet the sink surface. Some faucets have a rubber gasket; if yours does, you might not need sealant, or just a thin layer. Check your faucet’s manual.
Step 5: Installing the New Faucet
This is where the magic happens, connecting the new tap.
- Position the Faucet: Carefully lower the new faucet through the holes in your sink or countertop. Make sure it’s aligned correctly and facing the right direction.
- Secure the Faucet from Below: From under the sink, slide the mounting washers and nuts onto the faucet shanks. Hand-tighten them first.
- Tighten Mounting Nuts: Use your basin wrench to snug up the mounting nuts. Don’t overtighten, as this can damage the sink or faucet. Ensure the faucet is stable and doesn’t wobble from the top. You want a secure fit.
Step 6: Connecting the Supply Lines
This is where you’ll be working with the under-sink plumbing.
- Connect Supply Lines to Faucet: Screw the supply lines onto the corresponding hot and cold water inlets on the new faucet. Hand-tighten them, then use your adjustable wrench to give them a final quarter-turn. Be careful not to overtighten.
- Connect Supply Lines to Shut-Off Valves: Now, connect the other end of the supply lines to the shut-off valves. Again, hand-tighten first, then use your adjustable wrench for a slight snug.
Step 7: Checking for Leaks and Testing
The moment of truth!
- Turn on Water Supply: Slowly turn the shut-off valves counter-clockwise to restore the water supply.
- Inspect for Leaks: Carefully check all the connections you made for any signs of dripping. Pay close attention to where the supply lines connect to the faucet and the shut-off valves.
- Turn on Faucet: Turn on the new faucet, both hot and cold. Let the water run for a minute to flush out any air or debris from the lines.
- Check Again: While the water is running and after you turn it off, re-inspect all connections for leaks. If you see any drips, try tightening faucet connections slightly more. If a leak persists, you may need to disconnect, reapply Teflon tape to the threads, and reconnect.
Step 8: Final Touches
- Clean Up: Wipe up any water spills and put your cleaning supplies away.
- Organize Under the Sink: Place your items back under the sink.
- Enjoy Your New Faucet!
Troubleshooting Common Issues
Even with careful work, you might encounter a few snags.
Persistent Leaks
- Problem: A connection continues to leak.
- Solution: Ensure the threads are clean. If using Teflon tape, wrap it clockwise around the threads 2-3 times. Try tightening the connection slightly more, but be cautious not to overtighten. The supply line itself might be faulty, or the fitting on the faucet or valve might be damaged. In rare cases, you might need to replace a supply line.
Faucet Wobbles
- Problem: The faucet feels loose from the top.
- Solution: Go back under the sink and ensure the mounting nuts are snug. The basin wrench is key here. Make sure the washers are properly seated.
Water Flow Issues
- Problem: Water flow is weak or uneven.
- Solution: Check that the shut-off valves are fully open. Remove the aerator (the small screen at the tip of the spout) and clean it. Debris can get lodged here and restrict flow. Reconnect and test again. If problems persist, the supply lines might be kinked or there could be an issue within the new faucet itself.
Faucet Types and Considerations
When you’re replacing kitchen faucet, you might be considering different types.
Single-Handle vs. Double-Handle
- Single-Handle: Controls both temperature and flow with one lever. Convenient and modern.
- Double-Handle: Separate handles for hot and cold water. Offers more precise temperature control but takes up more space.
Mounting Styles
- Deck-Mounted: The most common type, where the faucet mounts directly through holes in the sink or countertop.
- Wall-Mounted: Less common in kitchens, but the faucet is mounted on the wall above the sink. This requires different under-sink plumbing considerations.
Special Features
- Pull-Down/Pull-Out Sprayers: These have a flexible hose that extends from the spout for easier cleaning.
- Touchless Faucets: Activated by motion, offering convenience and hygiene.
- Filtered Water Faucets: Separate taps for filtered drinking water.
Why DIY Kitchen Faucet Replacement?
Embarking on a DIY sink faucet installation offers several advantages:
- Cost Savings: You save on labor costs, which can be significant for plumbing work.
- Sense of Accomplishment: Successfully completing a home improvement project is rewarding.
- Learning New Skills: It’s a great way to expand your home maintenance capabilities.
- Convenience: You can do it on your own schedule.
Frequently Asked Questions (FAQ)
How long does it typically take to install a new kitchen faucet?
For a first-time DIYer, allot about 1-3 hours for the entire process, including preparation and cleanup. Experienced DIYers can often complete it in under an hour.
Can I replace my kitchen faucet without shutting off the main water supply?
Yes, as long as you can locate and successfully shut off the individual hot and cold water shut-off valves under your sink. If these valves don’t work or are absent, you will need to shut off the main water supply to your house.
What is the difference between plumber’s putty and silicone sealant?
Plumber’s putty is a pliable, oil-based compound that creates a watertight seal and is good for use with most sink materials. Silicone sealant is a flexible, waterproof adhesive that forms a more permanent seal and is often used on countertops or for a more robust seal. Always check the manufacturer’s recommendations for your specific faucet and sink.
How tight should I make the faucet connections?
You want connections to be snug and watertight, but not so tight that you strip the threads or crack the fittings. Hand-tighten first, then use a wrench for about a quarter-turn to a half-turn. If you feel significant resistance, stop.
Do I need to replace my old supply lines when installing a new faucet?
It is highly recommended to replace old supply lines when you replace your faucet. Old rubber hoses can degrade over time and may be more prone to leaks. New faucets often come with new supply lines, or you can purchase them separately. Ensure you get the correct length and connector types.
My new faucet has three holes, but my sink has four. What do I do?
Many faucets come with an optional decorative plate or escutcheon that covers the extra hole. If your faucet doesn’t include one, you can purchase a sinkhole cover separately.
What if my faucet won’t fit the existing holes in my sink?
This is a common concern with kitchen faucet replacement. Newer faucets might have different hole configurations than older ones. You may need to purchase a new sink or have a countertop fabricator modify the existing holes. Measure your sink’s hole pattern before purchasing a new faucet to avoid this issue.
What are common problems with under-sink plumbing when replacing a faucet?
The most common issues involve corroded or seized shut-off valves, leaky supply line connections, or difficulty reaching the mounting nuts with standard tools. Having a basin wrench and being prepared for potential minor leaks are key.
By following this comprehensive guide, you’re well-equipped to handle your kitchen faucet replacement with confidence. This DIY project not only upgrades your kitchen but also empowers you with valuable home maintenance skills. Enjoy your new, perfectly installed kitchen faucet!