
Can you replace a single handle kitchen faucet yourself? Yes, you absolutely can! With a few basic tools and this straightforward guide, you can successfully replace your old kitchen faucet and enjoy a fresh, functional fixture.
Replacing a single handle kitchen faucet might seem like a daunting task, but it’s one of the most rewarding DIY plumbing projects for a homeowner. It can transform the look and feel of your kitchen, and importantly, fix annoying leaks or improve water flow. This guide will walk you through every step, from preparing your workspace to tightening the final connection, making your DIY kitchen faucet install a breeze. Whether you’re dealing with a dripping faucet or simply want an upgrade, this tutorial is for you.
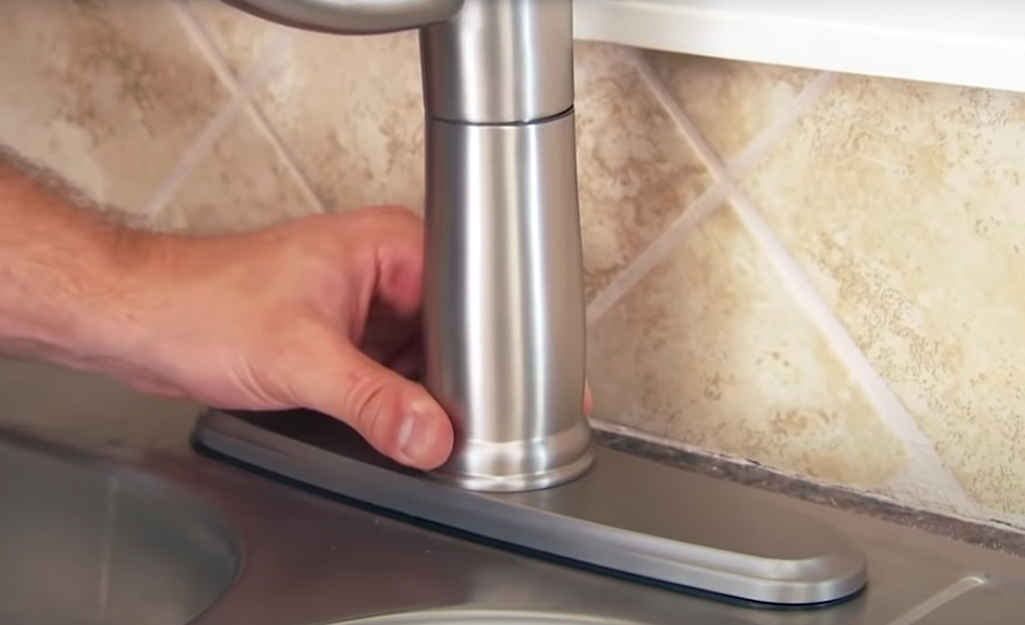
Image Source: contentgrid.homedepot-static.com
Preparing for Your Faucet Replacement
Before you dive in, gathering your tools and materials is key. This preparation ensures a smooth process and prevents frustrating interruptions.
What You’ll Need: Essential Tools and Materials
Having the right equipment at hand makes the job much easier. Think of this as your faucet replacement toolkit.
- Adjustable Wrenches (Two): These are crucial for loosening and tightening nuts and fittings. Having two allows you to hold one part steady while turning another.
- Basin Wrench: This specialized tool is designed to reach nuts in tight spaces, often found behind the sink bowl. It’s a lifesaver for under sink faucet removal.
- Pliers (Channel Locks or Slip-Joint): Useful for gripping and turning various plumbing components.
- Screwdriver Set: You might need both Phillips and flathead screwdrivers for certain parts.
- Bucket or Container: To catch any residual water that drains from the pipes.
- Rags or Towels: For wiping up spills and drying components.
- Safety Glasses: To protect your eyes from falling debris or dripping water.
- Work Light or Flashlight: Because the area under the sink is often dark.
- Plumber’s Putty or Silicone Sealant: For creating a watertight seal around the new faucet base.
- Thread Seal Tape (PTFE Tape): To ensure tight, leak-free connections on threaded pipes.
- New Faucet and Supply Lines: Make sure your new faucet is compatible with your sink and plumbing setup. Often, new supply lines come with the faucet, but it’s good to check.
Choosing Your New Faucet
Selecting the best kitchen faucet replacement involves considering style, functionality, and your budget. Look for faucets made from durable materials like brass or stainless steel. Consider features like a pull-down or pull-out sprayer, touchless operation, or specific finishes that match your kitchen décor. Always check that the faucet you choose will fit your sink’s hole configuration.
Turning Off the Water Supply
This is the most critical first step. You don’t want water spraying everywhere!
- Locate Shut-Off Valves: Underneath your sink, you should find two shut-off valves connected to the hot and cold water supply lines. They usually have a small knob or handle.
- Turn Off the Valves: Turn both knobs clockwise until they are completely closed.
- Test the Faucet: Turn on the faucet in the middle position (both hot and cold) to drain any remaining water in the lines and confirm that the water is indeed off. Let it run until no more water comes out.
Removing the Old Faucet
With the water off, you can now tackle the removal of the old fixture. This is where most of the work happens.
Disconnecting the Water Supply Lines
These lines connect your shut-off valves to the faucet itself.
- Place a Bucket: Position your bucket or container directly beneath the connections to catch any drips.
- Loosen Compression Nuts: Using an adjustable wrench, carefully loosen the compression nuts that connect the supply lines to the faucet shanks. Turn counter-clockwise.
- Disconnect Lines: Once loose, gently pull the supply lines away from the faucet. There might be a small amount of water remaining, so be prepared with rags.
Detaching the Faucet from the Sink
This is typically the trickiest part, especially if you have a deep sink or limited space.
- Access Under the Sink: Get down on your back and look up into the cabinet space below the sink. You’ll see the faucet shanks extending down from the sink basin.
- Identify Mounting Nuts: The faucet is held in place by large nuts or mounting brackets. These can be made of metal or plastic.
- Use the Basin Wrench: This is where your basin wrench truly shines. Position the jaws of the basin wrench around the mounting nut.
- Loosen the Nuts: Turn the basin wrench counter-clockwise to loosen and remove the nuts. This might take some effort due to the tight space and potential corrosion.
- Remove Retaining Clips (If Applicable): Some faucets use metal clips or plastic brackets instead of nuts. If you see these, gently pry them off or loosen them with a screwdriver.
- Lift Out the Old Faucet: Once all connections and mounting hardware are removed, you should be able to lift the old faucet straight up and out of the sink holes from above. If it’s stuck, gently rock it or use a putty knife to carefully break any old sealant.
Installing the New Faucet
Now for the exciting part – installing your shiny new faucet! Follow these steps carefully for a perfect fit.
Preparing the Sink Surface
A clean surface ensures a good seal.
- Clean the Area: Remove any old plumber’s putty, sealant, or mineral deposits from the sink holes and the surrounding area. A putty knife and some degreaser can help with this.
- Apply Sealant: Most new faucets come with a rubber gasket or require plumber’s putty or silicone sealant. If using putty, roll it into a rope and place it around the base of the new faucet. If using a gasket, ensure it’s properly seated.
Mounting the New Faucet
Positioning the faucet correctly is key to its function.
- Feed the Faucet: Carefully feed the new faucet’s shanks and hoses through the mounting holes in the sink. Make sure the faucet is facing the correct direction.
- Secure from Below: From under the sink, thread the mounting nuts or brackets onto the faucet shanks. Hand-tighten them first.
- Align the Faucet: Go back above the sink and ensure the faucet is straight and centered.
- Tighten Mounting Hardware: Use your adjustable wrench or the tool provided with your faucet to tighten the mounting nuts securely. Be careful not to overtighten, as this can damage the sink or faucet. Ensure the faucet doesn’t wiggle.
Connecting the Water Supply Lines
This is where you’ll connect your new faucet to the water supply.
- Attach New Supply Lines: If your new faucet didn’t come with integrated supply lines, connect your new ones to the faucet shanks now. Hand-tighten them first, then use a wrench to give them a quarter-turn more.
- Connect to Shut-Off Valves: Connect the other end of the supply lines to the corresponding hot and cold shut-off valves. Use thread seal tape on the valve threads for a better seal. Hand-tighten the nuts, then use an adjustable wrench to tighten them snugly. Again, avoid overtightening.
- Check for Leaks: Once everything is connected, briefly turn on the shut-off valves under the sink, but only a little at a time. Check all connections for drips. If you see any, tighten the nuts slightly.
Testing and Final Touches
The moment of truth! Let’s see if everything works.
Turning On the Water and Checking for Leaks
- Turn on Shut-Off Valves: Slowly open both the hot and cold shut-off valves fully by turning them counter-clockwise.
- Inspect All Connections: Carefully check all the connections you made: where the supply lines meet the shut-off valves and where they meet the faucet. Look for any signs of dripping or moisture.
- Run the Faucet: Turn on the new faucet. Let the water run for a minute or two to flush out any air or debris from the lines.
- Test Hot and Cold: Operate the handle through its full range of motion, checking both hot and cold water flow.
- Check Sprayer (If Applicable): If your faucet has a sprayer, test its functionality and connections.
Dealing with Leaks and Troubleshooting
Even with careful work, a small leak can sometimes occur. This is a common part of single handle faucet repair.
- Slightly Tighten Connections: If you notice a drip, try tightening the compression nut slightly at the source of the leak. Often, just a quarter-turn is enough.
- Check Thread Seal Tape: Ensure you used enough thread seal tape on threaded connections. Sometimes, removing the fitting, reapplying tape, and re-tightening is necessary.
- Inspect Gaskets/Seals: Make sure any rubber gaskets or O-rings are properly seated and not damaged.
- Loose Mounting Nuts: If the faucet wobbles, the mounting nuts under the sink might need further tightening.
Final Cleaning and Inspection
Wipe down the new faucet and the surrounding area. Ensure no tools or debris are left behind in the cabinet. You’ve successfully completed your easy faucet replacement!
Advanced Tips for Faucet Replacement
For those looking to go the extra mile or tackle more complex issues, here are some advanced tips.
Replacing the Single Handle Faucet Cartridge
If your old faucet was leaking, the culprit is often the single handle faucet cartridge. Replacing this is a common single handle faucet repair.
- Identify Cartridge Type: Faucet cartridges vary by manufacturer. You might need to identify your faucet brand to find the correct replacement part. Taking a picture of your faucet or the cartridge itself can be helpful when shopping for parts.
- Remove Handle: Usually, there’s a small set screw on the back or side of the handle, often hidden by a decorative cap. Pry off the cap and loosen the screw with an Allen wrench. Then, pull the handle off.
- Remove Decorative Cap/Escutcheon: You might need to unscrew a decorative cap or escutcheon plate to expose the cartridge.
- Remove Cartridge Retaining Nut/Clip: There will be a retaining nut or clip holding the cartridge in place. Use pliers or a wrench to remove it.
- Extract Old Cartridge: Carefully pull the old cartridge straight up and out. You might need to wiggle it or use a cartridge puller tool if it’s stuck.
- Insert New Cartridge: Place the new cartridge into the faucet body, ensuring it’s oriented correctly.
- Reassemble: Reinstall the retaining nut/clip, decorative cap, and handle.
When to Replace the Entire Faucet vs. Repairing
Sometimes, the cost and effort of replacing individual kitchen faucet parts like a cartridge or valve might outweigh the benefit, especially if the faucet is old or corroded.
- Signs You Need a New Faucet:
- Persistent leaks that can’t be fixed by replacing the cartridge.
- Corrosion or mineral buildup that affects appearance or function.
- Damaged or worn-out internal components that are hard to find or replace.
- Outdated design or functionality that you want to upgrade.
- Multiple issues occurring simultaneously.
Fixing a Leaky Faucet Without Full Replacement
If you have a leak and don’t want to replace the entire faucet, focusing on the replace kitchen faucet valve or cartridge is the way to go.
- For Compression Faucets (Less Common for Single Handle): These often leak from worn rubber washers or O-rings. Disassembling the handle, stem, and replacing these small parts can fix the leak.
- For Cartridge Faucets (Most Single Handle Faucets): The cartridge itself is the most likely source of leaks. The steps outlined above for replacing the cartridge are the primary method for fixing leaks in these types.
Frequently Asked Questions (FAQ)
Q1: How long does it take to replace a kitchen faucet?
A: For most DIYers, it takes about 1-3 hours. If you’re quick and have all your tools ready, you might even do it in under an hour.
Q2: Do I need to turn off the main water supply to my house?
A: No, you only need to turn off the individual shut-off valves located under the sink for your hot and cold water supply lines.
Q3: What is the most common reason for a faucet to leak?
A: For single-handle faucets, the most common cause of leaks is a worn-out or damaged O-ring or cartridge inside the faucet body.
Q4: Can I reuse my old supply lines?
A: It’s generally recommended to replace your supply lines when you replace your faucet. Old lines can become brittle and prone to leaks. Plus, new faucets often come with matching supply lines.
Q5: How do I know if I have a good quality faucet?
A: Look for faucets made from solid brass or stainless steel. Check reviews from other consumers. Reputable brands often offer better warranties and customer support.
Q6: What if the new faucet doesn’t fit my sink holes?
A: Most standard kitchen faucets are designed to fit sinks with 1, 2, 3, or 4 holes. If your sink has a different configuration or you’re unsure, look for faucets that come with an optional deck plate to cover extra holes.
Q7: Do I need plumber’s putty or silicone sealant?
A: This depends on the faucet you purchase. Many new faucets come with a rubber gasket that creates the seal. Check the manufacturer’s instructions. If a gasket isn’t provided, you’ll typically use plumber’s putty or silicone sealant around the base to prevent water from seeping under the faucet and into the countertop.
Q8: How tight should I make the connections?
A: Tighten connections snugly, but do not overtighten. Overtightening can strip threads or crack fittings, leading to leaks. Hand-tighten first, then use a wrench for a final quarter to half turn.
You’ve now got a comprehensive guide to successfully replace your single handle kitchen faucet. Enjoy your newly upgraded kitchen!